Topic outline
-
-
Before we begin it should be noted that in the world of audio, everything works to an average. The correct distance away and angle from a microphone, the correct level setting, and correct speaking volume, all have a degree of flexibility. In the lesson below, there will be numbers, that we suggest are correct, but these are a good general use guide. It is up to you to determine exactly how far you can change these parameters before degradation occurs.
When setting up for a recording we first need to start with microphone position. A good rule of thumb is to place the mic around 15-20cm away from your mouth. If it is too close, your voice will become boomy and noisy, and too far away means the microphone will start to pick up room noise. If you keep a good distance, then your recording will be clear.
Test the quality. If you hear a lot of pops and clicks as you speak, then move the mic slightly to the side. These noises are called plosives and are a result of the air leaving your mouth and hitting the mic. Check your breathing volume- too loud and it can become an unnecessary noise, so make sure to not breathe directly into the mic.
Try not to move around too much. Computer chairs that rotate from side to side can create extra noise. Try to be conscious of your movement, as any change to your position will change the audio quality. The same applies to rocking back and forth or slouching in your chair. Maintaining good posture will also increase your vocal performance. You can test this by speaking at the same volume and moving side to side. This will show you how sensitive your mic is and how much room you have to move.
Position the mic so that it doesn’t block your screen. If you’re using a laptop, then you may want to place is on a raised surface. If the microphone blocks the screen, you will be tempted to move it during your recording, which can cause uneven levels of volume, and disrupt your pacing as you attempt to read around the microphone.
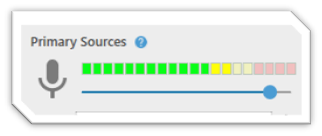
When setting the levels on your recorder, you want to be aiming to record at -12 db. Sometimes the software will give you a metre but won’t give you a number, so roughly 2/3rds of the metre is a good level (usually when the metre changes colour to yellow).
As always, run a test recording and check. It’s also a good idea to share your recording with someone else, so they can test the quality and your voice will sound different when recorded and a different set of ears may pick up things you can’t hear.
Common Issues
The most common causes for poor audio quality are:
- Panopto Volume Too Low
- Adjust audio slider in Panopto Recorder to increase the volume
- Always do a quick test recording before starting a recording session
- Background Noise/Hiss, caused by
- Poor-quality mics - see our recommended microphones
- Poor mic positioning
- Desk fans, fridges, air conditioners
- Open windows
- Noisy spaces (open offices etc.)
- Poor-quality mics - see our recommended microphones
... or a combination of these!
Where to go for help
Initially you should send your test recordings to your Course Coordinator to confirm the quality. You can also send a copy to the TIU media team to quickly check as well. This should be done at the beginning of the first few recording sessions so any issues can be resolved early in the piece. Once you get a hang of it, you’ll be able to judge it yourself.
If you have any audio issue or questions please don’t hesitate to contact the TIU Media Team audio expert, Chris Jackson.
- Panopto Volume Too Low
-
Reflection

Watch the following video, of examples of audio quality with a range of scenarios (poor quality mic, distance, background noise etc.) To really hear the full experience, we recommend watching the video with headphones (as most students are likely to be listening to the media in your course this way).
Now have a listen to one of your recent video or audio recordings used in your course and see what you can hear. If you haven't yet created any media, use Panopto to make a short recording (1-2 mins) in the space that you are planning to use for this sort of activity.
What can you hear in your recording that might detract from the teaching?
For example:
- Do you need to invest in a higher quality microphone?
- Is your microphone situated too far or too close to your mouth? Remember the ideal position is 15-20cm away, and to the side so as to avoid plosives.
- Can you hear noise in the background? If you are recording at home, find a quiet space without any electrical equipment nearby that might create a hum (e.g. the fridge), or a ticking clock. Try to keep your pets out of the room as well.
- Would the recording meet the UniSA Standards of Media Literacy for Education?
If you haven't already, have a look at how to Set up Your Recording Space. If you need a quiet space to record, you can access the university's recording facilities available on each campus.
-