Student Placement System Light
| Site: | learnonline |
| Course: | Student Placement System Help |
| Book: | Student Placement System Light |
| Printed by: | Guest user |
| Date: | Wednesday, 1 April 2026, 1:32 PM |
Description
SPS light
Student Placement System Light
The Student Placement System (SPS) assists students, academic and professional staff with the administration of any work experience, work placement, practicum, clinical or field placement that requires students to undertake activities in a work setting.
The SPS Light module is a wizard-driven compact version of the existing system, designed for users who don’t require the capability of the full SPS system. SPS Light provides the core administrative functionality required to record student placements in Medici.
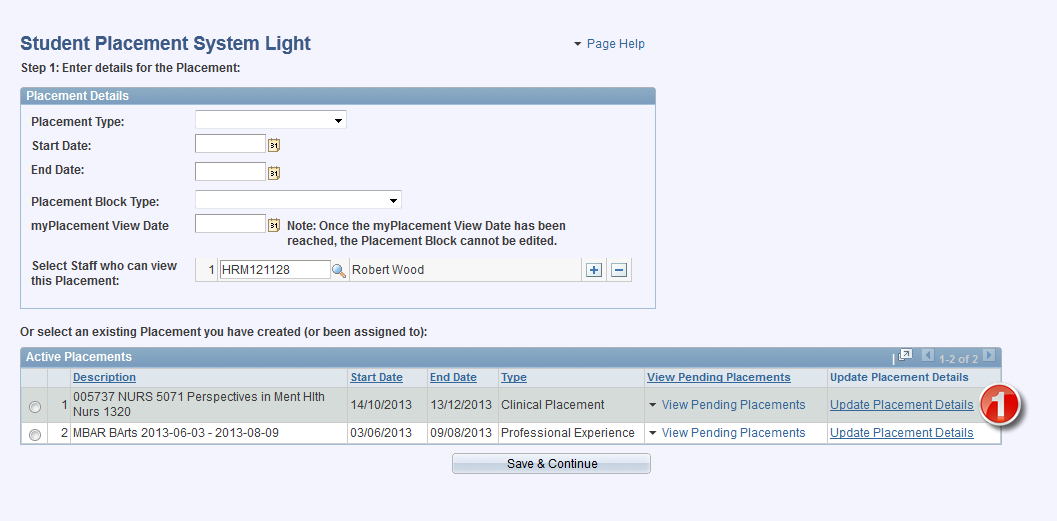
Step 1: Enter Placement Metadata
Begin creating the placement by inputting some basic details. These details then form the basis of the 'Placement Block' in the full system.

1. Define the Placement Type:
-
-
- Course Based: Involves classes and/or individually selected students. Is associated with a particular Study Period.
- Program Based: Placement is associated with a particular program. Students are individually selected by the user.
- Stand-Alone: Not linked to either a course or program. Intended for use with simple placements with small student numbers.
-
2. Define the Start Date of the placement.
3. Define the End Date of the placement. Note: both the Start and End Dates can be tailored for individual students in a later screen.
4. Select the Placement Block Type that most closely matches your placement
5. Input the myPlacement View Date: the date input here deteremins when students can view the details of the placement in the myPlacement application, accessed through the student portal.
Note: Once the myPlacement View Date has been reached, the Placement block will cease to be user-editable. Where past placements are being created it is therefore essential that the information input into
this screen is accurate.
6. Select Staff who can view this Placement: any staff members that are added to the list will be able to see this Placement when they enter SPS Light. Staff will be able to process students simultaneously, but
you will only be able to view your own students.
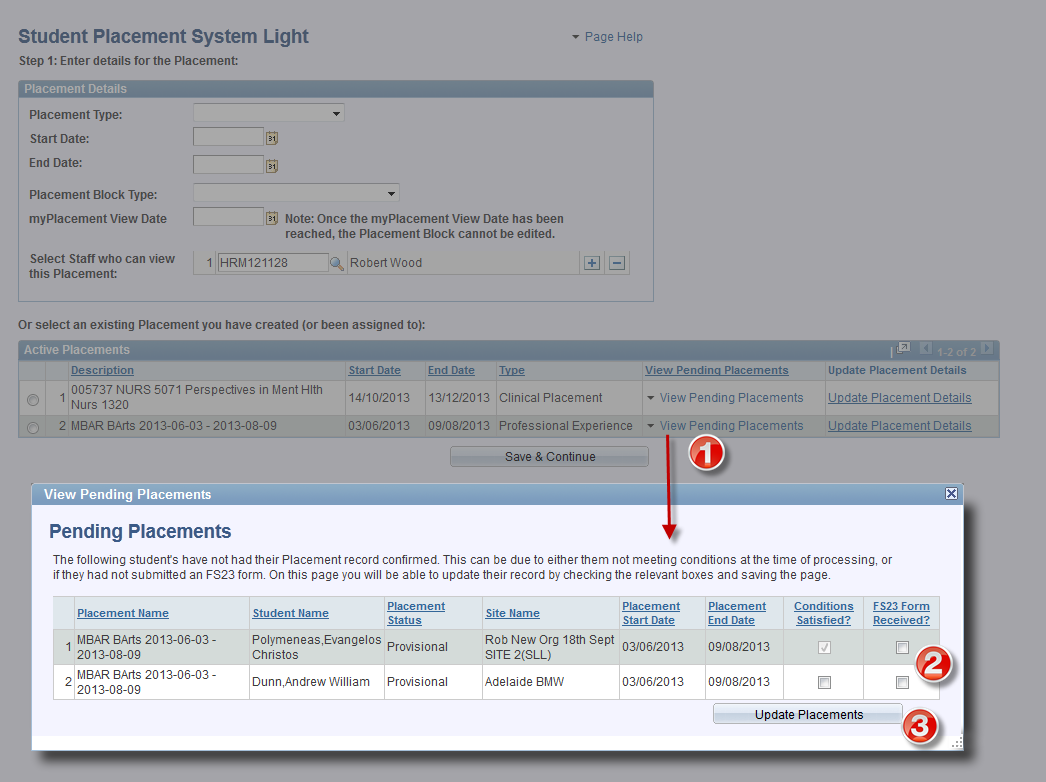
A) Any existing placements can be viewed/edited by selecting the radio button relating to the placement followed by the Save & Continue button.
B) Selecting the View Pending Placements link allows users to view any students who are essentially in a provisional state, i.e. staff may be waiting for the FS23 form or for other conditions to be satisfied before confirming that students can undertake the placement.
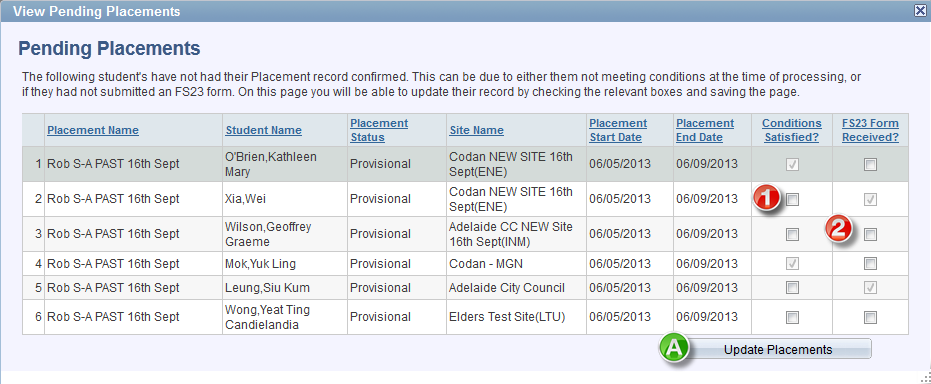
1. Users can define if all placement conditions are now satisfied.
2. Users can define if the FS23 Insurance form has been received.
A) Once users make a change to any of the checkboxes, selecting the Update Placements button will update the placement record with the new information.
Step 2: Select who is going on placement
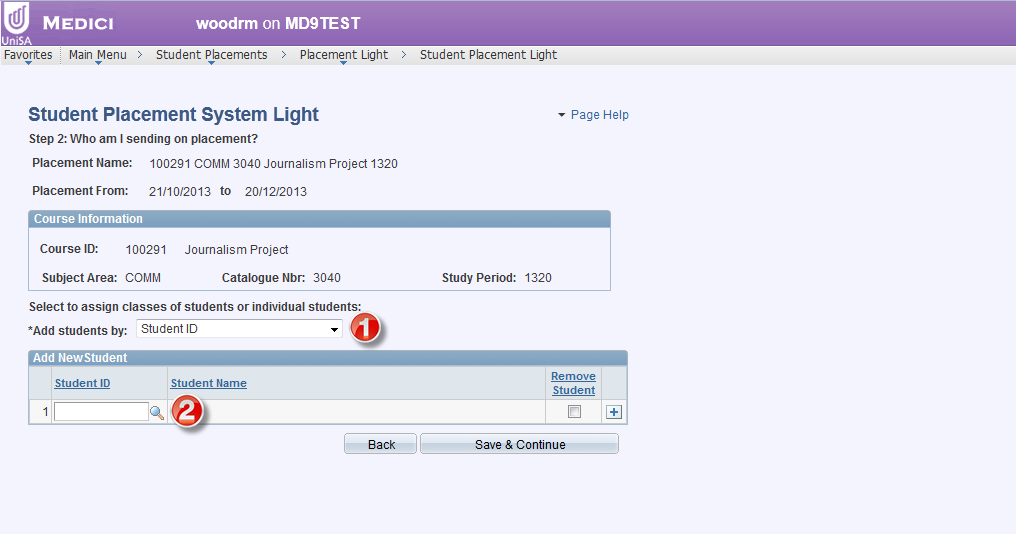
1. Add students by: this drop-down box allows users to define whether to add students by class or individually by student Id (or both if required)
Note: You can only add students by class if the placement block is associated is a course-type placement.
2. Students can be individually located via the lookup icon.

1. Where "Class" has been selected via the Add students by drop-down box, a list of all classes containing student enrolments for the chosen study period will be displayed.
Choosing the Select Students hyperlink will display a list of all the students in the chosen class:
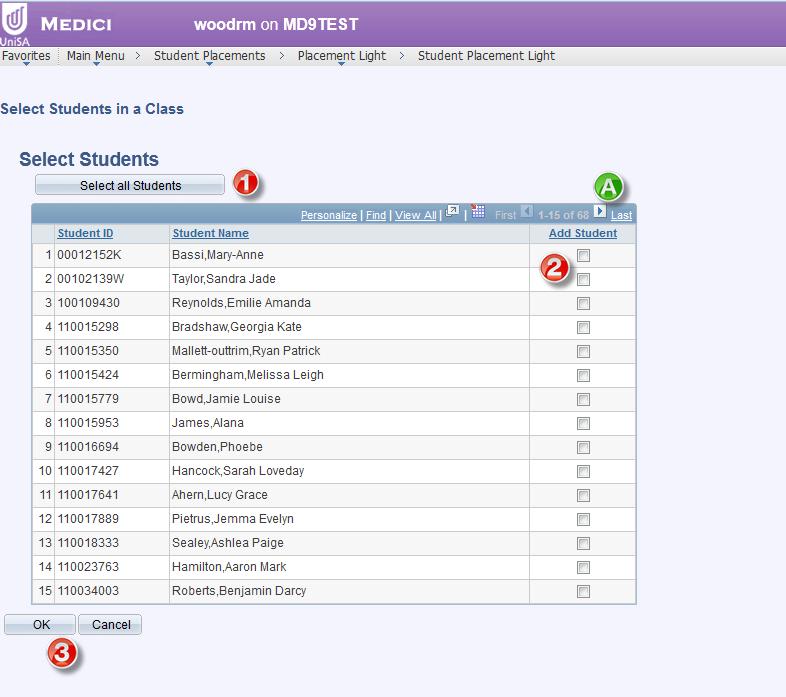
1. Use the Select all Students button to select all students in the class (including those students not shown until you select the View All link at the top of the table).
2. Individually select students via the checkboxes.
3. Select the OK button to save any selections you've made and be returned to the previous screen.
A) Note the arrow buttons that allow you to display the other students in the class.
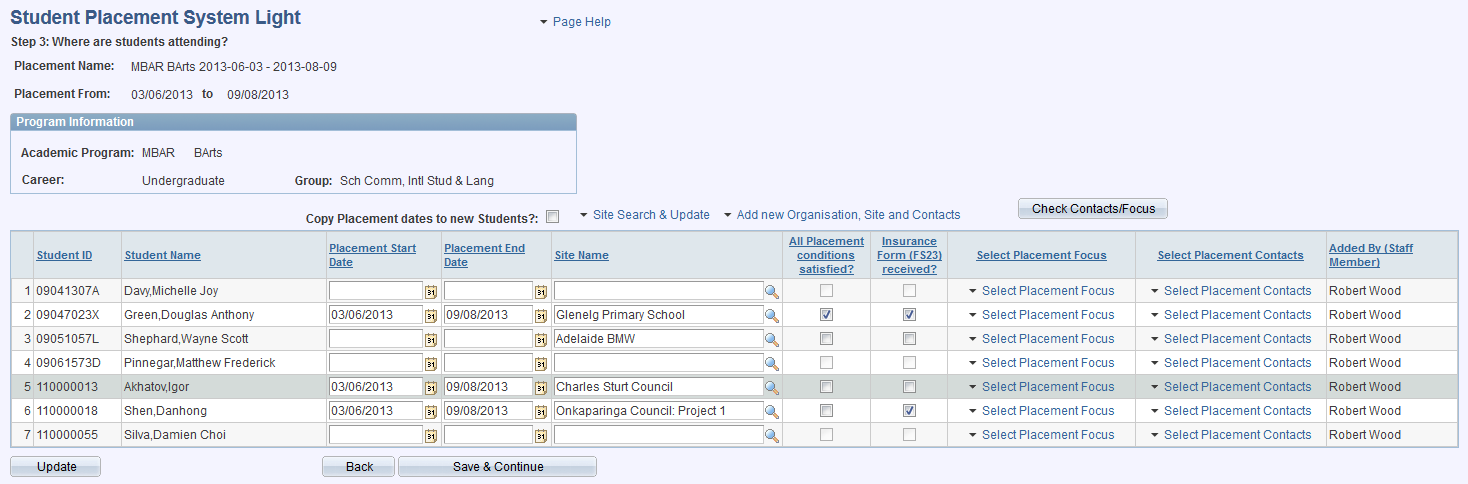
Step 3: Define where students are going
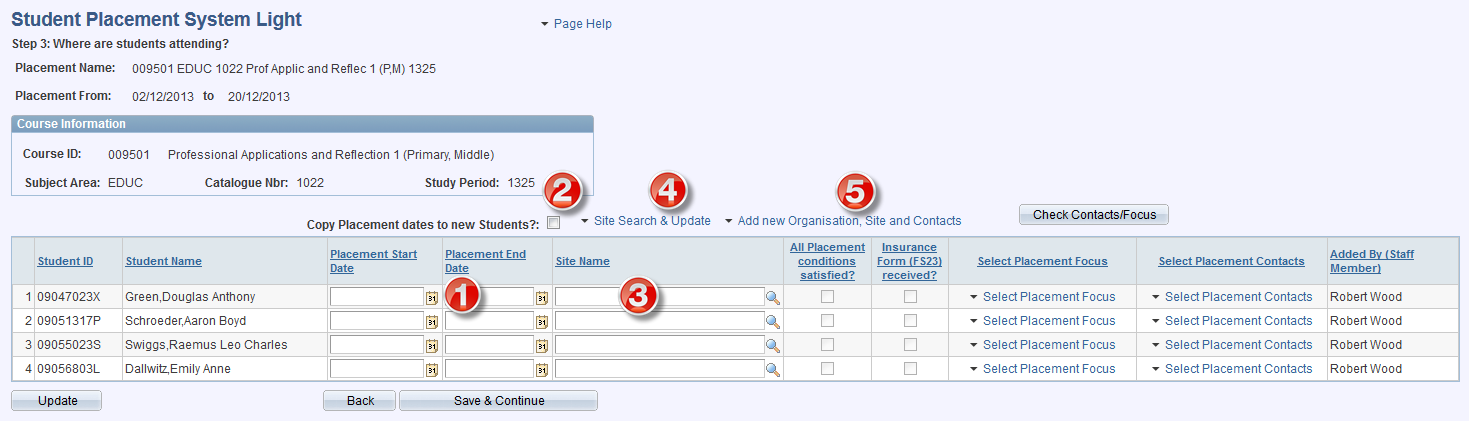
1. Input the placement start and end dates.
2. Copy Placement dates to new students: this copies the placement start and end dates originally set up for the placement to each newly added student.
3. Site Name: select the Site the student is attending.
4. Sites Search & Update: selecting this option displays a search box below the table to enable users to search for existing Sites and update Site Contacts and Focus values
5. Add new Organisation, Sites and Contacts: provides the functionality for users to add new Organisations and Sites, and then add new contacts to associate with the new site.
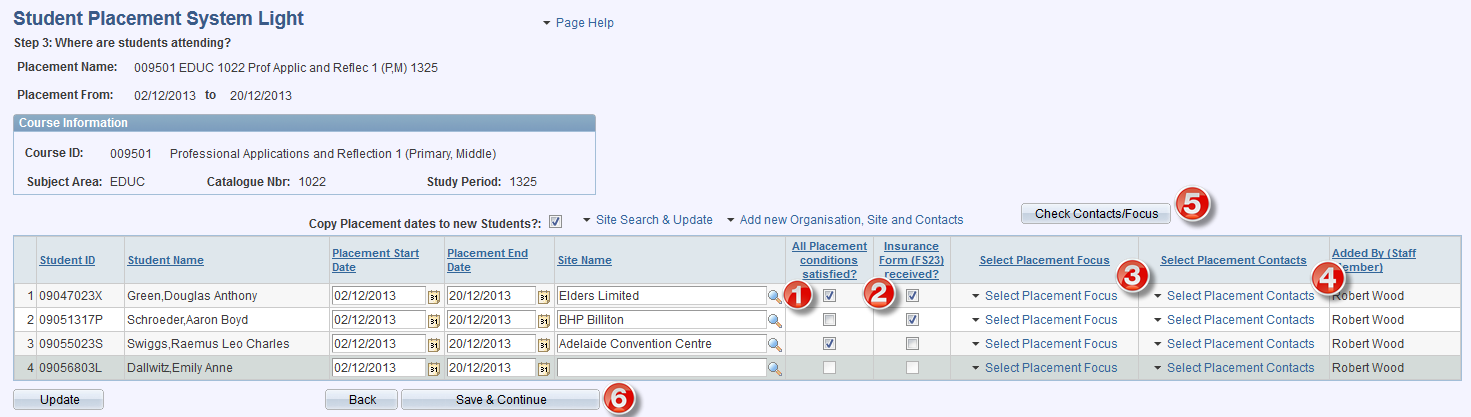
1. All Placement conditions satisfied?: select whether the student has met any conditions.
2. Insurance Form (FS23) received?: indicate whether the FS23 form has been completed by all relevant parties.
3. Select Placement Focus: define the placement foci from the list of focus values associated with the Site.
4. Select Placement Contacts: Select the Site Contact for the placement.
5. Check Contacts/Focus: Selecting this button at any time will highlight in green text where values have been saved for Select Placement Focus and Select Placement Contacts.
6. Save & Continue: once all data has been input select this button to progress to the next page where you select to finalize the placements.
Update site contacts and focus values
In Step 3 select Site Search & Update hyperlink:

1. Search By: Define whether you wish to search for an Organisation or Site details
2. Search using the following variables:
-
-
- Description
- Phone Number
- Fax Number
- School
- Division
-
3. Once the desired Site/Organisation has been located, select the associated radio button to perform further actions.
4. Select whether to add new Contacts or Focus values to an existing Site.
5. Selecting the Update Site Details link opens a new window and navigates the user directly to the Site settings.
Note: a new effective-dated row should be added to the Site if changes are required.
Note: care should be taken when updating Sites that have other Schools as the 'UniSA Custodian'
Add New Contact
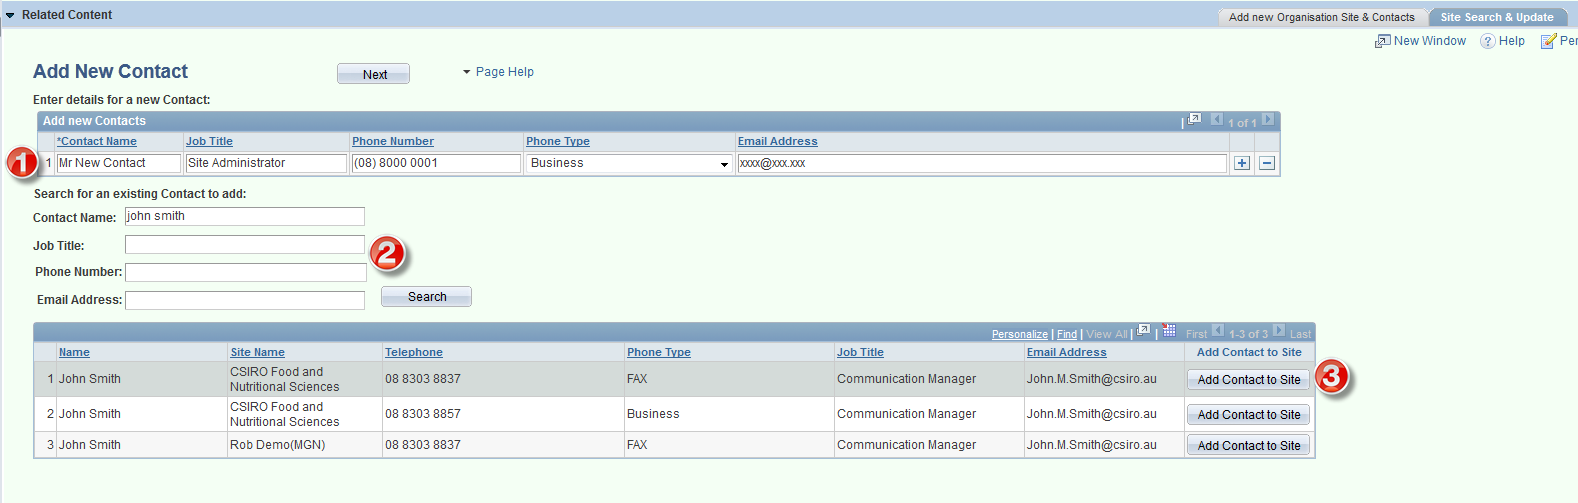
1. New Contact details are added here. Select the + or - buttons to add new rows or remove existing rows.
2. Existing Contacts can be located by searching on the following fields
-
-
- Contact Name
- Job Title
- Phone Number
- Email Address
-
3. After searching for existing Contacts they can be added to the Site by selecting Add Contact to Site button.
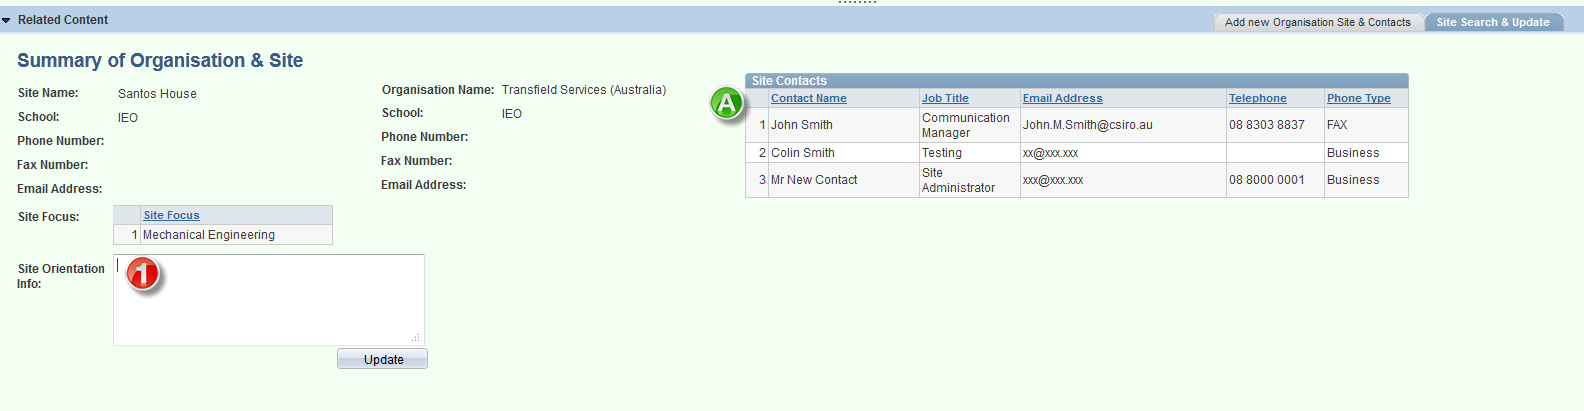
A) A summary of the Site Contacts is presented in the next screen. At this stage the updated Contacts are now available to add through the Select Placement Contacts hyperlink within the list of students.
1) Site Orientation Info: in this field users can add any text they need students to view about the confirmed placement in myPlacement (e.g. "On your first day report to....")
Add New Focus
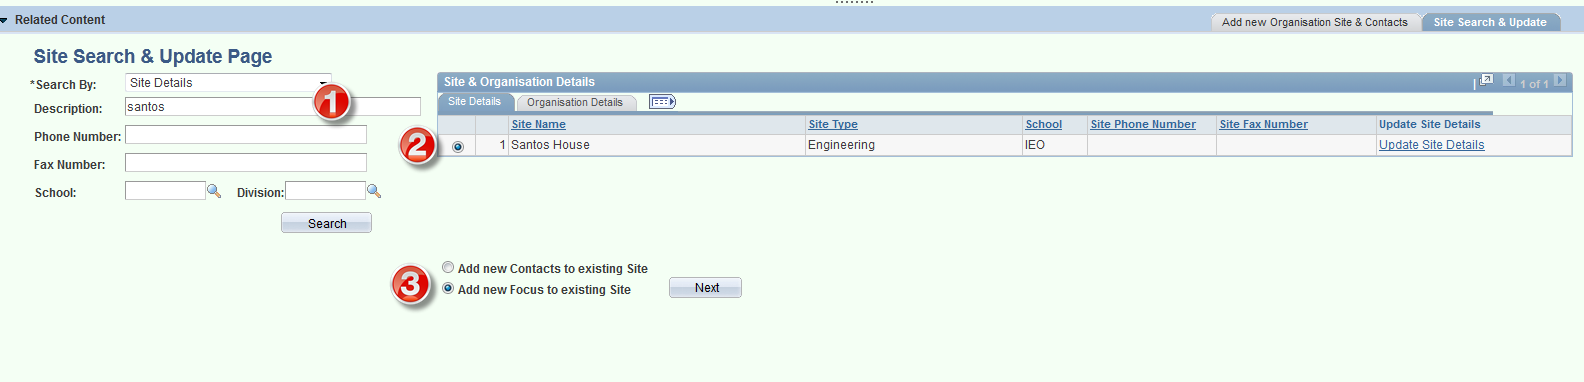
1. Use the search fields to search for the required Site/Organisation.
2. Once a Site is located, select via the radio button which Site to update.
3. Select Add new Focus to existing Site radio button, followed by Next.
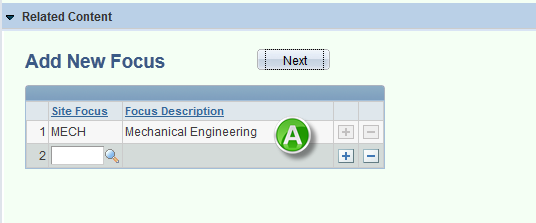
A) The existing Site Focus values are displayed, plus a lookup for a new Focus value. Additional Foci can be added by the + button.
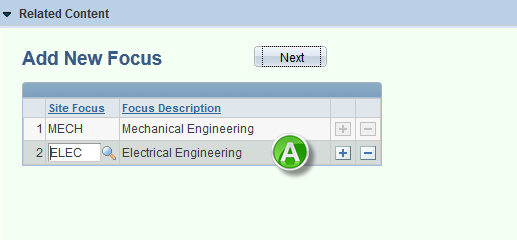
A) A new Focus value is selected from the lookup.
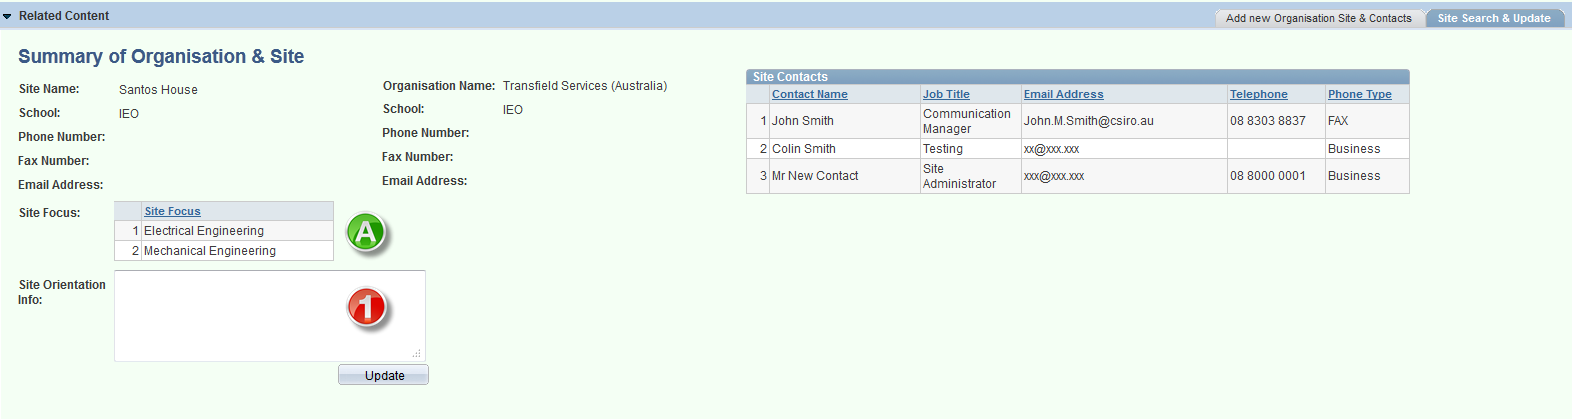
A) The Focus values for the Site are displayed in the summary. At this stage the updated Focus values are now available to add through the Select Placement Focus hyperlink within the list of students.
1. Site Orientation Info: in this field users can add any text they need students to view about the confirmed placement in myPlacement (e.g. "On your first day report to....").
Update placement metadata
Certain basic data about the placement can be amended by using the Update Placement Details option described below.
1. Once a placement is created, on the SPS Light home screen the Update Placement Details link becomes available. Selecting this link will navigate users to the Placement Block screen within the existing
SPS system:

1. Placement Block Name. Note: for naming consistency is recommended that placement block names are not changed.
2. Start and End Date.
3. Placement Block Summary.
4. Placement Block Type
5. myPlacement View Date.
6. Associated Study Period.
7. Save button: one the required updates are made, select this button to save changes.
Amend student placements/add new students to placement
1. View Pending Placements: where a placement has already been created, any students who are not yet confirmed in their placement can be viewed and rapidly confirmed in the placement by
selecting this link.
2. Users can select the relevant checkbox(es) to define any updates to students.
3. Update Placements: selecting this button will update the individual student placement records. If both the "Conditions Satisfied" and "FS23 Form Received?" checkboxes are selected for
update, the student placement will be confirmed.
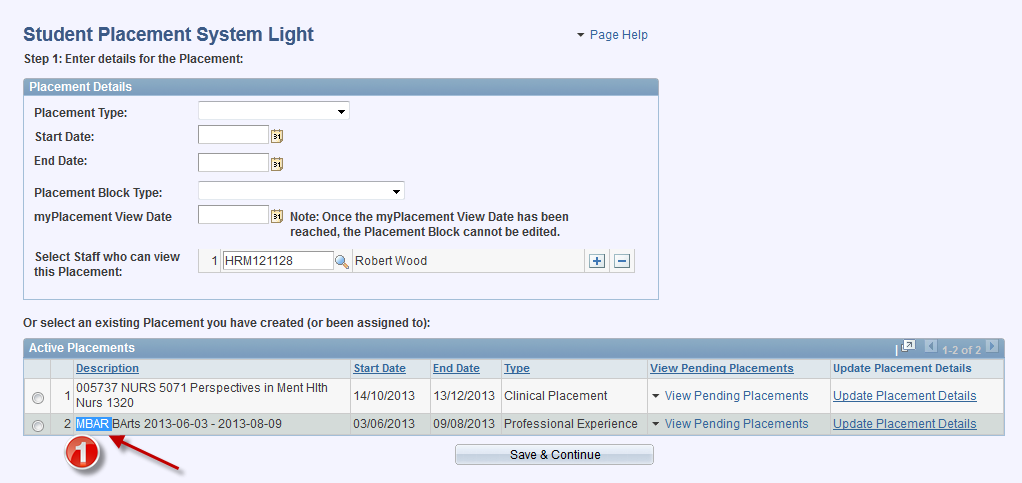
Amend Existing Placements

1. Select the radio button relevant to the placement you wish to edit.
2. Select the Save & Continue button to proceed with editing in the next step:
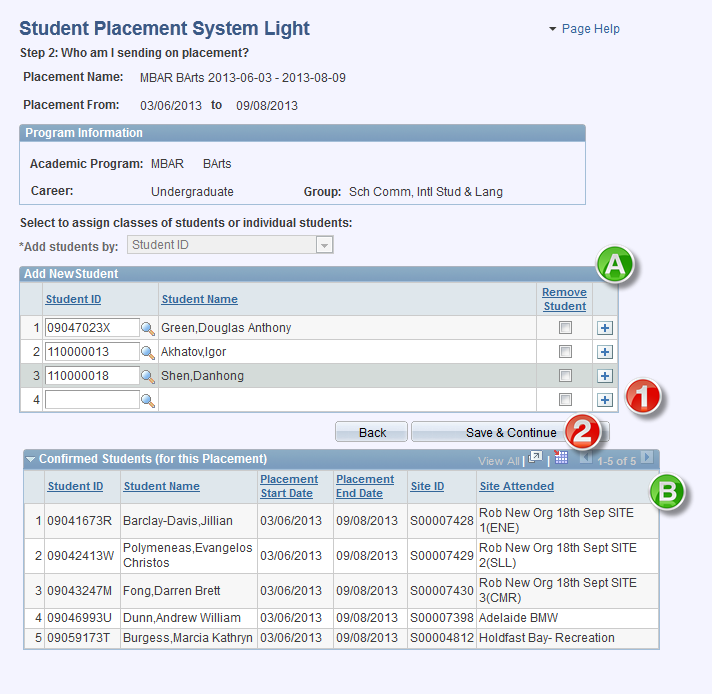
A) Any students within the placement who don't have a confirmed placement are displayed towards the top of the page.
B) Students who already have confirmed placements are displayed in a read-only table towards the bottom of the page.
1. New students can be added to or removed from the placement using the + and - buttons.
2. Save & Continue: select this button once any students have been added/removed to proceed to the next screen:
Once on the above screen, proceed with entering placement data as normal.
SPS Light placement management records (PMR'S)
SPS Light provides an easy interface to create student placements. In the background it is also utilising the existing SPS system and therefore creates records that can be viewed in the existing system if required.
1. Copy the start of the placement name in the Light home screen. Then navigate to:
Main Menu > Student Placements > Placement Administration > Placement Management Records
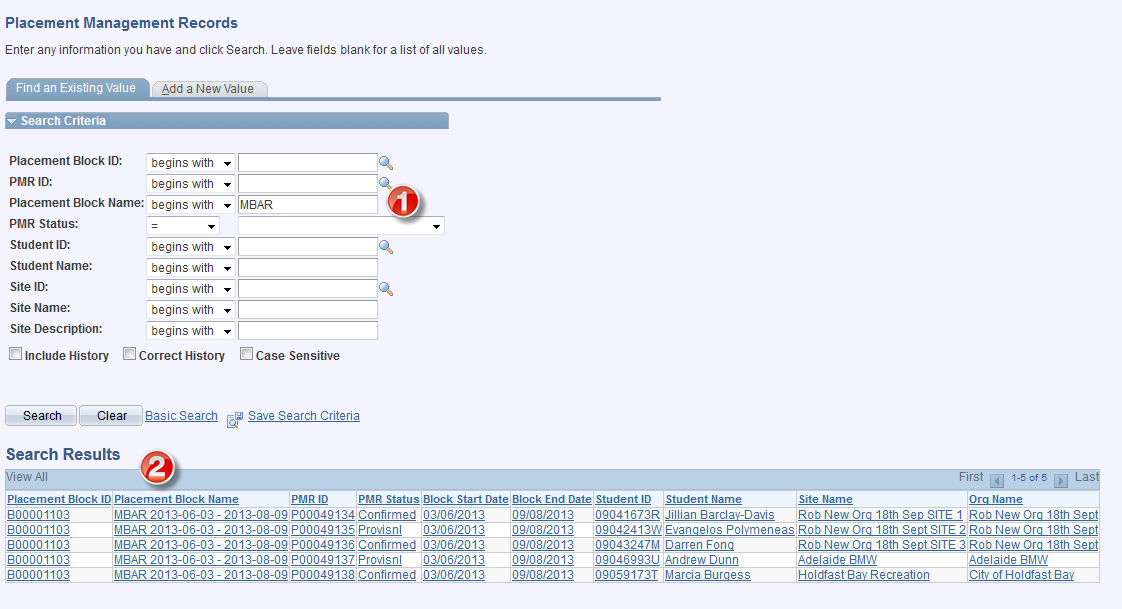
1. Paste the name into the "Placement Block Name" field and select the Search button.
2. Any PMR's that have been created for placement are displayed in the search results. The individual PMR's can be selected to view information about the placement:
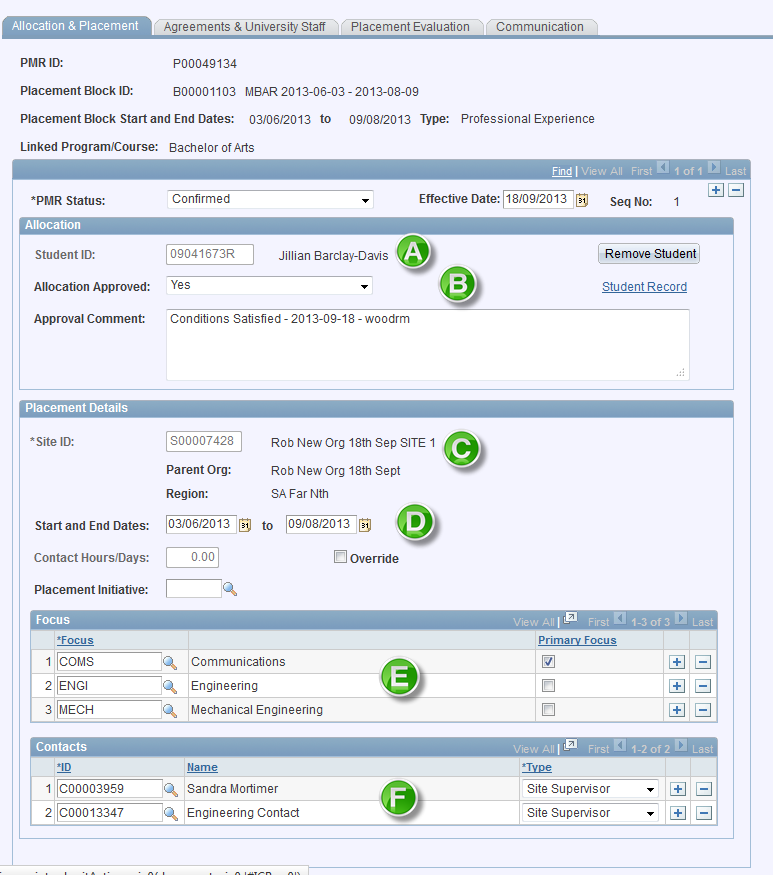
The following data is displayed in the PMR:
A) Student undertaking the placement
B) Allocation Approval Status
C) Site of placement details
D) Placement Start and End dates
E) Placement Focus
F) Placement Contacts