PP Sites
| Site: | learnonline |
| Course: | Student Placement System Help |
| Book: | PP Sites |
| Printed by: | Guest user |
| Date: | Friday, 3 April 2026, 12:52 PM |
Description
PP Organisations
Table of contents
- Create a New Site
- Update a Site's Conditions
- Update a Site's Details
- Update a Site's Focus
- Update a Site's Orientation Information
- Update a Site's Pay Claim Details
- Correct a Site's Conditions
- Correct a Site's Orientation Information
- Correct a Site's Details
- Correct a Site's Focus
- Correct a Site's Pay Claim Details
- View a Site's Details
Create a New Site
Process Overview
Placement Administrators and Placement Officers are able to create and update Site records, and Placement Administrators are able to correct Site records (when required).
Warning: Prior to creating a new Site record, you must first perform a thorough search of the existing Site records to ensure the required Site does not already exist in Medici. Only create a new Site record if you fail to find an existing record for the Site.
Sites represent a department or business unit of an Organisation, based at a specific Location of an Organisation. It is at Sites that Placements occur.
In addition to the Site’s basic details (eg. Organisation, Location, Phone Number, etc), the following details can also be recorded for the Site (if applicable):
- UniSA Custodian
- Conditions
- Pay Claim Details
- Site Orientation Information
UniSA Custodian
The UniSA Custodian is the ‘owner’ of the Site. If it is discovered that a Site’s details are incorrect or out of date, contact the UniSA Custodian (do not update a Site’s details prior to liaising with the Site’s UniSA Custodian).
Conditions
Sites may have Conditions that will apply to all students undertaking a Placement at the Site.
Conditions attached to a Site are in excess of the Conditions attached to a Program or Course, or Conditions attached to the Organisation; therefore the student must satisfy all conditions imposed at Program/Course level, Organisation and Site. Where a Condition is repeated across the spectrum (eg. the same Condition is recorded for the Site and also Program, Course and/or Organisation), the student must ensure they satisfy all aspects of currency requirements from all sources (if applicable). In this instance the student will be required to satisfy all instances of the Condition, and myPlacement will display the instance that imposes the greatest impact (Currency).
When a Site Condition is added, the Condition Type must be selected as follows:
- Compulsory: The Condition must be satisfied for the student to be eligible for Placement, and evidence to satisfy the Condition will be processed by UniSA Placement staff.
- Additional: The Condition is not considered ‘Compulsory’ by UniSA, and UniSA Placement staff will not be responsible for processing evidence to satisfy the Condition. The Site may consider the Condition to be mandatory and will be responsible for processing the student’s evidence; or it may be that students are encouraged to satisfy the Condition, however the University is unable to enforce the Condition.
Pay Claim Details
Site Contacts may be able to claim payment for supervising UniSA students on Placement. Where applicable, a Site’s Pay Claim Details can be recorded as ‘Default Rate for All’, indicating all Site Contacts will receive the same rate of payment, or different Pay Claim Details can be entered for different Contact Types.
Site Orientation Information
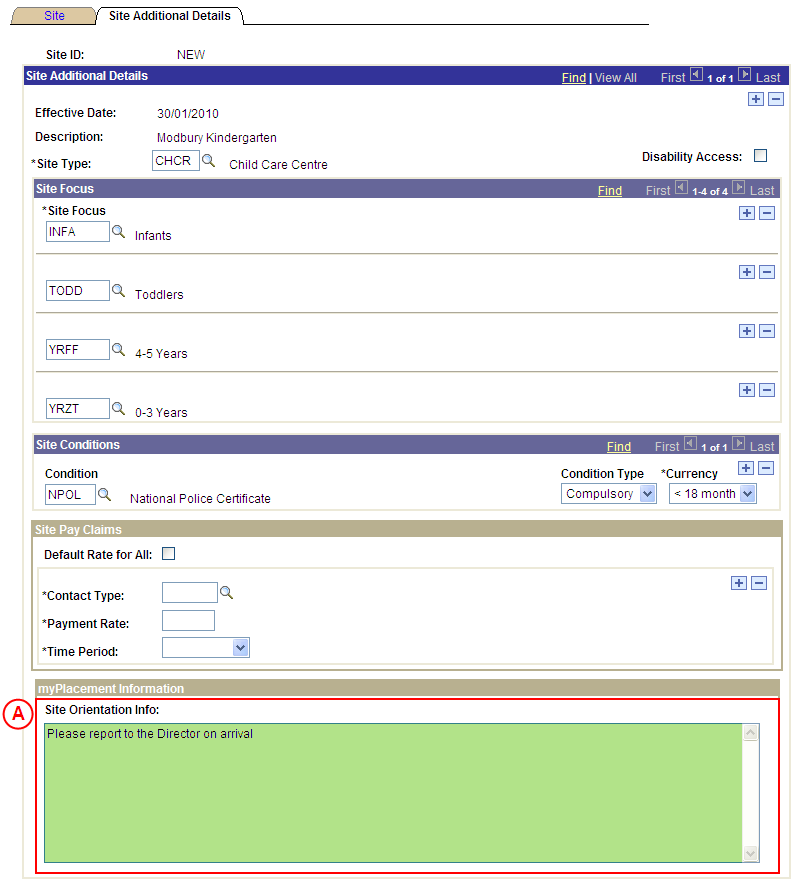
It is highly recommended that Site Orientation Information be entered for the Site. This information is displayed to students.
Step by Step Instructions
Note: The following instructions assume information has not previously been configured for the Site. If the Site has previously been configured, and the existing information needs to be updated or corrected, please refer to the process instructions on the ‘Updating a Site’ or ‘Correcting a Site’ process pages.
Step 1: Record the Site details in Medici
Step 2: Record the Site Type and Site Focus
Question 1: Does the Site have Conditions for placement?
Step 3: Record the Condition(s) for the Site
Question 2: Do Pay Claim details need to be recorded for the Site?
Question 3: Will all Contact Types receive the same rate of pay?
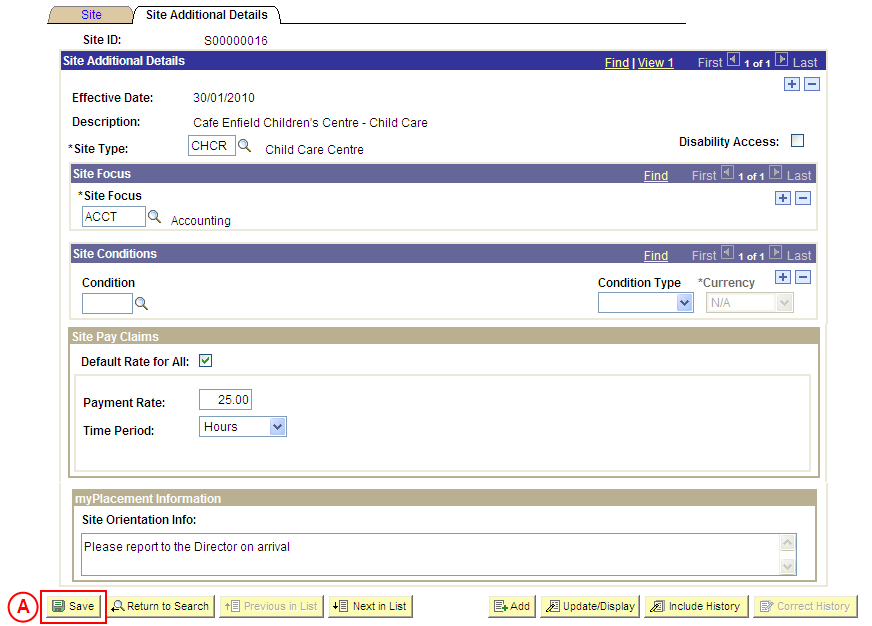
Step 4: Record the Pay Claim details as ‘Default Rate for All’
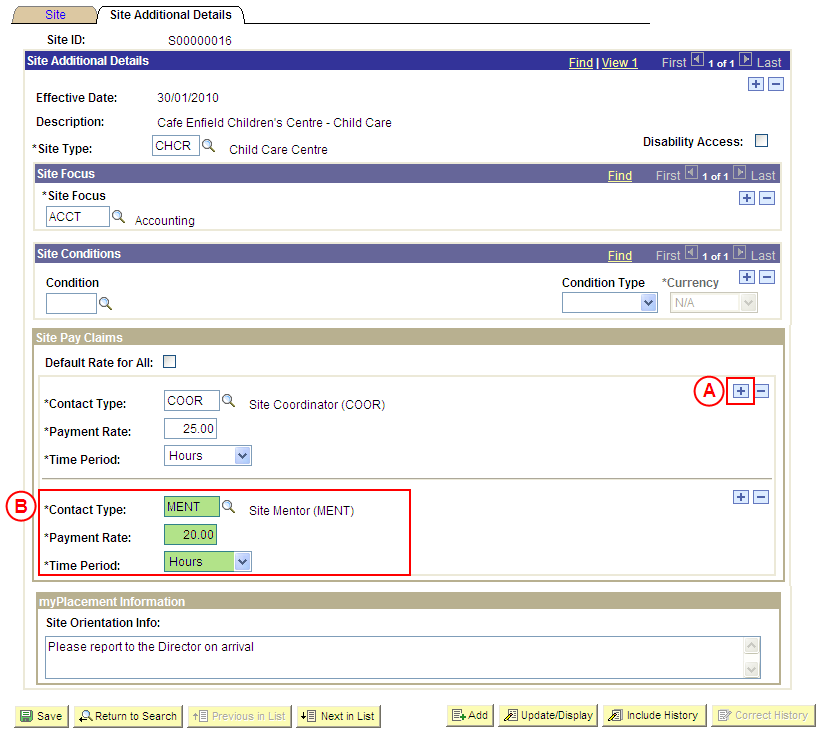
Step 5: Record the Pay Claim details for the required Contact Type(s)
Question 4: Does Site Orientation Information need to be entered for the Site?
Step 6: Record the Site Orientation Information
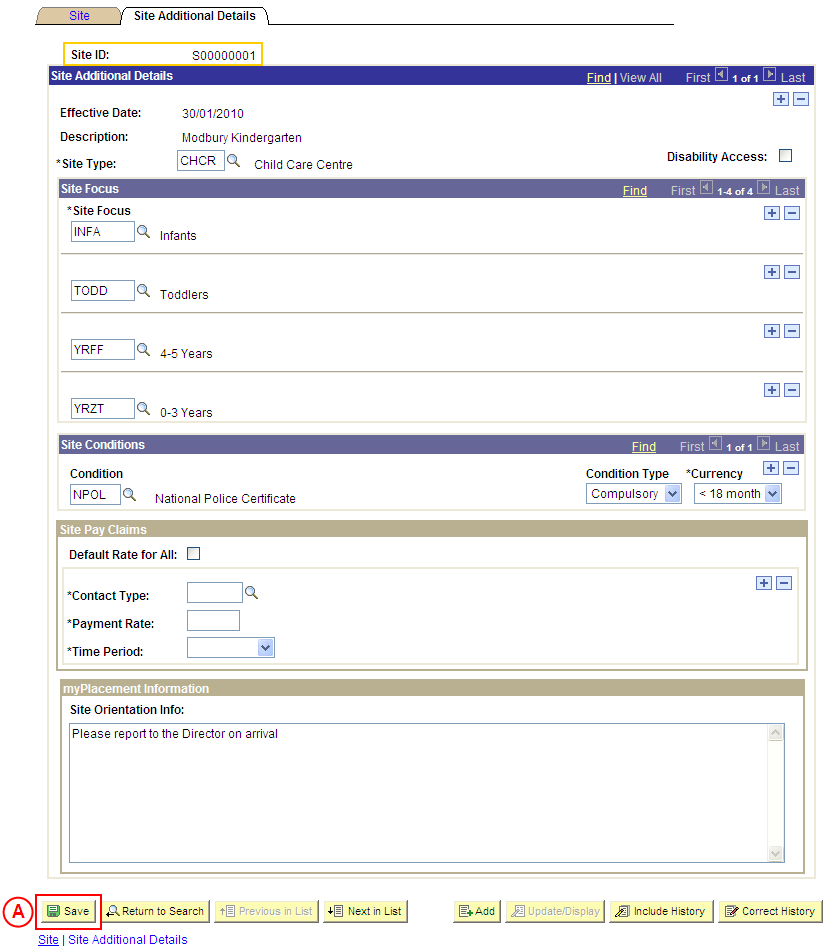
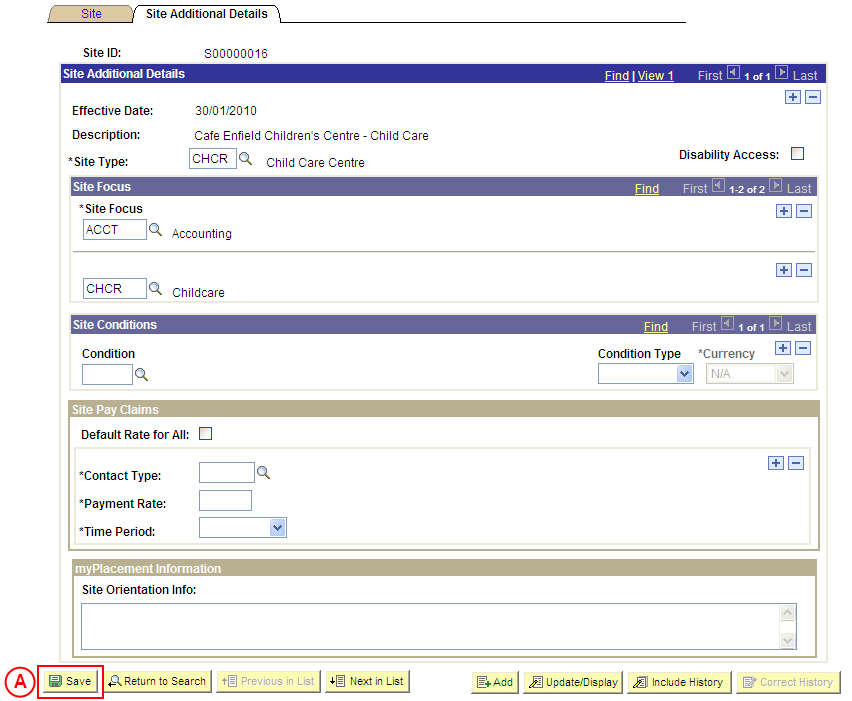
Step 7: Save the new Site record in Medici
|
Application: Medici Navigation: Student Placements®Placement Providers® Sites |
|
|
|
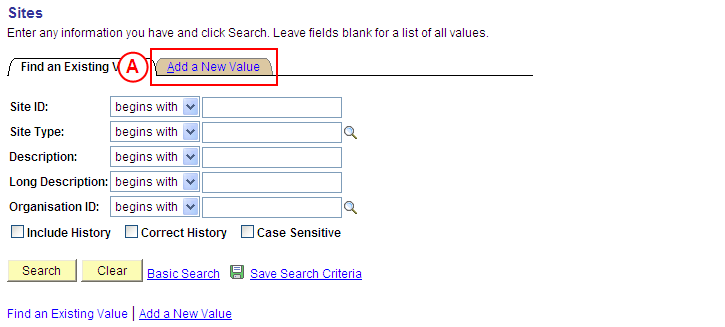
Warning: Prior to creating a new Site record, you must first perform a thorough search of the existing Site records to ensure the required Site does not already exist in Medici. Only create a new Site record if you fail to find an existing record for the Site.
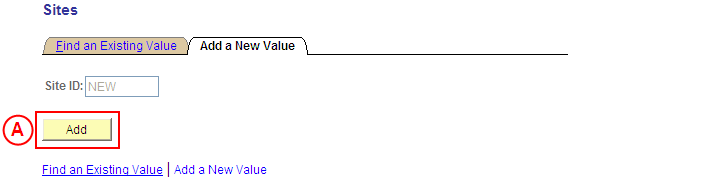
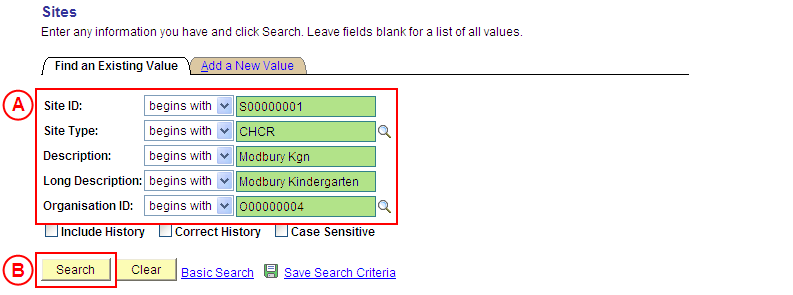
Result: The Sites: Add a New Value page is displayed. |
|
|
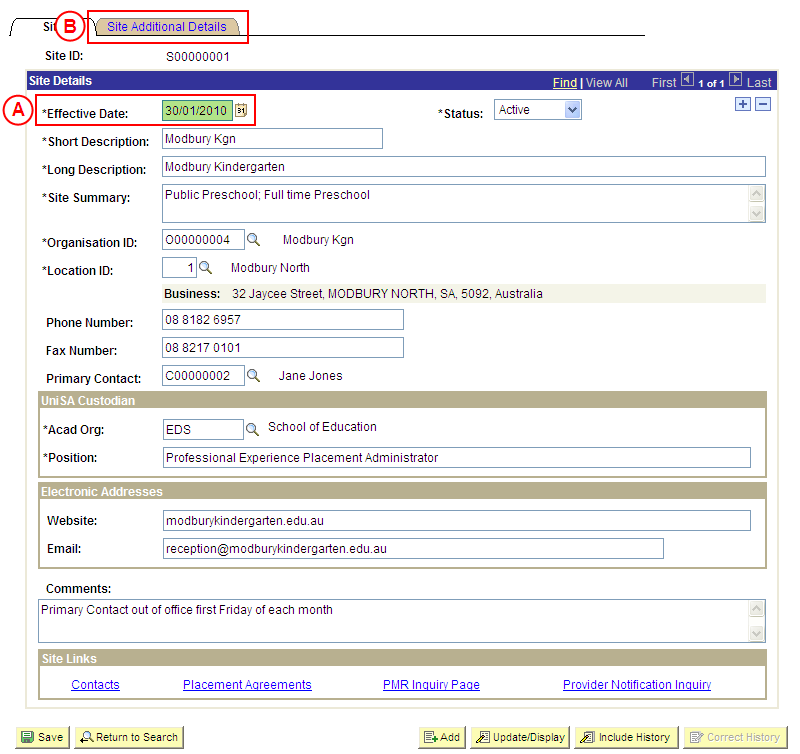
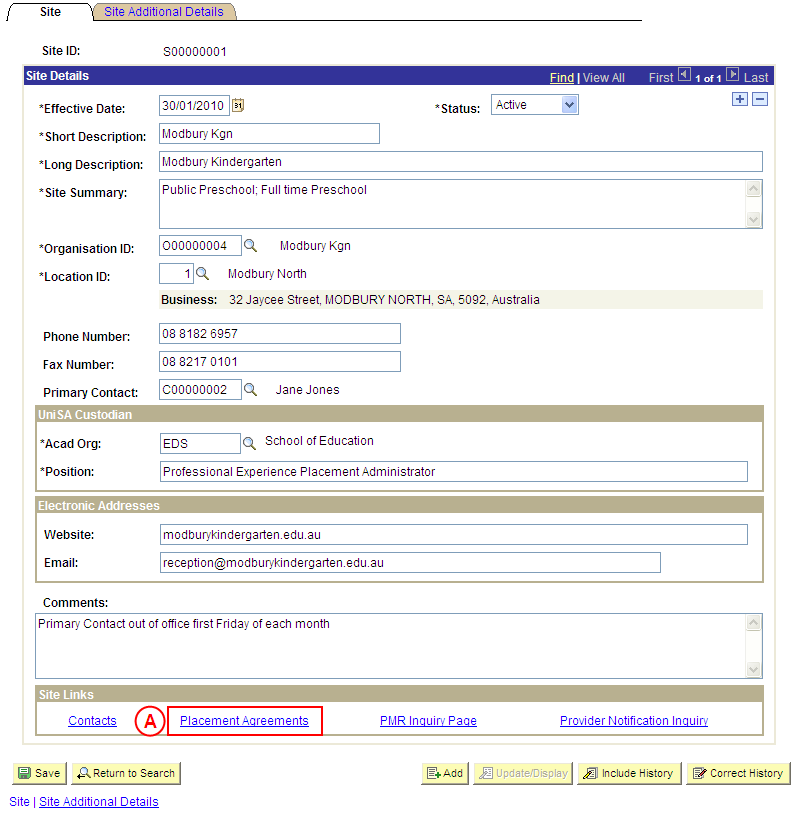
Result: The Sites: Site page is displayed. |
|
|
|
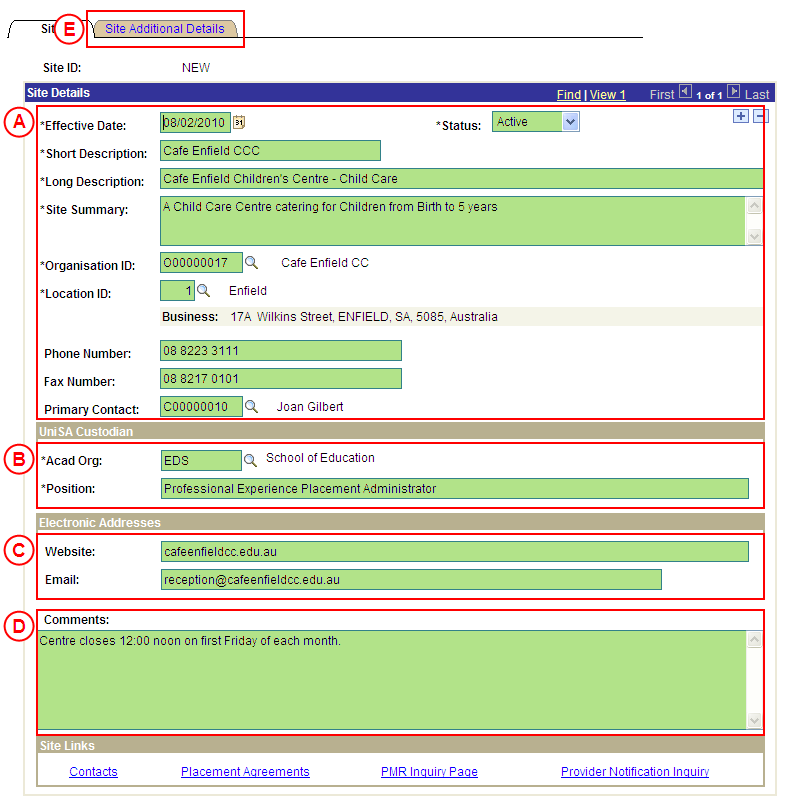
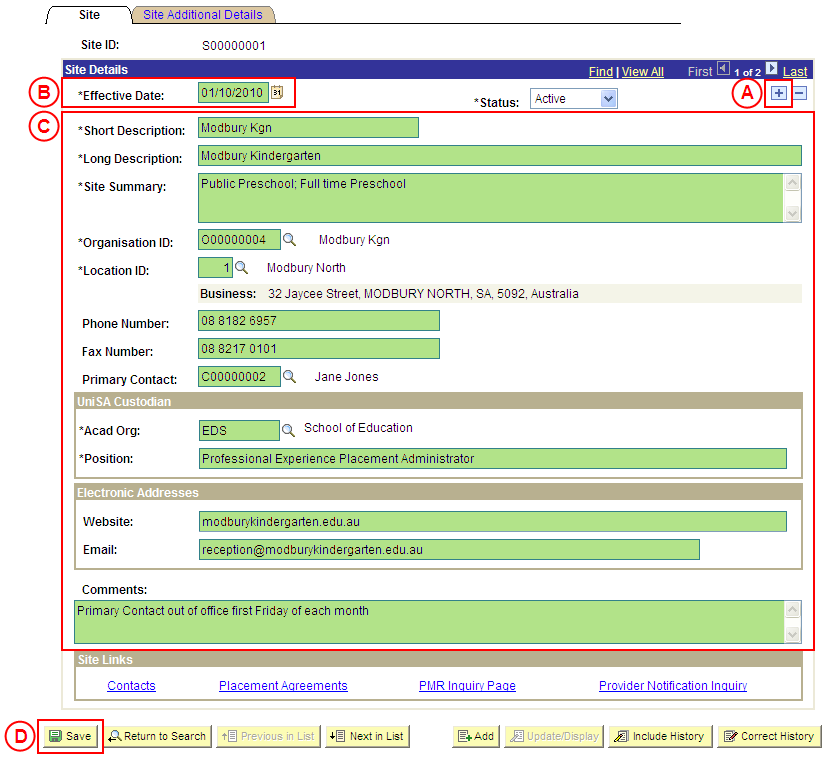
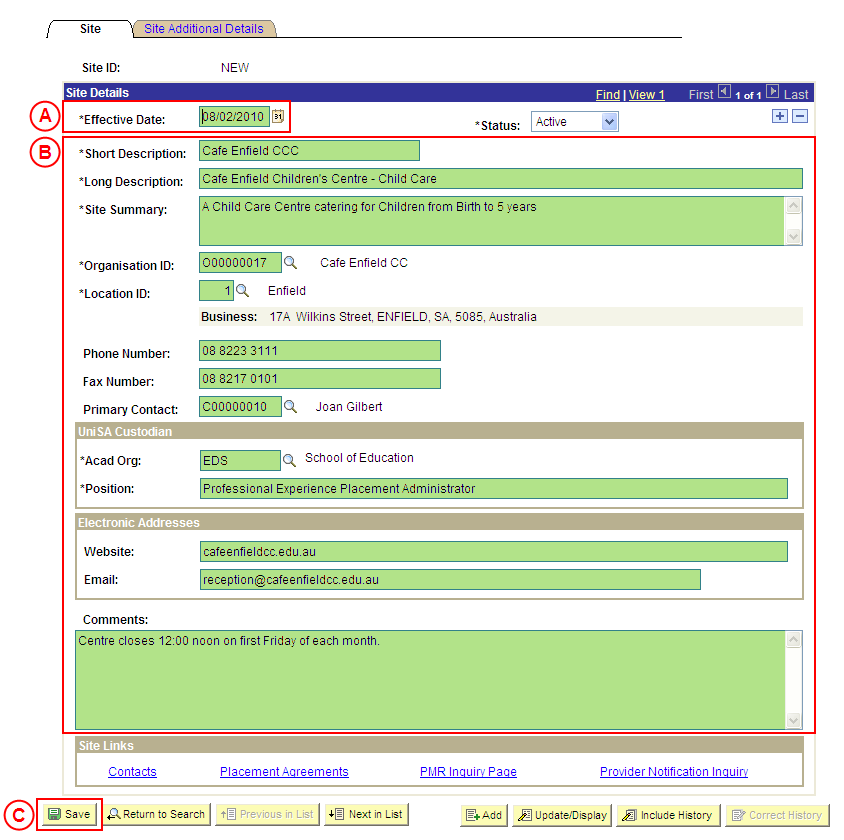
Site Details
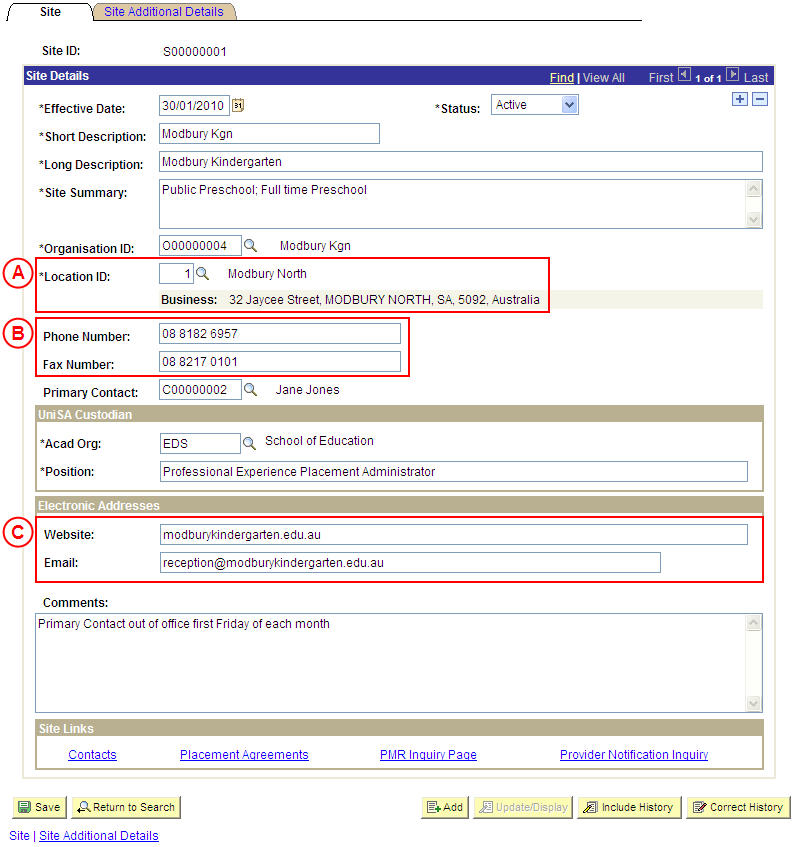
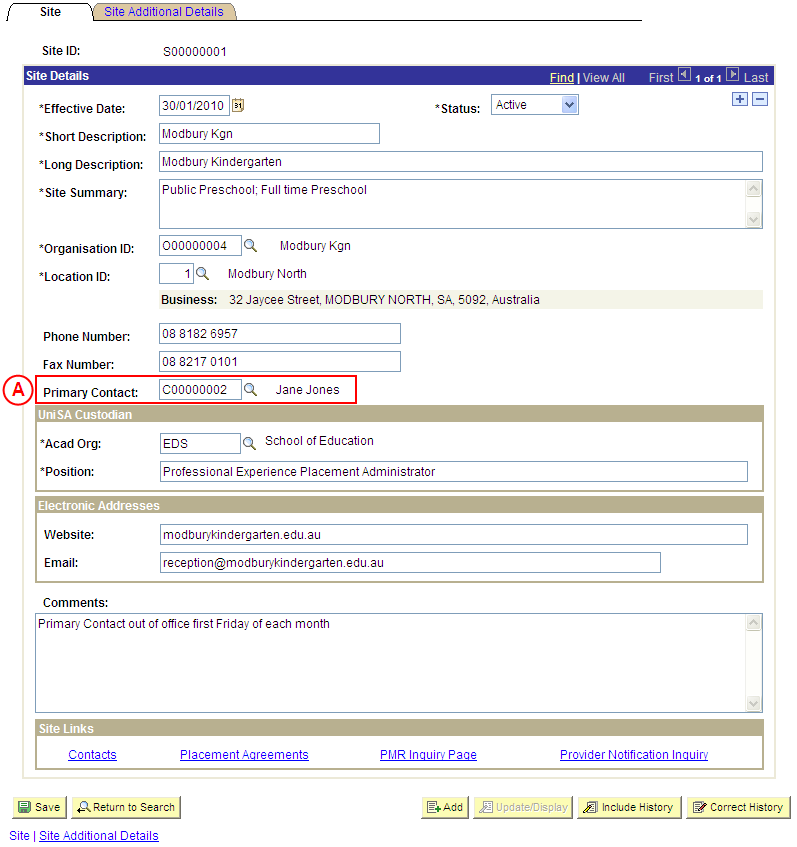
Status: Select Active (if this value is not already displayed). Short Description: Type a [description of the new Site] (abbreviate if required). Long Description: Type the [full description of the new Site]. Site Summary: Type a [brief description that summarises the Site] (if applicable). Organisation ID: Select the [Organisation the new Site belongs to]. Location ID: Select the [Location of the new Site]. Phone Number: Type the [Site’s telephone number]. Fax Number: Type the [Site’s fax number]. Primary Contact: Select the [Primary Contact for the new Site]. Note: If the Primary Contact has not yet been configured as a Contact for the new Site, refer to the ‘Creating a New Contact’ process. UniSA Custodian
Position: Type the [position title of the UniSA Custodian for the new Site]. Electronic Addresses
Email: Type the [email address of the new Site].
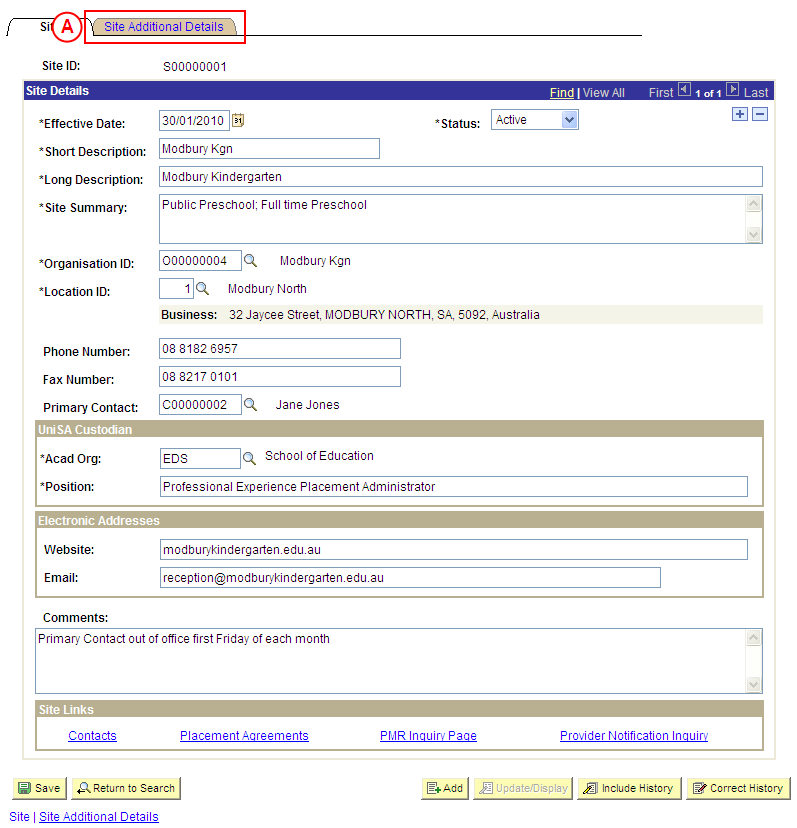
Result: The Sites: Site Additional Details page is displayed. |
|
Application: Medici Navigation: The Sites: Site Additional Details page will already be displayed as a result of performing step 1 |
|
|
|
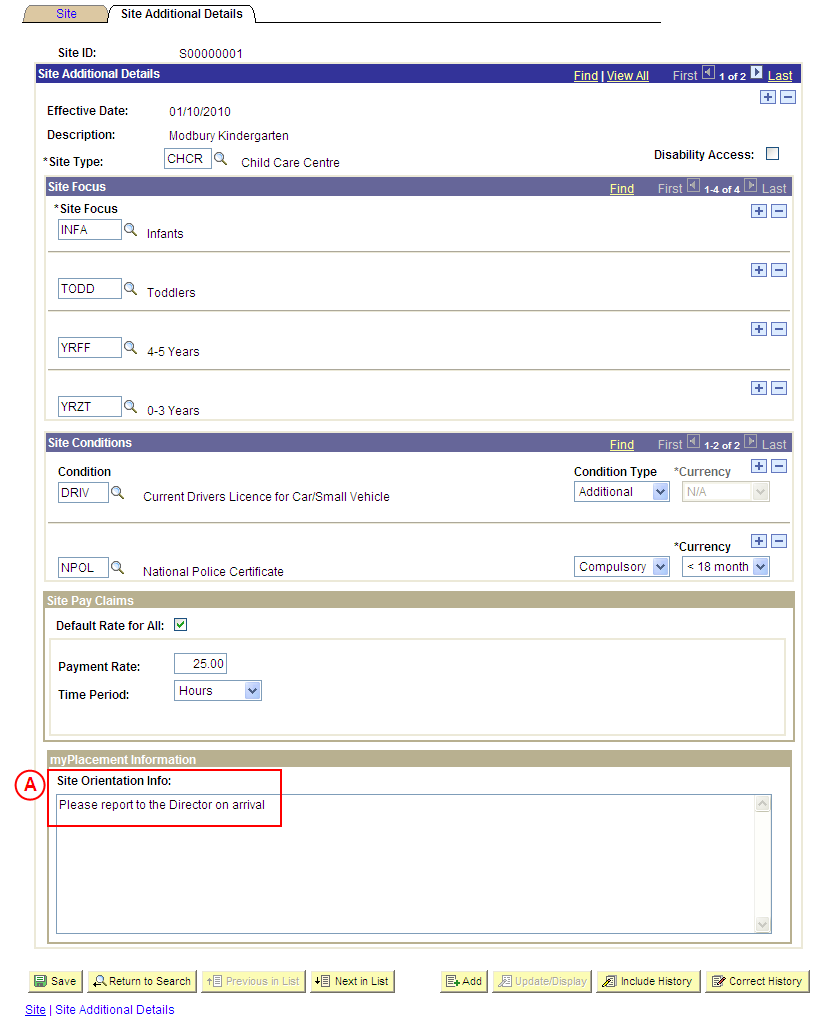
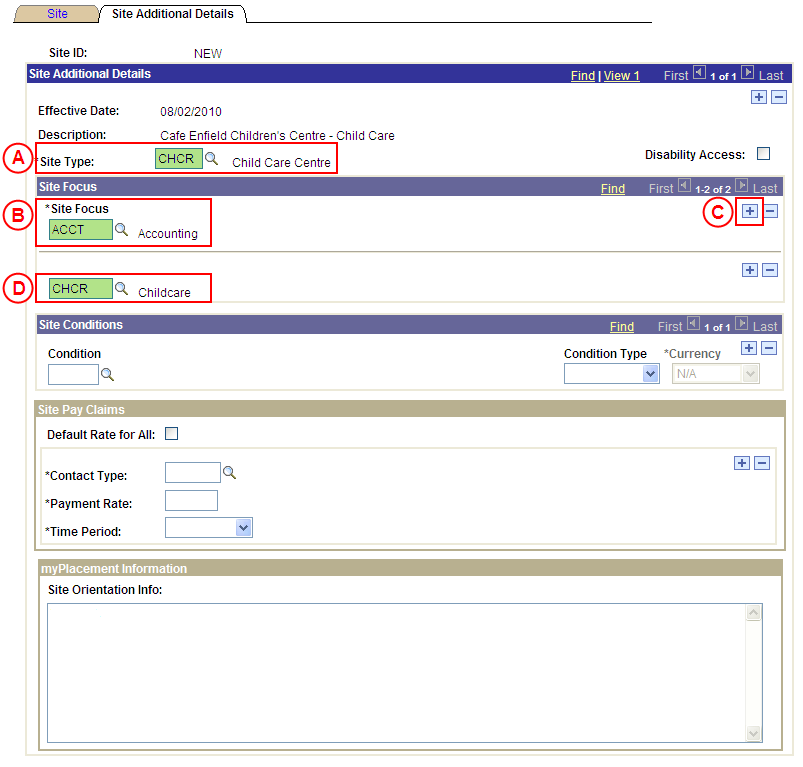
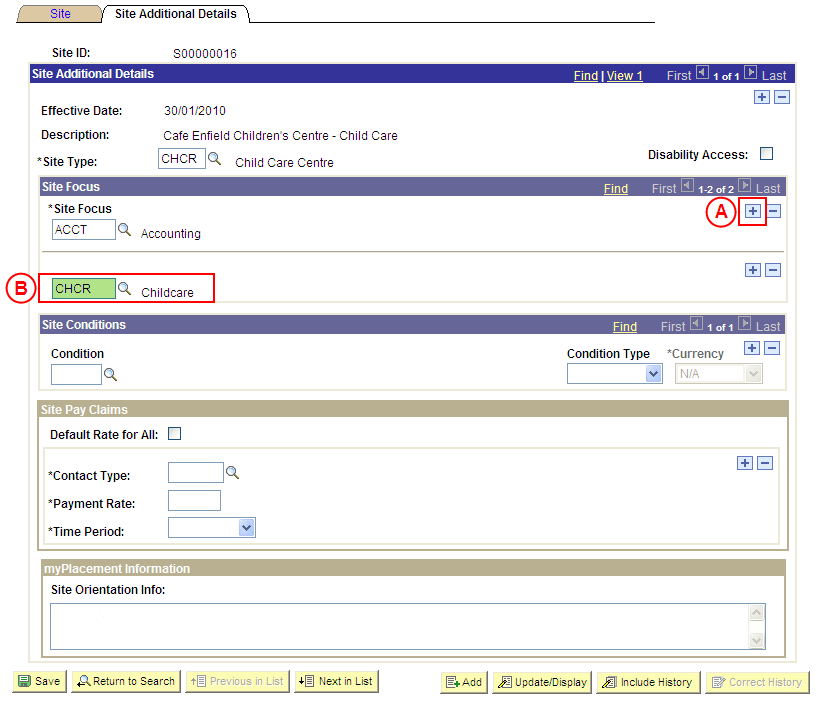
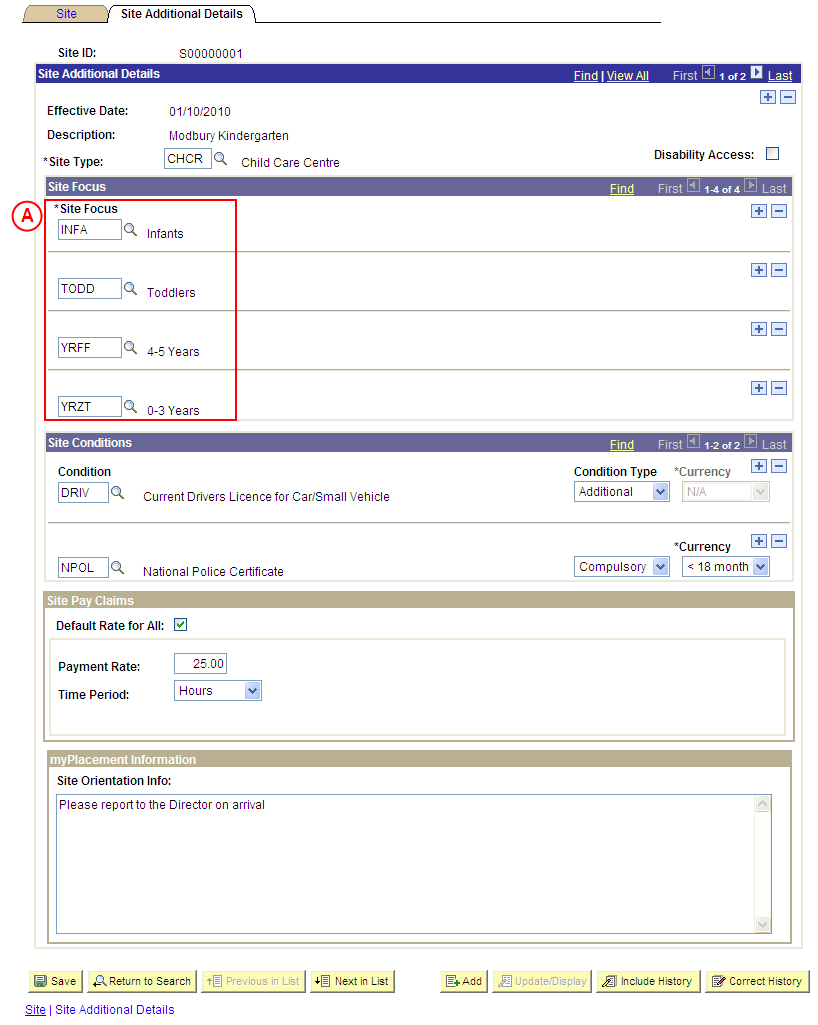
Site Details
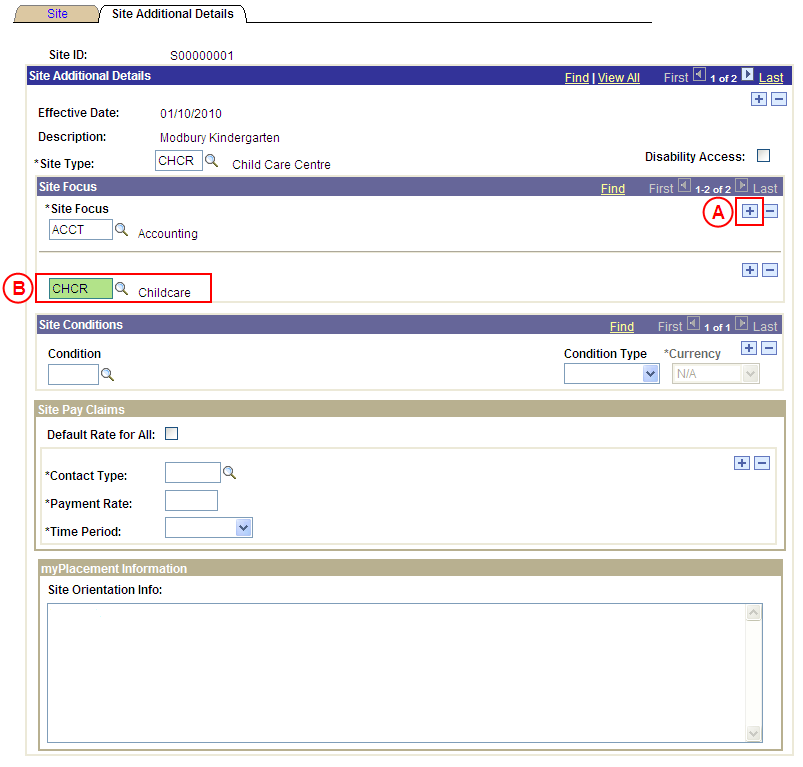
Site Focus: Select the [relevant Site Focus]. |
|
Continue to repeat parts C and D of this step until all Site Focus offered by the Site have been recorded. |
|
Question |
Yes |
No |
|
Does the Site have Conditions for placement? |
Go to step 3. |
Go to question 2. |
|
Explanation: If the Site has specific Placement Conditions, the Site’s Conditions must be recorded (step 3). If the Site does not have specific Placement Conditions, the next step is to determine if Pay Claim details need to be recorded for the Site (question 2). |
||
|
Application: Medici Navigation: The Sites: Site Additional Details page will already be displayed as a result of performing step 2 |
|
|
|
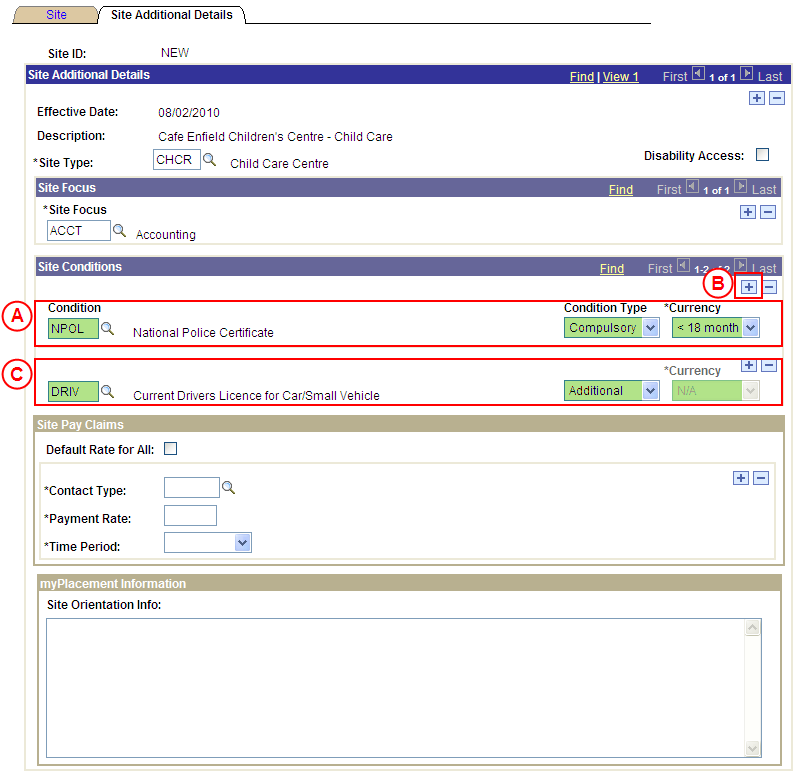
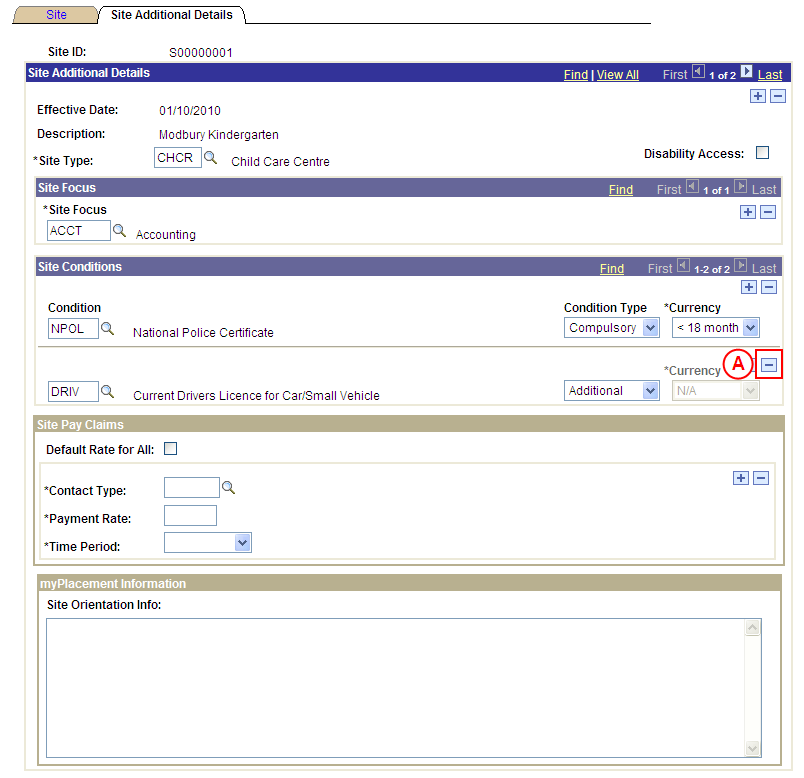
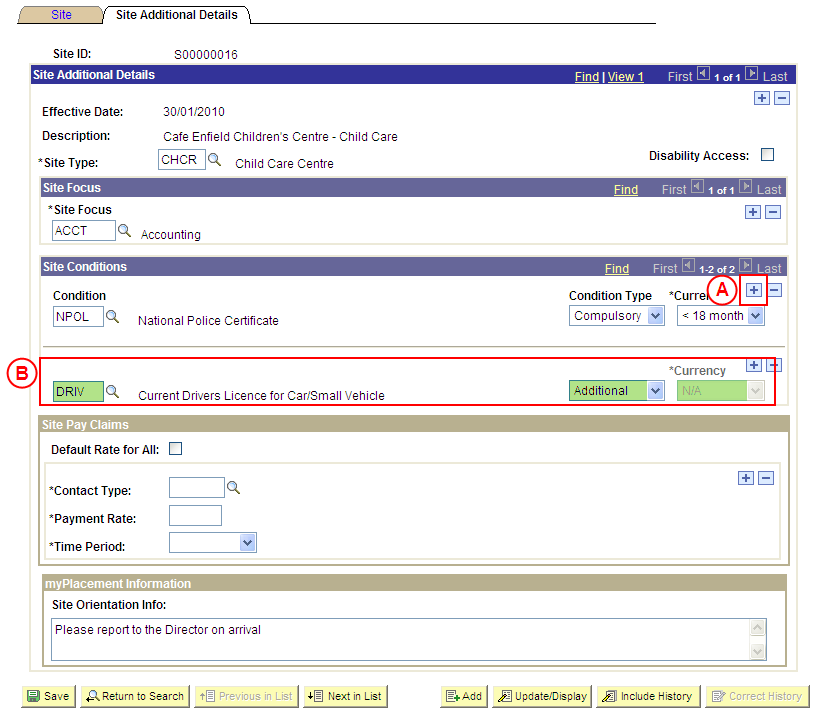
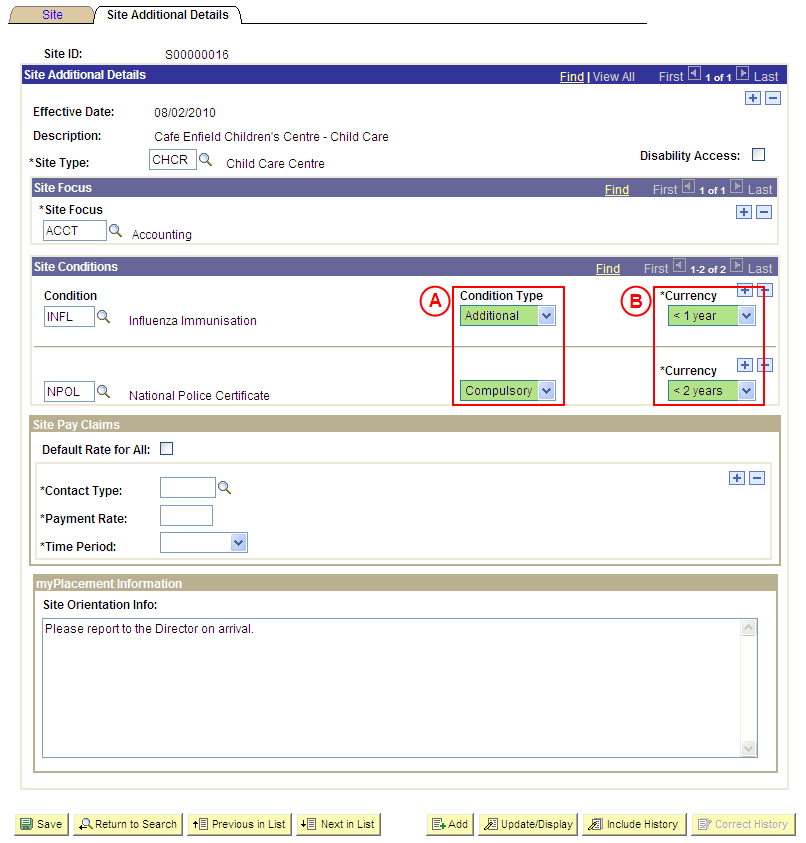
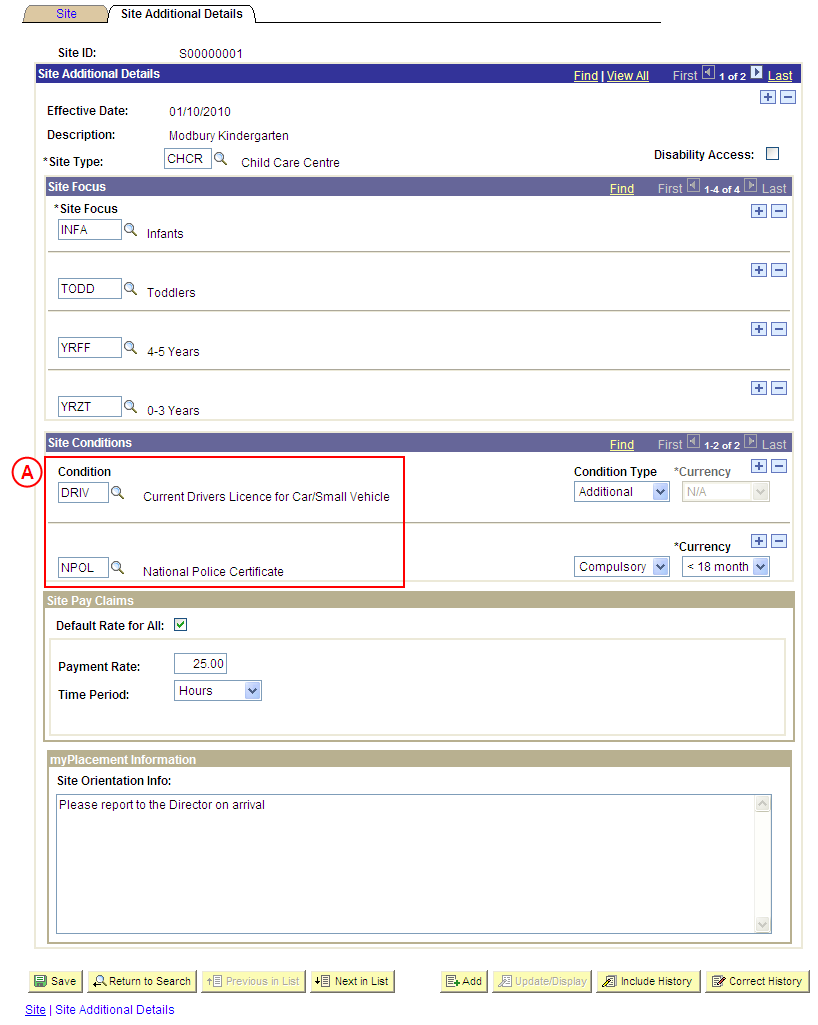
Site Conditions
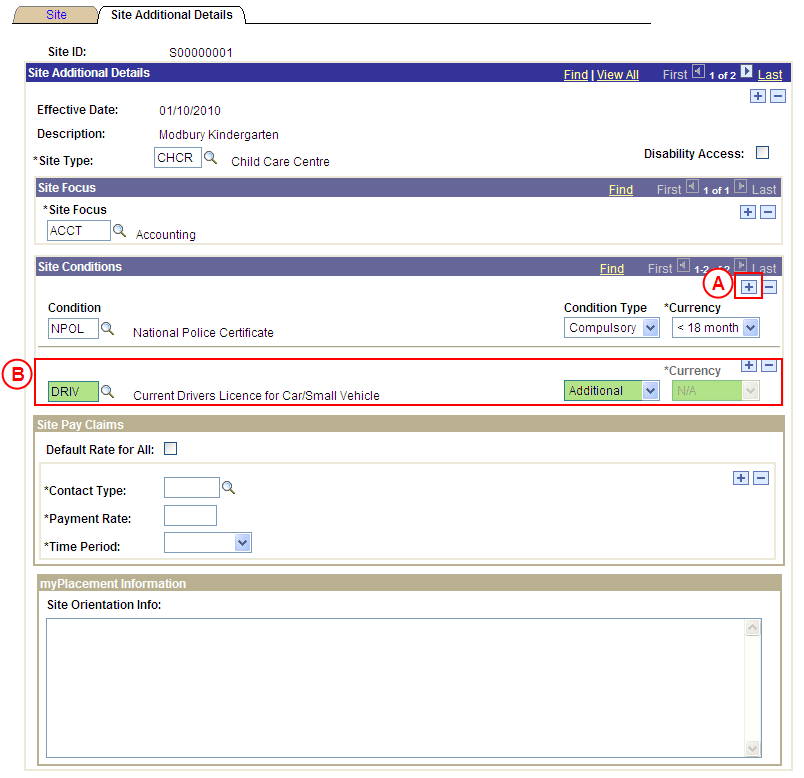
Condition Type: Select the appropriate value as follows: - Compulsory (if the Condition must be satisfied for the student to be eligible for Placement, and UniSA staff will be responsible for processing the student’s evidence to satisfy the Condtion). - Additional (the Condition is not considered ‘Compulsory’ by UniSA, and UniSA staff will not be responsible for processing evidence to satisfy the Condition (please note an ‘Additional’ Condition may still be considered mandatory by the Site and the Site will be responsible for processing the student’s evidence)). Currency: Select the [maximum age of the student’s evidence to satisfy the Condition] (if applicable). If further Site Conditions apply:
Condition: Type or select the [relevant Condition]. Condition Type: Select the appropriate value as follows: - Compulsory (if the Condition must be satisfied for the student to be eligible for Placement, and UniSA staff will be responsible for processing the student’s evidence to satisfy the Condtion). - Additional (the Condition is not considered ‘Compulsory’ by UniSA, and UniSA staff will not be responsible for processing evidence to satisfy the Condition (please note an ‘Additional’ Condition may still be considered mandatory by the Site and the Site will be responsible for processing the student’s evidence)). Currency: Select the [maximum age of the student’s evidence to satisfy the Condition] (if applicable). |
|
Continue to repeat parts B and C of this step until all Site Conditions have been recorded. |
|
Question 2: Do Pay Claim details need to be recorded for the Site? |
||
|
Question |
Yes |
No |
|
Do Pay Claim details need to be recorded for the Site? |
Go to question 3. |
Go to question 4. |
|
Explanation: If Pay Claim details need to be recorded for the Site, the next step is to determine if a default rate of pay will apply to all Contact Types at the Site (question 3). If Pay Claim details do not need to be recorded for the Site, the next step is to determine if Site Orientation Information needs to be recorded (question 4). |
||
|
Question 3: Will all Contact Types receive the same rate of pay? |
||
|
Question |
Yes |
No |
|
Will all Contact Types receive the same rate of pay? |
Go to step 4. |
Go to step 5. |
|
Explanation: If the Contact Types at the Site will receive the same rate of pay, record the default rate of pay for all Contact Types (step 4). If the Contact Types at the Site will receive a different rate of pay, record the different pay rates for the Contact Types (step 5). |
||
|
Step 4: Record the Pay Claim details as ‘Default Rate for All’ |
|
Application: Medici Navigation: The Sites: Site Additional Details page will already be displayed as a result of performing step 2 |
|
|
|
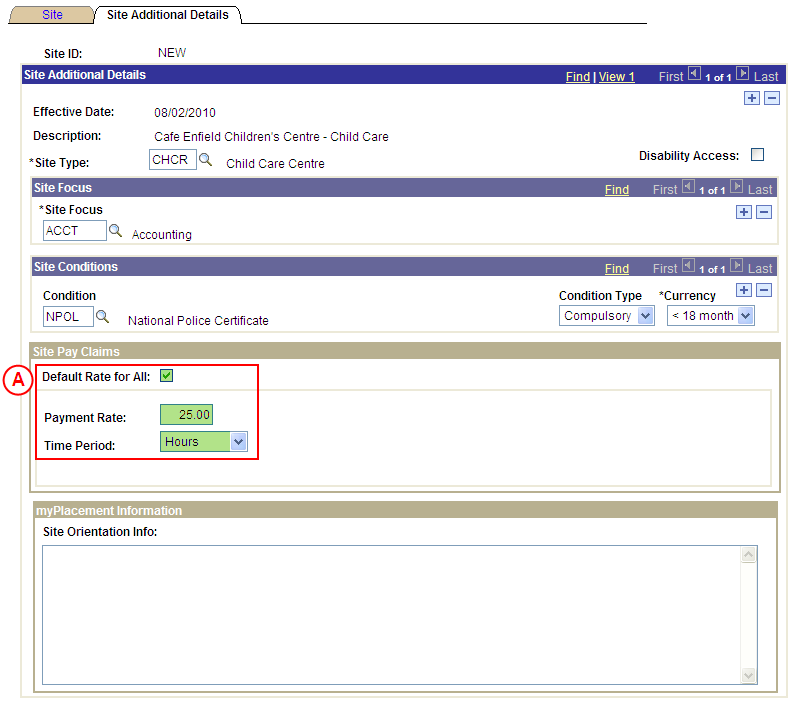
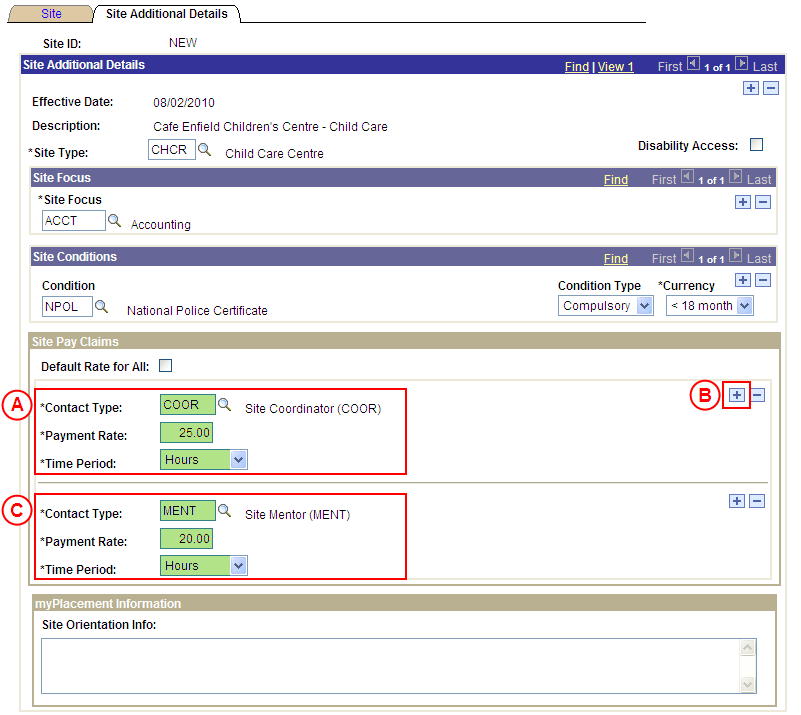
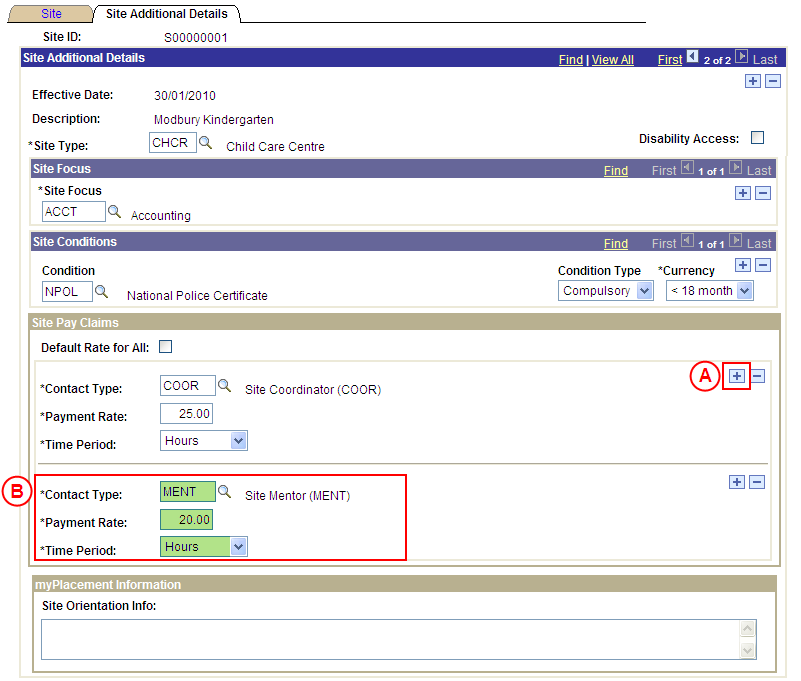
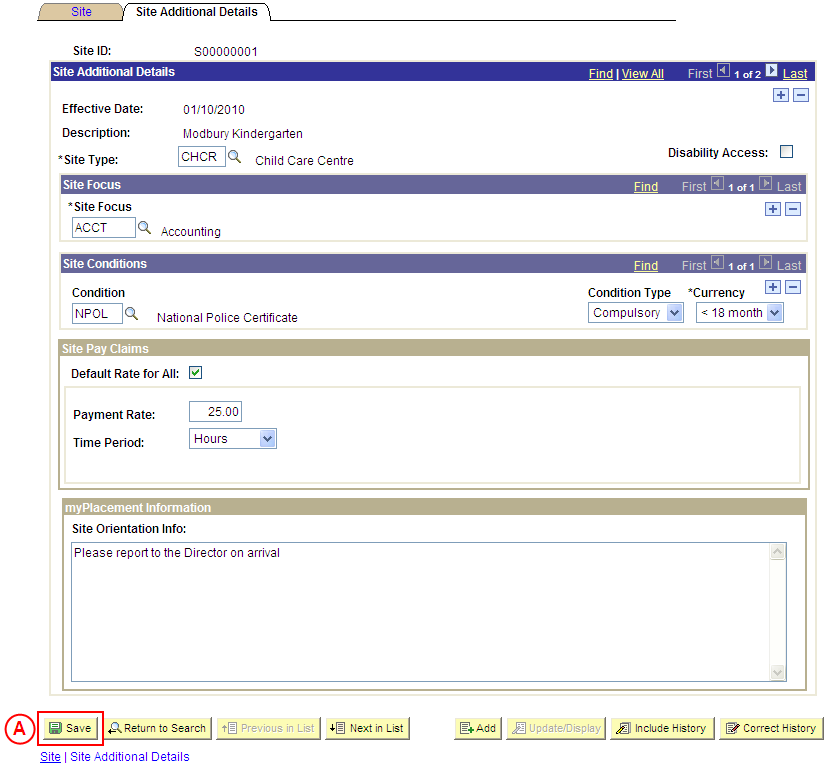
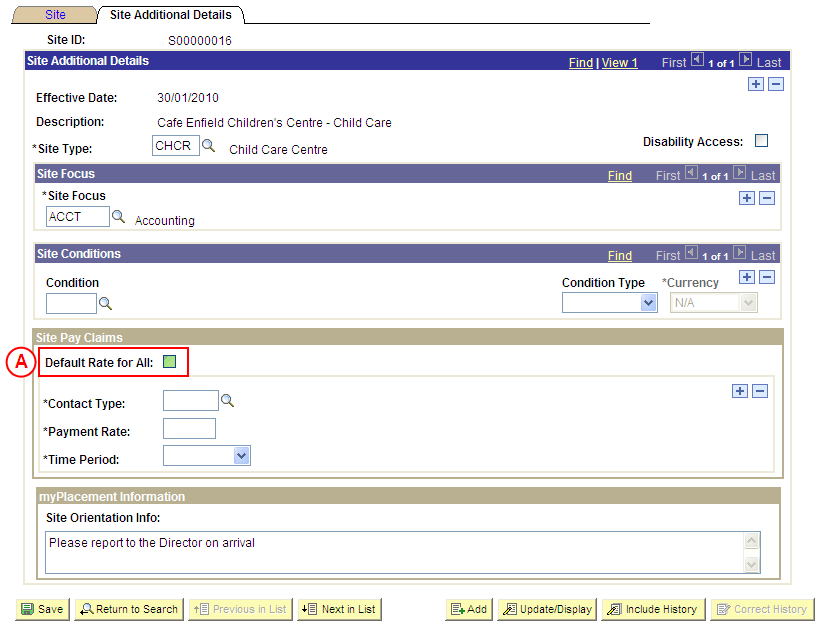
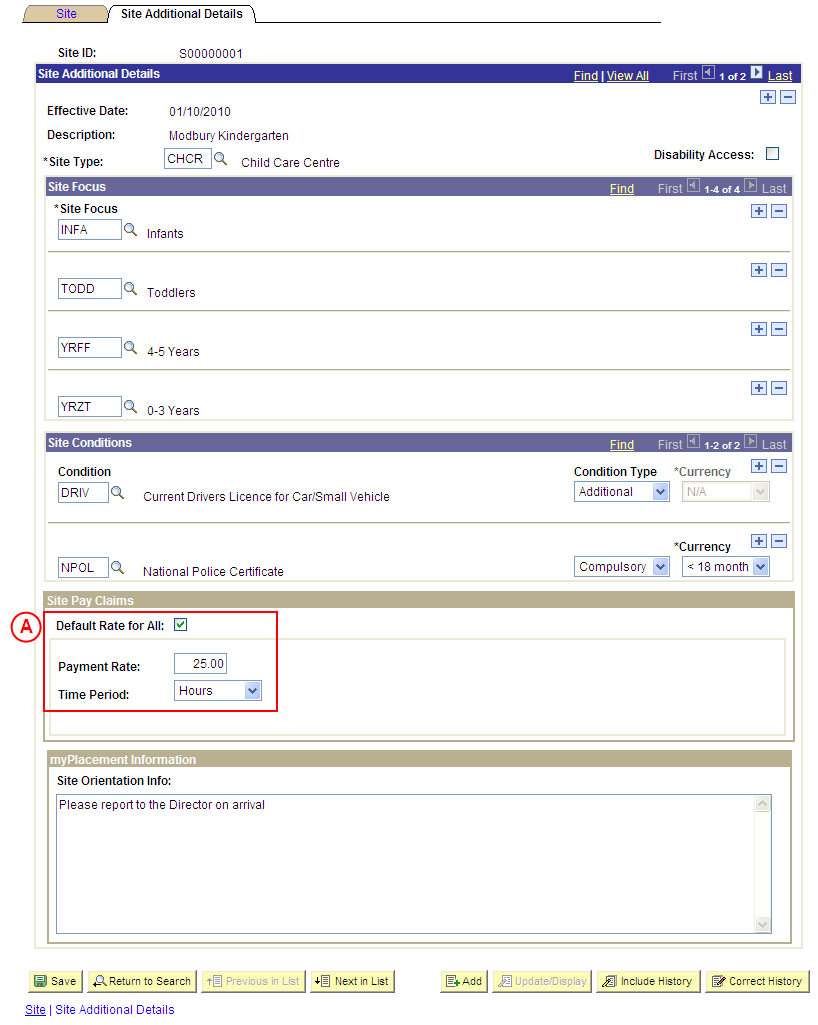
Site Pay Claims
Payment Rate: Type the [default pay rate for all Contact Types]. Time Period: Select the appropriate value as follows: - Day (if the daily pay rate has been entered in the Payment Rate field). - Hours (if the hourly pay rate has been entered in the Payment Rate field). |
|
Go to question 4. |
|
Question 4: Does Site Orientation Information need to be entered for the Site? |
||
|
Question |
Yes |
No |
|
Does Site Orientation Information need to be entered for the Site? |
Go to step 6. |
Go to step 7. |
|
Explanation: If Site Orientation Information needs to be recorded (information to be displayed to students in myPlacement), record the Site Orientation Information before saving the record (step 6). If Site Orientation Information does not need to be recorded, the new Site record can be saved (step 7). |
||
|
Application: Medici Navigation: The Sites: Site Additional Details page will already be displayed as a result of performing step 2 |
|
|
|
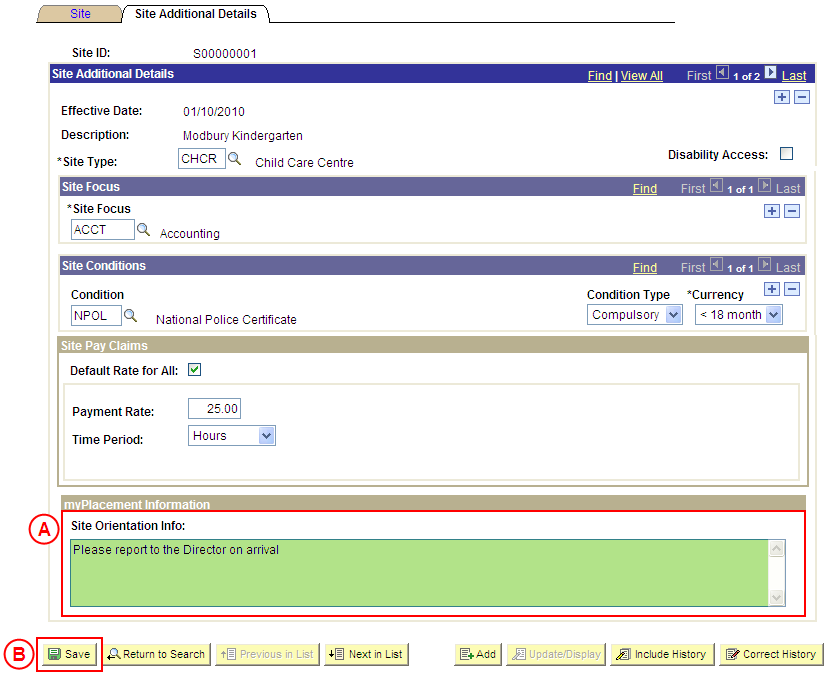
myPlacement Information
|
|
Application: Medici Navigation: The Sites: Site Additional Details page will already be displayed as a result of performing step 2 |
|
|
|
Result: The new Site is created in Medici and will be available from the entered Effective Date. The Site ID for the new Site is displayed at the top of the Medici page. |
Update a Site's Conditions
Process Overview
Placement Administrators and Placement Officers have access to update Site records as required.
If the Site record needs to be updated due to a recent or future change, insert a new effective dated row to update the Site record as at the date of the change. If the Site record needs to be corrected rather than updated (ie. incorrect information has been entered for the Site), the record should be corrected by a Placement Administrator using ‘Correction’ mode (refer to the ‘Correcting a Site’ process page).
When a Site Condition is added, the Condition Type must be selected as follows:
- Compulsory: The Condition must be satisfied for the student to be eligible for Placement, and evidence to satisfy the Condition will be processed by UniSA Placement staff.
- Additional: The Condition is not considered ‘Compulsory’ by UniSA, and UniSA Placement staff will not be responsible for processing evidence to satisfy the Condition. The Site may consider the Condition to be mandatory and will be responsible for processing the student’s evidence; or it may be that students are encouraged to satisfy the Condition, however the University is unable to enforce the Condition.
UniSA Custodian
The UniSA Custodian is the ‘owner’ of the Site. Do not update a Site’s details prior to liaising with the Site’s UniSA Custodian.
Step by Step Instructions
Note: This process provides instructions on how to update the Conditions for a Site. Instructions on how to update a Site’s Focus, Pay Details, Orientation Information or basic details (eg. Organisation, UniSA Custodian, Phone and Fax Numbers, etc) are available from the ‘Updating a Site’ process page.
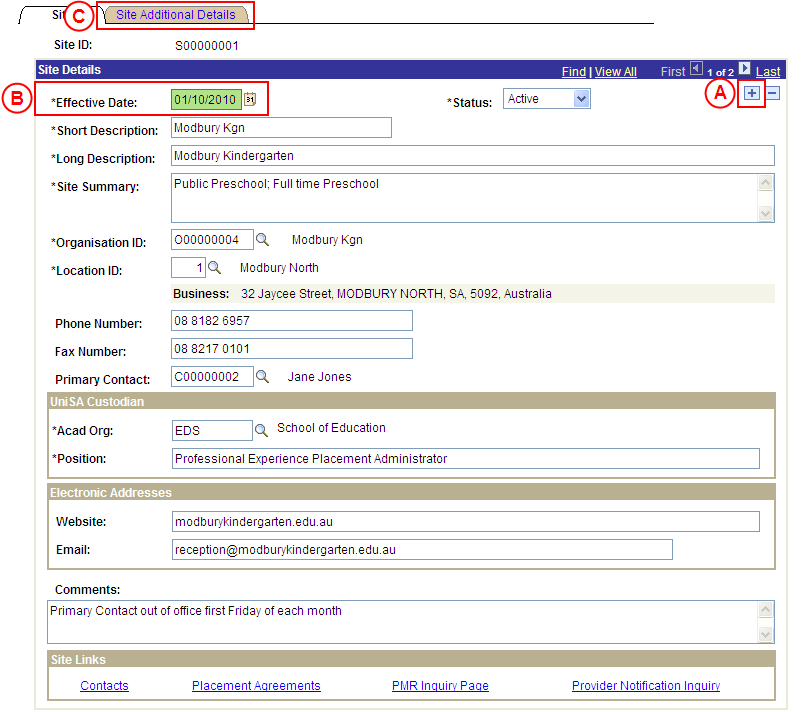
Step 1: Locate the Site record and record the Effective Date
Question 1: Does a Condition need to be added to the Site?
Step 2: Record the new Condition(s) for the Site
Question 2: Does a Condition need to be deleted from the Site?
Step 3: Delete the Condition(s) from the Site
Step 4: Save the updates to the Site record

|
Question |
Yes |
No |
|
Does a Condition need to be added to the Site? |
Go to step 2. |
Go to question 2. |
|
Explanation: If a Condition needs to be added to the Site, the new Site Condition(s) must be recorded (step 2). If a Condition does not need to be added to the Site, the process continues by determining if a Condition needs to be deleted from the Site (question 2). |
||
|
Application: Medici Navigation: The Sites: Site Additional Details page will already be displayed as a result of performing step 1 |
|
|
|
Site Conditions If there is an existing Condition record:
Condition Type: Select the appropriate value as follows: - Compulsory (if the Condition must be satisfied for the student to be eligible for Placement, and UniSA staff will be responsible for processing the student’s evidence to satisfy the Condtion). - Additional (the Condition is not considered ‘Compulsory’ by UniSA, and UniSA staff will not be responsible for processing evidence to satisfy the Condition (please note an ‘Additional’ Condition may still be considered mandatory by the Site and the Site will be responsible for processing the student’s evidence)). Currency: Select the [maximum age of the student’s evidence to satisfy the Condition] (if applicable). |
|
Continue to repeat this step until all required Site Conditions have been recorded. |
|
Question 2: Does a Condition need to be deleted from the Site? |
||
|
Question |
Yes |
No |
|
Does a Condition need to be deleted from the Site? |
Go to step 3. |
Go to step 4. |
|
Explanation: If a Condition needs to be deleted from the Site as at the same effective date, delete the Condition record(s) that are no longer required (step 3). If a Condition does not need to be deleted from the Site, the update(s) to the Site record can be saved in Medici (step 4). |
||
|
Application: Medici Navigation: The Sites: Site Additional Details page will already be displayed as a result of performing step 1 |
|
|
|
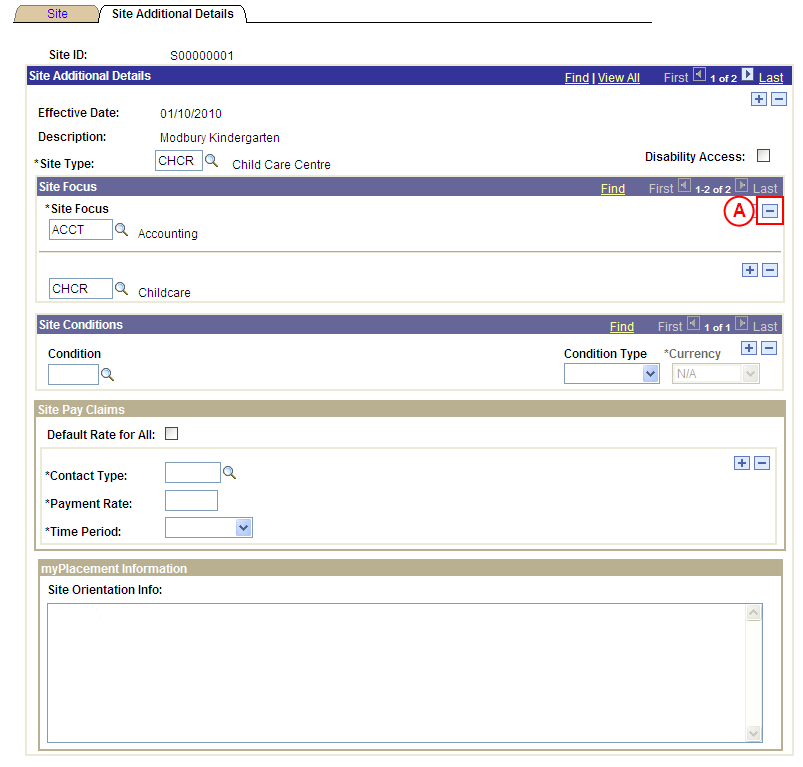
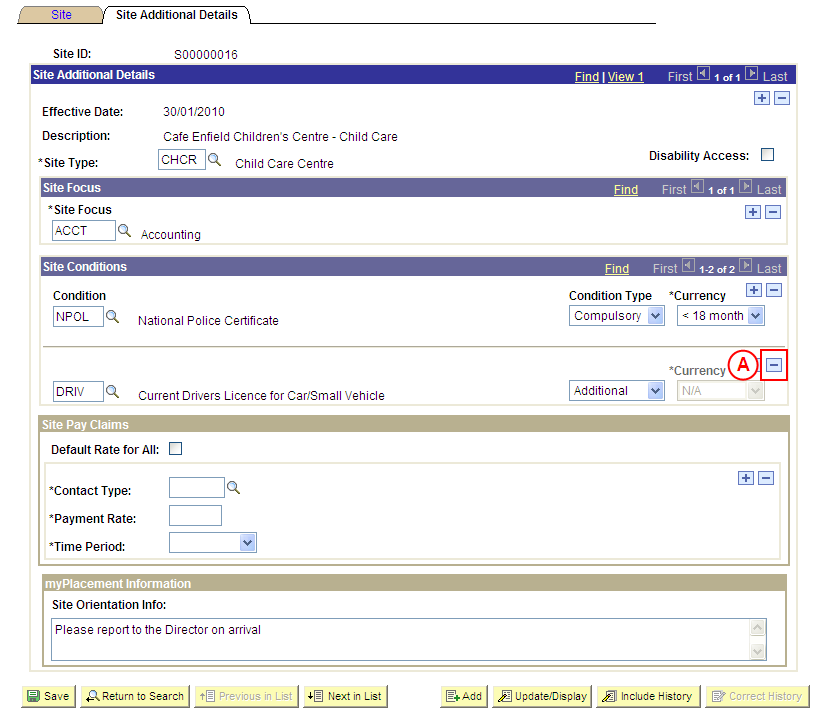
Site Conditions
Result: A message is displayed requesting confirmation the selected row is to be deleted, and advises the deletion will occur when the transaction is saved. |
|
|
|
Result: The selected Condition is deleted. |
|
Continue to repeat this step until all Conditions that are no longer required have been deleted. |

|
Application: Medici Navigation: The Sites: Additional Details page will already be displayed as a result of performing step 2 or 3 |
|
|
|
If further Site details need to be updated from the same effective date (eg. Pay Details, name, phone, email, etc), update these details prior to saving the record. Refer to the relevant process instructions on the ‘Updating a Site’ process page if required. |
Result: The updated information will apply to the Site as of the entered effective date. |

Update a Site's Details
Process Overview
Placement Administrators and Placement Officers have access to update Site records as required.
If the Site record needs to be updated due to a recent or future change, insert a new effective dated row to update the Site record as at the date of the change. If the Site record needs to be corrected rather than updated (ie. incorrect information has been entered for the Site), the record should be corrected by a Placement Administrator using ‘Correction’ mode (refer to the ‘Correcting a Site’ process page).
UniSA Custodian
The UniSA Custodian is the ‘owner’ of the Site. Do not update a Site’s details prior to liaising with the Site’s UniSA Custodian.
Step by Step Instructions
Note: This process provides instructions on how to update a Site’s basic details (eg. Organisation, UniSA Custodian, Phone and Fax Numbers, etc). Instructions on how to update a Site’s Focus, Conditions, Orientation Information, or Pay Claim Details are available from the ‘Updating a Site’ process page.
Step 1: Update the Site’s details in Medici
|
Application: Medici Navigation: Student Placements®Placement Providers®Sites |
|
|
|
Site ID: Type the relevant [Site ID]. Site Type: Type or select the relevant [Site Type]. Description: Type the relevant [Site description]. Long Description: Type the relevant [Site long description]. Organisation ID: Select the relevant [Organisation]. Result: The Sites: Site page is displayed. |
|
|
| Warning: The UniSA Custodian is the ‘owner’ of the Site. Do not update a Site’s details prior to liaising with the Site’s UniSA Custodian. |
|
Site Details
|
|
If further Site details need to be updated from the same effective date (eg. Conditions or Pay Claim details), update these details prior to saving the record. Refer to the relevant process instructions on the ‘Updating a Site’ process page if required. |
|
Result: The updated information will apply to the Site as of the entered effective date. |

Update a Site's Focus
Process Overview
Placement Administrators and Placement Officers have access to update Site records as required.
If the Site record needs to be updated due to a recent or future change, insert a new effective dated row to update the Site record as at the date of the change. If the Site record needs to be corrected rather than updated (ie. incorrect information has been entered for the Site), the record should be corrected by a Placement Administrator using ‘Correction’ mode (refer to the ‘Correcting a Site’ process page).
UniSA Custodian
The UniSA Custodian is the ‘owner’ of the Site. Do not update a Site’s details prior to liaising with the Site’s UniSA Custodian.
Step by Step Instructions
Note: This process provides instructions on how to update the Site Focus for a Site. Instructions on how to update a Site’s Pay Details, Conditions, Orientation Information or basic details (eg. Organisation, UniSA Custodian, Phone and Fax Numbers, etc) are available from the ‘Updating a Site’ process page.
Step 1: Locate the Site record and record the Effective Date
Question 1: Does a Site Focus need to be added to the Site?
Step 2: Record the new Focus for the Site
Question 2: Does a Site Focus need to be deleted from the Site?
Step 3: Delete the Site Focus from the Site
Step 4: Save the updates to the Site record

|
Question |
Yes |
No |
|
Does a Site Focus need to be added to the Site? |
Go to step 2. |
Go to question 2. |
|
Explanation: If a Site Focus needs to be added to the Site, the new Site Focus must be recorded (step 2). If a Site Focus does not need to be added to the Site, the process continues by determining if a Site Focus needs to be deleted from the Site (question 2). |
||
|
Application: Medici Navigation: The Sites: Site Additional Details page will already be displayed as a result of performing step 1 |
|
|
|
Site Focus If there is an existing Site Focus record:
|
|
Continue to repeat this step until all required Site Focus offered by the Site have been recorded. |
|
Question 2: Does a Site Focus need to be deleted from the Site? |
||
|
Question |
Yes |
No |
|
Does a Site Focus need to be deleted from the Site? |
Go to step 3. |
Go to step 4. |
|
Explanation: If a Site Focus needs to be deleted from the Site, delete the Focus record(s) that are no longer required If a Site Focus does not need to be deleted from the Site, the update(s) to the Site record can be saved in Medici (step 4). |
||
|
Application: Medici Navigation: The Sites: Site Additional Details page will already be displayed as a result of performing step 1 |
|
|
|
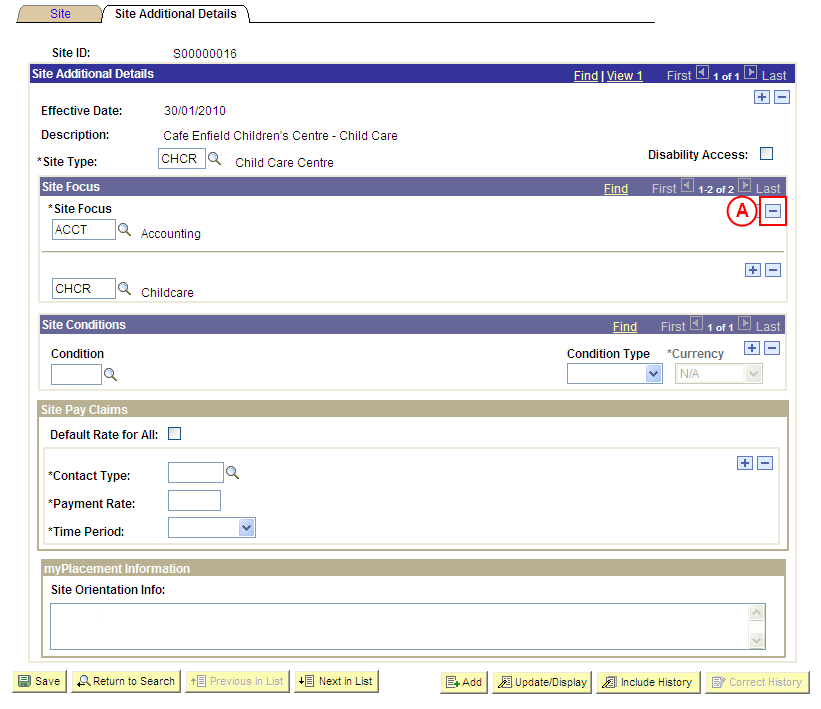
Site Focus
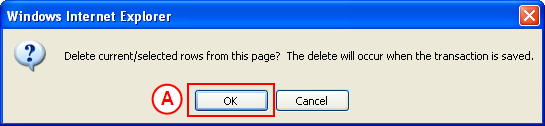
Result: A message is displayed requesting confirmation the selected row is to be deleted, and advises the deletion will occur when the transaction is saved. |
|
|
|
Result: The selected Site Focus is deleted. |
|
Continue to repeat this step until all Site Focus that are no longer required have been deleted. |

|
Application: Medici Navigation: The Sites: Additional Details page will already be displayed as a result of performing step 2 or 3 |
|
|
|
If further Site details need to be updated from the same effective date (eg. Pay Details, name, phone, email, etc), update these details prior to saving the record. Refer to the relevant process instructions on the ‘Updating a Site’ process page if required. |
|
Result: The updated information will apply to the Site as of the entered effective date. |

Update a Site's Orientation Information
Process Overview
Placement Administrators and Placement Officers have access to update Site records as required.
If the Site record needs to be updated due to a recent or future change, insert a new effective dated row to update the Site record as at the date of the change. If the Site record needs to be corrected rather than updated (ie. incorrect information has been entered for the Site), the record should be corrected by a Placement Administrator using ‘Correction’ mode (refer to the ‘Correcting a Site’ process page).
UniSA Custodian
The UniSA Custodian is the ‘owner’ of the Site. Do not update a Site’s details prior to liaising with the Site’s UniSA Custodian.
Step by Step Instructions
Note: This process provides instructions on how to update a Site’s Orientation Information. Instructions on how to update a Site’s Focus, Conditions, Pay Claim Details, or basic details (eg. Organisation, UniSA Custodian, Phone and Fax Numbers, etc) are available from the ‘Updating a Site’ process page.
Step 1: Update the Site’s Orientation Information in Medici
|
Application: Medici Navigation: Student Placements®Placement Providers®Sites |
|
 |
|
Site ID: Type the relevant [Site ID]. Site Type: Type or select the relevant [Site Type]. Description: Type the relevant [Site description]. Long Description: Type the relevant [Site long description]. Organisation ID: Select the relevant [Organisation].
Result: The Sites: Site page is displayed. |
|
 |
| Warning: The UniSA Custodian is the ‘owner’ of the Site. Do not update a Site’s details prior to liaising with the Site’s UniSA Custodian. |
|
Site Details
Result: The Sites: Site Additional Details page is displayed. |
|
 |
|
|
|
If further Site details need to be updated from the same effective date (eg. Conditions or Pay Claim details), update these details prior to saving the record. Refer to the relevant process instructions on the ‘Updating a Site’ process page if required. |
|
Result: The updated information will apply to the Site as of the entered effective date. |
Process Overview
Placement Administrators and Placement Officers have access to update Site records as required.
If the Site record needs to be updated due to a recent or future change, insert a new effective dated row to update the Site record as at the date of the change. If the Site record needs to be corrected rather than updated (ie. incorrect information has been entered for the Site), the record should be corrected by a Placement Administrator using ‘Correction’ mode (refer to the ‘Correcting a Site’ process page).
UniSA Custodian
The UniSA Custodian is the ‘owner’ of the Site. Do not update a Site’s details prior to liaising with the Site’s UniSA Custodian.
Step by Step Instructions
Note: This process provides instructions on how to update a Site’s Orientation Information. Instructions on how to update a Site’s Focus, Conditions, Pay Claim Details, or basic details (eg. Organisation, UniSA Custodian, Phone and Fax Numbers, etc) are available from the ‘Updating a Site’ process page.
Step 1: Update the Site’s Orientation Information in Medici
|
Application: Medici Navigation: Student Placements®Placement Providers®Sites |
|||
|
|
|||
Site ID: Type the relevant [Site ID]. Site Type: Type or select the relevant [Site Type]. Description: Type the relevant [Site description]. Long Description: Type the relevant [Site long description].
Select the Search button (or press Enter). Result: The Sites: Site page is displayed. |
|||
|
|
|||
|
|||
Select the Site Additional Details tab. Result: The Sites: Site Additional Details page is displayed. |
|||
|
|
|||
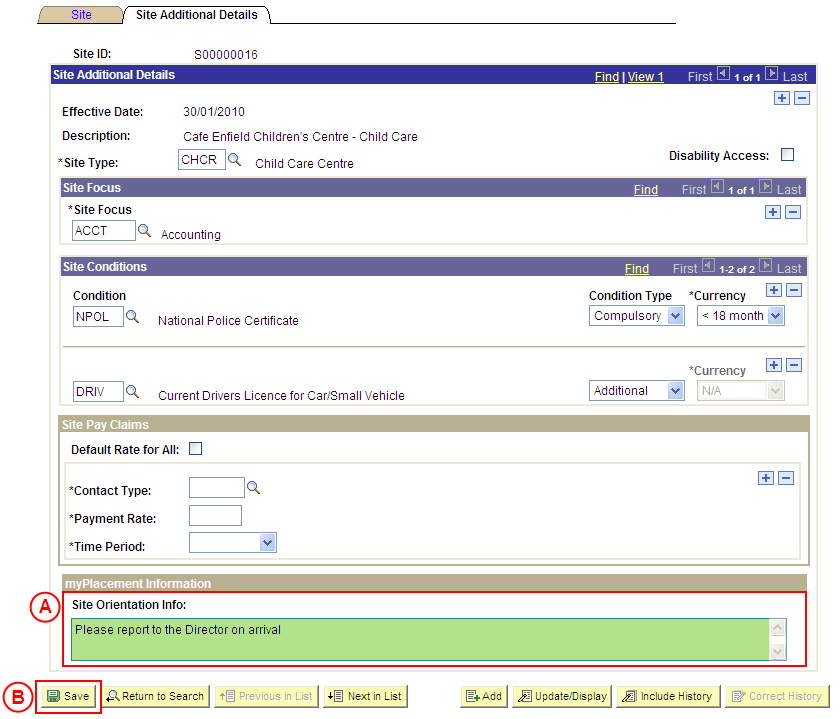
Site Orientation Info: Type the [updated Site Orientation Information]. |
|||
|
If further Site details need to be updated from the same effective date (eg. Conditions or Pay Claim details), update these details prior to saving the record. Refer to the relevant process instructions on the ‘Updating a Site’ process page if required. |
|||
Result: The updated information will apply to the Site as of the entered effective date. |
Update a Site's Pay Claim Details
Process Overview
Placement Administrators and Placement Officers have access to update Site records as required.
If the Site record needs to be updated due to a recent or future change, insert a new effective dated row to update the Site record as at the date of the change. If the Site record needs to be corrected rather than updated (ie. incorrect information has been entered for the Site), the record should be corrected by a Placement Administrator using ‘Correction’ mode (refer to the ‘Correcting a Site’ process page).
UniSA Custodian
The UniSA Custodian is the ‘owner’ of the Site. Do not update a Site’s details prior to liaising with the Site’s UniSA Custodian.
Step by Step Instructions
Note: This process provides instructions on how to update the Pay Claim Details for a Site. Instructions on updating a Site’s Focus, Conditions, Orientation Information or basic details are available from the ‘Updating a Site’ process page.
Step 1: Locate the Site and record the Effective Date
Question 1: Do Pay Claim details need to be deleted from the Site?
Question 2: Are the current Pay Claim Details flagged as ‘Default Rate for All’?
Step 2: De-select the ‘Default Rate for All’ checkbox
Step 3: Delete the Pay Claim Details from the Site
Question 3: Do Pay Claim Details need to be added to the Site?
Question 4: Will all Contact Types receive the same rate of pay?
Step 4: Record the new Pay Claim Details as ‘Default Rate for All’
Step 5: Record the new Pay Claim Details for the required Contact Type(s)
Step 6: Save the updates to the Site record in Medici
|
Application: Medici Navigation: Student Placements®Placement Providers®Sites |
|
|
|
Site ID: Type the relevant [Site ID]. Site Type: Type or select the relevant [Site Type]. Description: Type the relevant [Site description]. Organisation ID: Select the relevant [Organisation]. Result: The Sites: Site page is displayed. |
|
|
| Warning: The UniSA Custodian is the ‘owner’ of the Site. Do not update a Site’s details prior to liaising with the Site’s UniSA Custodian. |
|
Site Details
Result: The Sites: Site Additional Details page is displayed. |


|
<bQuestion 1: Do Pay Claim details need to be deleted from the Site? |
||
|
Question |
Yes |
No |
|
Do Pay Claim Details need to be deleted? |
Go to question 2. |
Go to question 3. |
|
Explanation: If Pay Claim Details need to be deleted from the Site, the next step of the process differs depending on whether the current Pay Claims Details are flagged as ‘Default Rate for All’ (question 2). If Pay Claim details do not need to be deleted from the Site, the next step is to determine if existing Pay Claim details need to be added to the Site record (question 3). |
||
|
Question 2: Are the current Pay Claim Details ‘Default Rate for All’? |
||
|
Question |
Yes |
No |
|
Are the current Pay Claim Details flagged as ‘Default Rate for All’? |
Go to step 2. |
Go to step 3. |
|
Explanation: If the current Pay Claim Details are flagged as ‘Default Rate for All’, the ‘Default Rate for All’ checkbox must be de-selected so that a tick is not displayed (step 2). If the current Pay Claim Details are not flagged as ‘Default Rate for All’, the individual Pay Claim Detail record(s) can be deleted as required (step 3). |
||
|
Application: Medici Navigation: The Sites: Site Additional Details page will already be displayed as a result of step 1 |
|
|
|
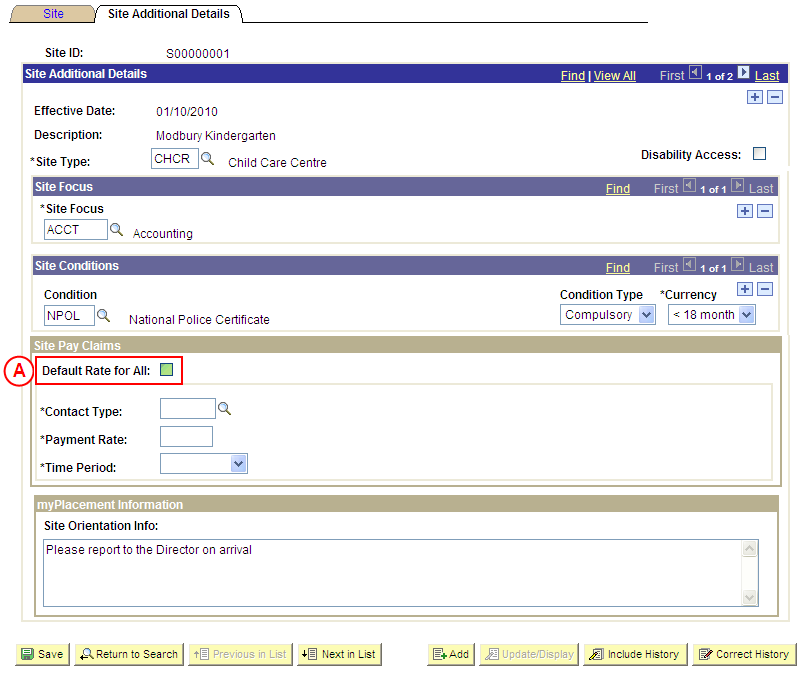
Site Pay Claims
Result: The existing Pay Claim Details are deleted, and the Contact Type field, Add a New Row button, and Delete Row button are displayed in the Site Pay Claims section. |
|
Go to question 3. |
|
Application: Medici Navigation: The Sites: Site Additional Details page will already be displayed as a result of performing step 1 |
 |
|
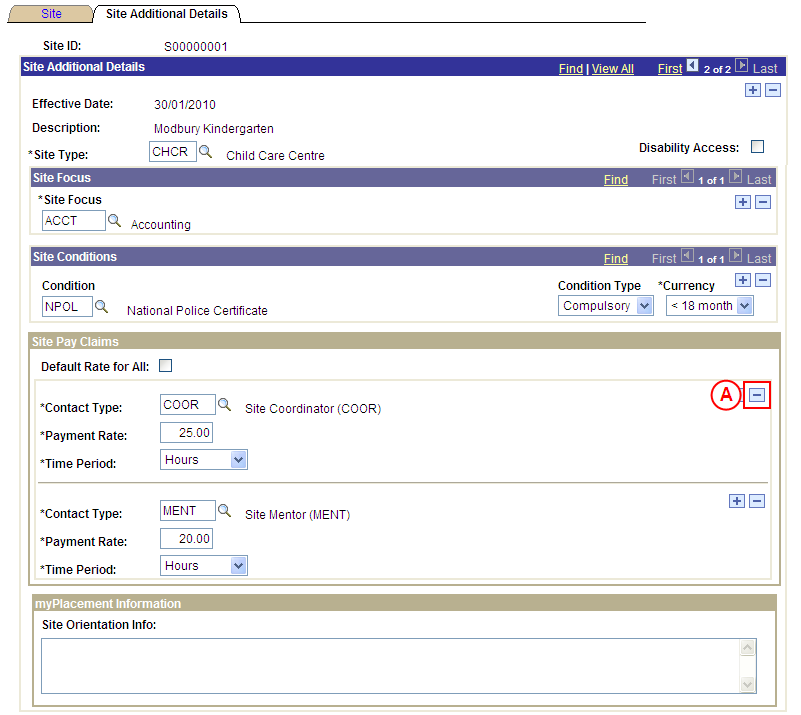
Site Pay Claims
Result: A message is displayed requesting confirmation the selected row is to be deleted, and advises the deletion will occur when the transaction is saved. |
|
|
Result: The selected Pay Claim record is deleted. |
|
Continue to repeat this step until all Pay Claim details that are no longer required have been deleted. |

|
Question 3: Do Pay Claim details need to be added to the Site? |
||
|
Question |
Yes |
No |
|
Do Pay Claim details need to be added to the Site? |
Go to question 4. |
Go to step 6. |
|
Explanation: If Pay Claim details need to be recorded for the Site, the next step is to determine if a default rate of pay will apply to all Contact Types at the Site (question 4). If Pay Claim details do not need to be recorded, the updates to the Site record can be saved (step 6). |
||
|
Question 4: Will all Contact Types receive the same rate of pay? |
||
|
Question |
Yes |
No |
|
Will all Contact Types receive the same rate of pay? |
Go to step 4. |
Go to step 5. |
|
Explanation: If all Contact Types will receive the same rate of pay, record the default rate of pay for all Contacts (step 4). If the Contact Types at the Site will receive a different rate of pay, record the different pay rates for the Contact Types (step 5). |
||
|
Step 4: Record the Pay Claim details as ‘Default Rate for All’ |
|
Application: Medici Navigation: The Sites: Site Additional Details page will already be displayed as a result of step 2 or step 3 |
|
|
|
Site Pay Claims
Payment Rate: Type the [default pay rate for all Contact Types]. Time Period: Select the appropriate value as follows: - Day (if the daily pay rate has been entered in the Payment Rate field). - Hours (if the hourly pay rate has been entered in the Payment Rate field). |
|
Go to step 6. |

|
Application: Medici Navigation: The Sites: Site Additional Details page will already be displayed as a result of performing step 2, 3, 4 or 5 |
|
|
|
If further Site details need to be updated from the same effective date (eg. Pay Details, name, phone, email, etc), update these details prior to saving the record. Refer to the relevant process instructions on the ‘Updating a Site’ process page if required. |
|
Result: The updated information will apply to the Site as of the entered effective date. |
Correct a Site's Conditions
Process Overview
Only Placement Administrators have access to correct a Site record. If you are not a Placement Administrator, send an email request to your Placement Administrator.
A Site record should only be corrected if incorrect information has been entered for the Site. If the Site record needs to be updated due to a recent or future change, insert a new effective dated row to update the Site as at the date of the change (refer to the ‘Updating a Site’ process page).
When a Site Condition is added, the Condition Type must be selected as follows:
- Compulsory: The Condition must be satisfied for the student to be eligible for Placement, and evidence to satisfy the Condition will be processed by UniSA Placement staff.
- Additional: The Condition is not considered ‘Compulsory’ by UniSA, and UniSA Placement staff will not be responsible for processing evidence to satisfy the Condition. The Site may consider the Condition to be mandatory and will be responsible for processing the student’s evidence; or it may be that students are encouraged to satisfy the Condition, however the University is unable to enforce the Condition.
UniSA Custodian
The UniSA Custodian is the ‘owner’ of the Site. Do not correct a Site’s details prior to liaising with the Site’s UniSA Custodian.
Step by Step Instructions
Note: This process provides instructions on how to correct the Conditions for a Site. Instructions on how to correct a Site’s Focus, Pay Details, Orientation Information or basic details (eg. Organisation, UniSA Custodian, Phone and Fax Numbers, etc) are available from the ‘Correcting a Site’ process page.
Step 1: Receive request to correct Site Conditions (if applicable)
Step 2: Locate the Site record in ‘Correction’ mode
Question 1: Does a Condition need to be added to the Site?
Step 3: Record the new Condition(s) for the Site
Question 2: Does a Condition need to be deleted from the Site?
Step 4: Delete the Condition(s) from the Site
Question 3: Does the Condition Type or Currency of an existing Condition need to be corrected?
Step 5: Correct the existing Condition Type and/or Currency
Step 6: Save the corrections to the Site record
Step 7: Send notification that the Site record has been corrected (if applicable)
|
Application: Medici Navigation: Student Placements®Placement Providers®Sites |
|
|
|
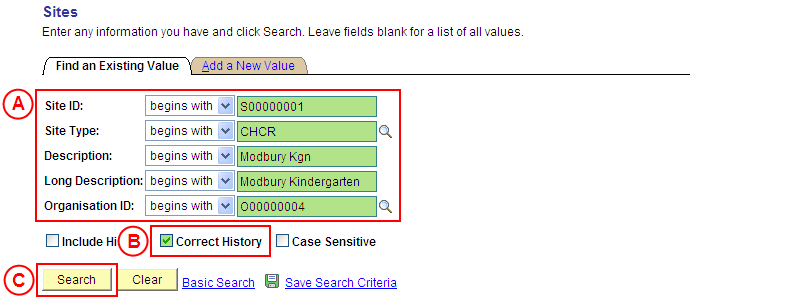
Site ID: Type the relevant [Site ID]. Site Type: Type or select the relevant [Site Type]. Description: Type the relevant [Site description]. Long Description: Type the relevant [Site long description]. Organisation ID: Select the relevant [Organisation].
Result: The Sites: Site page is displayed in ‘Correction’ mode. |
|
|
|
Warning: The Effective Date field should only be updated in ‘Correction’ mode if the effective date currently entered for the Site record is incorrect. ‘Correction’ mode is generally used to correct information within the other fields on the page ‘as at’ the existing effective date.
Warning: The UniSA Custodian is the ‘owner’ of the Site. Do not correct a Site’s details prior to liaising with the Site’s UniSA Custodian. Site Details
Result: The Sites: Site Additional Details page is displayed. |


|
Question |
Yes |
No |
|
Does a Condition need to be added to the Site? |
Go to step 3. |
Go to question 2. |
|
Explanation: If a Condition needs to be added to the Site, the new Site Condition(s) must be recorded (step 3). If a Condition does not need to be added to the Site, the process continues by determining if a Condition needs to be deleted from the Site (question 2). |
||
|
Application: Medici Navigation: The Sites: Site Additional Details page will already be displayed as a result of performing step 2 |
|
|
|
Site Conditions If there is an existing Condition record:
Condition Type: Select the appropriate value as follows: - Compulsory (if the Condition must be satisfied for the student to be eligible for Placement, and UniSA staff will be responsible for processing the student’s evidence to satisfy the Condtion). - Additional (the Condition is not considered ‘Compulsory’ by UniSA, and UniSA staff will not be responsible for processing evidence to satisfy the Condition (please note an ‘Additional’ Condition may still be considered mandatory by the Site and the Site will be responsible for processing the student’s evidence). Currency: Select the [maximum age of the student’s evidence to satisfy the Condition] (if applicable). |
|
Continue to repeat this step until all required Site Conditions have been recorded. |
|
Question 2: Does a Condition need to be deleted from the Site? |
||
|
Question |
Yes |
No |
|
Does a Condition need to be deleted from the Site? |
Go to step 4. |
Go to question 3. |
|
Explanation: If a Condition needs to be deleted from the Site, delete the Condition record(s) that are no longer required (step 4). If a Condition does not need to be deleted from the Site, the process continues by determining if the Condition Type and/or Currency of an existing Condition needs to be corrected (question 3). |
||
|
Application: Medici Navigation: The Sites: Site Additional Details page will already be displayed as a result of performing step 2 |
|
|
|
Site Conditions
Result: A message is displayed requesting confirmation the selected row is to be deleted, and advises the deletion will occur when the transaction is saved. |
|
|
Result: The selected Condition is deleted. |
|
Continue to repeat this step until all Conditions that are no longer required have been deleted. |

|
Question 3: Does the Condition Type or Currency of an existing Condition need to be corrected? |
||
|
Question |
Yes |
No |
|
Does the Condition Type and/or Currency of an existing Condition need to be corrected? |
Go to step 5. |
Go to step 6. |
|
Explanation: If the Condition Type and/or Currency of an existing Condition needs to be corrected, update the Condition details as required (step 5). If the Condition Type and/or Currency of an existing Condition does not need to be corrected, the next step is to perform any other required corrections and then save the record (step 6). |
||
|
Application: Medici Navigation: The Organisations: Additional Details page will already be displayed as a result of performing step 2 |
|
|
|
Site Conditions
- Compulsory (if the Condition must be satisfied for the student to be eligible for Placement, and UniSA staff will be responsible for processing the student’s evidence to satisfy the Condtion). - Additional (the Condition is not considered ‘Compulsory’ by UniSA, and UniSA staff will not be responsible for processing evidence to satisfy the Condition (please note an ‘Additional’ Condition may still be considered mandatory by the Site, and the Site will be responsible for processing the student’s evidence). |
|
Application: Medici Navigation: The Sites: Additional Details page will already be displayed as a result of performing step 3, 4 or 5 |
|
|
|
If further Site details need to be corrected (eg. Pay Details, name, phone, email, etc), correct these details prior to saving the record. Refer to the relevant process instructions on the ‘Correcting a Site’ process page if required. |
Result: The corrected information will apply to the Site as of the entered effective date. |

Correct a Site's Orientation Information
Process Overview
Only Placement Administrators have access to correct a Site record. If you are not a Placement Administrator, send an email request to your Placement Administrator.
A Site record should only be corrected if incorrect information has been entered for the Site. If the Site record needs to be updated due to a recent or future change, insert a new effective dated row to update the Site as at the date of the change (refer to the ‘Updating a Site’ process page).
UniSA Custodian
The UniSA Custodian is the ‘owner’ of the Site. Do not correct a Site’s details prior to liaising with the Site’s UniSA Custodian.
Step by Step Instructions
Note: This process provides instructions on how to correct a Site’s Orientation Information. Instructions on how to correct a Site’s Focus, Conditions, Pay Claim Details, or basic details (eg. Organisation, UniSA Custodian, Phone and Fax Numbers, etc) are available from the ‘Correcting a Site’ process page.
Step 1: Receive request to correct a Site’s Orientation Information (if applicable)
Step 2: Correct the Site Orientation Information in Student Placements in Medici
Step 3: Send notification that the Site record has been corrected (if applicable)


Correct a Site's Details
Only Placement Administrators have access to correct a Site record. If you are not a Placement Administrator, send an email request to your Placement Administrator.
A Site record should only be corrected if incorrect information has been entered for the Site. If the Site record needs to be updated due to a recent or future change, insert a new effective dated row to update the Site as at the date of the change (refer to the ‘Updating a Site’ process page).
UniSA Custodian
The UniSA Custodian is the ‘owner’ of the Site. Do not correct a Site’s details prior to liaising with the Site’s UniSA Custodian.
Step by Step Instructions
Note: This process provides instructions on how to correct a Site’s basic details (eg. Organisation, UniSA Custodian, Phone and Fax Numbers, etc). Instructions on how to correct a Site’s Focus, Conditions, Orientation Information, or Pay Claim Details are available from the ‘Correcting a Site’ process page.
Step 1: Receive request to correct a Site’s details (if applicable)
Step 2: Correct the Site’s details in Student Placements in Medici
Step 3: Send notification that the Site record has been corrected (if applicable)
Correct a Site's Focus
Process Overview
Only Placement Administrators have access to correct a Site record. If you are not a Placement Administrator, send an email request to your Placement Administrator.
A Site record should only be corrected if incorrect information has been entered for the Site. If the Site record needs to be updated due to a recent or future change, insert a new effective dated row to update the Site as at the date of the change (refer to the ‘Updating a Site’ process page).
UniSA Custodian
The UniSA Custodian is the ‘owner’ of the Site. Do not correct a Site’s details prior to liaising with the Site’s UniSA Custodian.
Step by Step Instructions
Note: This process provides instructions on how to correct the Site Focus for a Site. Instructions on how to correct a Site’s Pay Details, Conditions, Orientation Information or basic details (eg. Organisation, UniSA Custodian, Phone and Fax Numbers, etc) are available from the ‘Correcting a Site’ process page.
Step 1: Receive request to correct Site Focus (if applicable)
Step 2: Locate the Site record in ‘Correction’ mode
Question 1: Does a Site Focus need to be added to the Site?
Step 3: Record the new Focus for the Site
Question 2: Does a Site Focus need to be deleted from the Site?
Step 4: Delete the Site Focus from the Site
Step 5: Save the corrections to the Site record
Step 6: Send notification that the Site record has been corrected (if applicable)
|
Application: Medici Navigation: Student Placements®Placement Providers®Sites |
 |
|
Site ID: Type the relevant [Site ID]. Site Type: Type or select the relevant [Site Type]. Description: Type the relevant [Site description]. Long Description: Type the relevant [Site long description]. Organisation ID: Select the relevant [Organisation].
Result: The Sites: Site page is displayed in ‘Correction’ mode. |
|
|
|
Warning: The Effective Date field should only be updated in ‘Correction’ mode if the effective date currently entered for the Site record is incorrect. ‘Correction’ mode is generally used to correct information within the other fields on the page ‘as at’ the existing effective date. Warning: The UniSA Custodian is the ‘owner’ of the Site. Do not correct a Site’s details prior to liaising with the Site’s UniSA Custodian. Site Details
Result: The Sites: Site Additional Details page is displayed. |
|
Question |
Yes |
No |
|
Does a Site Focus need to be added to the Site? |
Go to step 3. |
Go to question 2. |
|
Explanation: If a Site Focus needs to be added to the Site, the new Site Focus must be recorded (step 3). If a Site Focus does not need to be added to the Site, the process continues by determining if a Site Focus needs to be deleted from the Site (question 2). |
||
|
Application: Medici Navigation: The Sites: Site Additional Details page will already be displayed as a result of performing step 2 |
|
|
|
Site Focus If there is an existing Site Focus record:
|
|
Continue to repeat this step until all required Site Focus offered by the Site have been recorded. |
|
Question 2: Does a Site Focus need to be deleted from the Site? |
||
|
Question |
Yes |
No |
|
Does a Site Focus need to be deleted from the Site? |
Go to step 4. |
Go to step 5. |
|
Explanation: If a Site Focus needs to be deleted from the Site, delete the Focus record(s) that are no longer required If a Site Focus does not need to be deleted from the Site, the update(s) to the Site record can be saved in Medici (step 5). |
||
|
Application: Medici Navigation: The Sites: Site Additional Details page will already be displayed as a result of performing step 2 |
|
|
|
Site Focus
Result: A message is displayed requesting confirmation the selected row is to be deleted, and advises the deletion will occur when the transaction is saved. |
|
|
|
Result: The selected Site Focus is deleted. |
|
Continue to repeat this step until all Site Focus that are no longer required have been deleted. |
|
Application: Medici Navigation: The Sites: Additional Details page will already be displayed as a result of performing step 3 or 4 |
|
|
|
If further Site details need to be corrected (eg. Pay Claim Details, Conditions, email, etc), correct these details prior to saving the record. Refer to the relevant process instructions on the ‘Correcting a Site’ process page if required. |
Result: The corrected information will apply to the Site as of the entered effective date. |
Correct a Site's Pay Claim Details
Process Overview
Only Placement Administrators have access to correct a Site record. If you are not a Placement Administrator, send an email request to your Placement Administrator.
A Site record should only be corrected if incorrect information has been entered for the Site. If the Site record needs to be updated due to a recent or future change, insert a new effective dated row to update the Site as at the date of the change (refer to the ‘Updating a Site’ process page).
UniSA Custodian
The UniSA Custodian is the ‘owner’ of the Site. Do not correct a Site’s details prior to liaising with the Site’s UniSA Custodian.
Step by Step Instructions
Note: This process provides instructions on how to correct a Site’s Pay Claim Details. Instructions on how to correct a Site’s Focus, Conditions, Orientation Information, or basic details (eg. Organisation, UniSA Custodian, Phone and Fax Numbers, etc) are available from the ‘Correcting a Site’ process page.
Step 1: Receive request to correct a Site’s Pay Claim Details (if applicable)
Step 2: Locate the Site record in ‘Correction’ mode
Question 1: Does the Payment Rate and/or Time Period require correction?
Step 3: Correct the Payment Rate and/or Time Period
Question 2: Do Pay Claim details need to be deleted from the Site?
Question 3: Are the current Pay Claim Details flagged as ‘Default Rate for All’?
Step 4: De-select the ‘Default Rate for All’ checkbox
Step 5: Delete the Pay Claim Details from the Site
Question 4: Do Pay Claim Details need to be added to the Site?
Question 5: Will all Contact Types receive the same rate of pay?
Step 6: Record the new Pay Claim Details as ‘Default Rate for All’
Step 7: Record the new Pay Claim Details for the relevant Contact Type(s)
Step 8: Save the corrections to the Site record in Medici
Step 9: Send notification that the Site record has been corrected (if applicable)
|
Application: Medici Navigation: Student Placements®Placement Providers®Sites |
|
|
|
Site ID: Type the relevant [Site ID]. Site Type: Type or select the relevant [Site Type]. Description: Type the relevant [Site description]. Long Description: Type the relevant [Site long description]. Organisation ID: Select the relevant [Organisation].
Result: The Sites: Site page is displayed in ‘Correction’ mode. |
|
|
|
Warning: The Effective Date field should only be updated in ‘Correction’ mode if the effective date currently entered for the Site record is incorrect. ‘Correction’ mode is generally used to correct information within the other fields on the page ‘as at’ the existing effective date.
Warning: The UniSA Custodian is the ‘owner’ of the Site. Do not correct a Site’s details prior to liaising with the Site’s UniSA Custodian. Site Details
Result: The Sites: Site Additional Details page is displayed. |


|
Question 1: Does the Payment Rate or Time Period require correction? |
||
|
Question |
Yes |
No |
|
Does the Payment Rate or Time Period of existing Pay Claim Details need to be corrected? |
Go to step 3. |
Go to question 2. |
|
Explanation: If the Payment Rate and/or Time Period for existing Pay Claim Details need to be corrected, type or select the correct Payment Rate/Time Period as required (step 3). If the Payment Rate and/or Time Period for existing Pay Claim Details do not need to be corrected, the next step is to determine if existing Pay Claim Details need to be deleted from the Site (question 2). |
||
|
Application: Medici Navigation: The Sites: Site Additional Details page will already be displayed as a result of step 2 |
|
|
|
Site Pay Claims
- Day (if the daily pay rate has been entered in the Payment Rate field). - Hours (if the hourly pay rate has been entered in the Payment Rate field). |

|
Question 2: Do Pay Claim details need to be deleted from the Site? |
||
|
Question |
Yes |
No |
|
Do Pay Claim Details need to be deleted? |
Go to question 3. |
Go to question 4. |
|
Explanation: If Pay Claim Details need to be deleted from the Site, the next step of the process differs depending on whether the current Pay Claims Details are flagged as ‘Default Rate for All’ (question 3). If Pay Claim details do not need to be deleted from the Site, the next step is to determine if existing Pay Claim details need to be added to the Site record (question 4). |
||
|
Question 3: Are the current Pay Claim Details ‘Default Rate for All’? |
||
|
Question |
Yes |
No |
|
Are the current Pay Claim Details flagged as ‘Default Rate for All’? |
Go to step 4. |
Go to step 5. |
|
Explanation: If the current Pay Claim Details are flagged as ‘Default Rate for All’, the ‘Default Rate for All’ checkbox must be de-selected so that a tick is not displayed (step 4). If the current Pay Claim Details are not flagged as ‘Default Rate for All’, the individual Pay Claim Detail record(s) can be deleted as required (step 5). |
||
|
Application: Medici Navigation: The Sites: Site Additional Details page will already be displayed as a result of step 2 |
|
|
|
Site Pay Claims
Result: The existing Pay Claim Details are deleted, and the Contact Type field, Add a New Row button, and Delete Row button are displayed in the Site Pay Claims section. |
|
Go to question 4. |
|
Application: Medici Navigation: The Sites: Site Additional Details page will already be displayed as a result of performing step 2 |
|
|
|
Site Pay Claims
Result: A message is displayed requesting confirmation the selected row is to be deleted, and advises the deletion will occur when the transaction is saved. |
|
|
Result: The selected Pay Claim record is deleted. |
|
Continue to repeat this step until all Pay Claim details that are no longer required have been deleted. |

|
Question 4: Do Pay Claim details need to be recorded to the Site? |
||
|
Question |
Yes |
No |
|
Do Pay Claim details need to be added to the Site? |
Go to question 5. |
Go to step 8. |
|
Explanation: If Pay Claim details need to be recorded for the Site, the next step is to determine if a default rate of pay will apply to all Contact Types at the Site (question 5). If Pay Claim details do not need to be recorded, the updates to the Site record can be saved (step 8). |
||
|
Question 5: Will all Contact Types receive the same rate of pay? |
||
|
Question |
Yes |
No |
|
Will all Contact Types receive the same rate of pay? |
Go to step 6. |
Go to step 7. |
|
Explanation: If all Contact Types will receive the same rate of pay, record the default rate of pay for all Contacts (step 6). If the Contact Types at the Site will receive a different rate of pay, record the different pay rates for the Contact Types (step 7). |
||
|
Step 6: Record the Pay Claim details as ‘Default Rate for All’ |
|
Application: Medici Navigation: The Sites: Site Additional Details page will already be displayed as a result of step 2 |
|
|
|
Site Pay Claims
Payment Rate: Type the [default pay rate for all Contact Types]. Time Period: Select the appropriate value as follows: - Day (if the daily pay rate has been entered in the Payment Rate field). - Hours (if the hourly pay rate has been entered in the Payment Rate field). |
|
Go to step 8. |
|
Application: Medici Navigation: The Sites: Site Additional Details page will already be displayed as a result of performing step 3, 4, 5, 6 or 7 |
|
|
|
If further Site details need to be corrected (eg. Pay Claim Details, Conditions, Site Focus, etc), correct these details prior to saving the record. Refer to the relevant process instructions on the ‘Correcting a Site’ process page if required. |
Result: The corrected information will apply to the Site as of the entered effective date. |
Process Overview
Only Placement Administrators have access to correct a Site record. If you are not a Placement Administrator, send an email request to your Placement Administrator.
A Site record should only be corrected if incorrect information has been entered for the Site. If the Site record needs to be updated due to a recent or future change, insert a new effective dated row to update the Site as at the date of the change (refer to the ‘Updating a Site’ process page).
UniSA Custodian
The UniSA Custodian is the ‘owner’ of the Site. Do not correct a Site’s details prior to liaising with the Site’s UniSA Custodian.
Step by Step Instructions
Note: This process provides instructions on how to correct a Site’s Pay Claim Details. Instructions on how to correct a Site’s Focus, Conditions, Orientation Information, or basic details (eg. Organisation, UniSA Custodian, Phone and Fax Numbers, etc) are available from the ‘Correcting a Site’ process page.
|
|
Step 1: Receive request to correct a Site’s Pay Claim Details (if applicable)
Step 2: Locate the Site record in ‘Correction’ mode
Question 1: Does the Payment Rate and/or Time Period require correction?
Step 3: Correct the Payment Rate and/or Time Period
Question 2: Do Pay Claim details need to be deleted from the Site?
Question 3: Are the current Pay Claim Details flagged as ‘Default Rate for All’?
Step 4: De-select the ‘Default Rate for All’ checkbox
Step 5: Delete the Pay Claim Details from the Site
Question 4: Do Pay Claim Details need to be added to the Site?
Question 5: Will all Contact Types receive the same rate of pay?
Step 6: Record the new Pay Claim Details as ‘Default Rate for All’
Step 7: Record the new Pay Claim Details for the relevant Contact Type(s)
Step 8: Save the corrections to the Site record in Medici
Step 9: Send notification that the Site record has been corrected (if applicable)
|
Application: Medici Navigation: Student Placements®Placement Providers®Sites |
|||
Site ID: Type the relevant [Site ID]. Site Type: Type or select the relevant [Site Type]. Description: Type the relevant [Site description]. Long Description: Type the relevant [Site long description]. Organisation ID: Select the relevant [Organisation].
Select the Search button (or press Enter). Result: The Sites: Site page is displayed in ‘Correction’ mode. |
|||
Warning: The UniSA Custodian is the ‘owner’ of the Site. Do not correct a Site’s details prior to liaising with the Site’s UniSA Custodian.
Effective Date: If required, type or select the [correct date for the Site].
Result: The Sites: Site Additional Details page is displayed. |
|
Question 1: Does the Payment Rate or Time Period require correction? |
||
|
Question |
Yes |
No |
|
Does the Payment Rate or Time Period of existing Pay Claim Details need to be corrected? |
Go to step 3. |
Go to question 2. |
|
Explanation: If the Payment Rate and/or Time Period for existing Pay Claim Details need to be corrected, type or select the correct Payment Rate/Time Period as required (step 3). If the Payment Rate and/or Time Period for existing Pay Claim Details do not need to be corrected, the next step is to determine if existing Pay Claim Details need to be deleted from the Site (question 2). |
||
|
Application: Medici Navigation: The Sites: Site Additional Details page will already be displayed as a result of step 2 |
||
Payment Rate: Type the [correct default pay rate for the Contact Type(s)].
- Day (if the daily pay rate has been entered in the Payment Rate field). - Hours (if the hourly pay rate has been entered in the Payment Rate field). |
|
Question 2: Do Pay Claim details need to be deleted from the Site? |
||
|
Question |
Yes |
No |
|
Do Pay Claim Details need to be deleted? |
Go to question 3. |
Go to question 4. |
|
Explanation: If Pay Claim Details need to be deleted from the Site, the next step of the process differs depending on whether the current Pay Claims Details are flagged as ‘Default Rate for All’ (question 3). If Pay Claim details do not need to be deleted from the Site, the next step is to determine if existing Pay Claim details need to be added to the Site record (question 4). |
||
|
Question 3: Are the current Pay Claim Details ‘Default Rate for All’? |
||
|
Question |
Yes |
No |
|
Are the current Pay Claim Details flagged as ‘Default Rate for All’? |
Go to step 4. |
Go to step 5. |
|
Explanation: If the current Pay Claim Details are flagged as ‘Default Rate for All’, the ‘Default Rate for All’ checkbox must be de-selected so that a tick (ü) is not displayed (step 4). If the current Pay Claim Details are not flagged as ‘Default Rate for All’, the individual Pay Claim Detail record(s) can be deleted as required (step 5). |
||
|
Application: Medici Navigation: The Sites: Site Additional Details page will already be displayed as a result of step 2 |
|
Default Rate for All: De-select the Default Rate for All checkbox so that a tick (ü) is not displayed. Result: The existing Pay Claim Details are deleted, and the Contact Type field, Add a New Row button, and Delete Row button are displayed in the Site Pay Claims section. |
|
|
Go to question 4. |
|
Application: Medici Navigation: The Sites: Site Additional Details page will already be displayed as a result of performing step 2 |
|
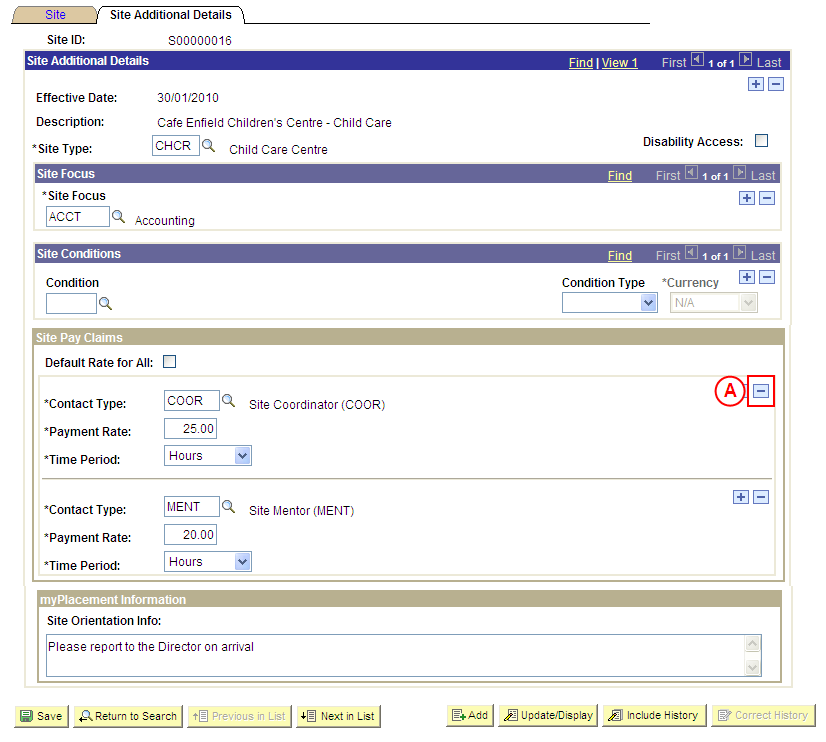
In the Site Pay Claims section, select the Delete Row button ( ) adjacent to the Pay Claim record to be deleted. Result: A message is displayed requesting confirmation the selected row is to be deleted, and advises the deletion will occur when the transaction is saved. |
|
Result: The selected Pay Claim record is deleted. |
|
|
Continue to repeat this step until all Pay Claim details that are no longer required have been deleted. |
|
Question 4: Do Pay Claim details need to be recorded to the Site? |
||
|
Question |
Yes |
No |
|
Do Pay Claim details need to be added to the Site? |
Go to question 5. |
Go to step 8. |
|
Explanation: If Pay Claim details need to be recorded for the Site, the next step is to determine if a default rate of pay will apply to all Contact Types at the Site (question 5). If Pay Claim details do not need to be recorded, the updates to the Site record can be saved (step 8). |
||
|
Question 5: Will all Contact Types receive the same rate of pay? |
||
|
Question |
Yes |
No |
|
Will all Contact Types receive the same rate of pay? |
Go to step 6. |
Go to step 7. |
|
Explanation: If all Contact Types will receive the same rate of pay, record the default rate of pay for all Contacts (step 6). If the Contact Types at the Site will receive a different rate of pay, record the different pay rates for the Contact Types (step 7). |
||
|
Step 6: Record the Pay Claim details as ‘Default Rate for All’ |
|
|
Application: Medici Navigation: The Sites: Site Additional Details page will already be displayed as a result of step 2 |
|
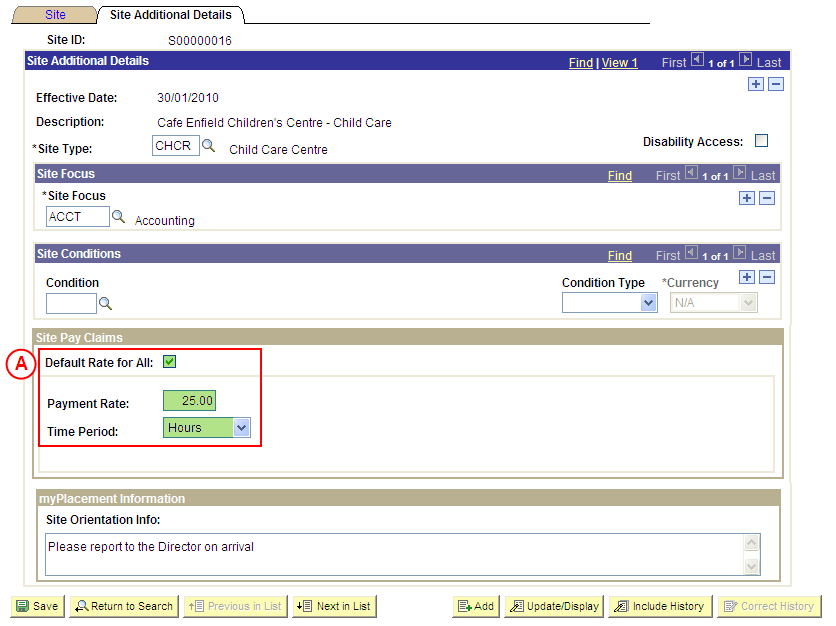
Default Rate for All: Select the Default Rate for All checkbox so that a tick (ü) is displayed. Payment Rate: Type the [default pay rate for all Contact Types]. Time Period: Select the appropriate value as follows: - Day (if the daily pay rate has been entered in the Payment Rate field). - Hours (if the hourly pay rate has been entered in the Payment Rate field). |
|
|
Go to step 8. |
|
Application: Medici Navigation: The Sites: Site Additional Details page will already be displayed as a result of performing step 3, 4, 5, 6 or 7 |
|
|
If further Site details need to be corrected (eg. Pay Claim Details, Conditions, Site Focus, etc), correct these details prior to saving the record. Refer to the relevant process instructions on the ‘Correcting a Site’ process page if required. |
|
Result: The corrected information will apply to the Site as of the entered effective date. |
|
Step 9: Send notification that the Site record has been corrected (if applicable) |
|
|
Action |
Details |
|
Advise the Placement Officer that the Site record has been corrected in Medici (if applicable). |
Send a ‘Reply to All’ response to the email request received in step 1 of this process, and advise that the Site record has been corrected using the details supplied in the request. |
View a Site's Details
Process Overview
Placement Officers and Placement Administrators are able to view the following Site details:
- Contacts and contact details (Phone, Fax, Email, Web Address)
- UniSA Custodian of the Site
- Site Comments
- Placement Agreements
- Site Focus
- Site Conditions
- Site Pay Claim Details
- Site Orientation Information
The Sites page also provides direct links to the PMR Inquiry page and the Provider Notification Inquiry page. These links allow Placement Officers and Placement Administrators to open a second Medici session at the Search page for the selected function (PMR Inquiry Search page or Provider Notification Inquiry Search page).
Step by Step Instructions
Step 1: Locate the Site record in Medici
Step 2: View the Site’s phone and fax numbers, and location and electronic addresses
Step 3: View the Site’s Primary Contact
Step 4: View the Site’s UniSA Custodian
Step 5: View the Site’s Comments
Step 6: View the Site’s Contacts
Step 7: View the Site’s Placement Agreements
Step 8: View the Site’s Focus / Foci
Step 9: View the Site’s Conditions
Step 10: View the Site’s Pay Claim Details
Step 11: View the Site’s Orientation Information
|
Application: Medici Navigation: Student Placements®Placement Providers®Sites |
|
|
|
Site ID: Type the relevant [Site ID]. Site Type: Type or select the relevant [Site Type]. Description: Type the relevant [Site description]. Long Description: Type the relevant [Site long description]. Organisation ID: Select the relevant [Organisation]. Result: The Sites: Site page is displayed. |

|
Step 2: View the Site’s phone and fax numbers, and electronic addresses |
|
Application: Medici Navigation: The Sites: Site page will already be displayed as a result of performing step 1 |
|
|
|
Site Details
|
|
Application: Medici Navigation: The Sites: Site page will already be displayed as a result of performing step 1 |
|
|
|
Site Details
|
|
Application: Medici Navigation: The Sites: Site page will already be displayed as a result of performing step 1 |
|
|
|
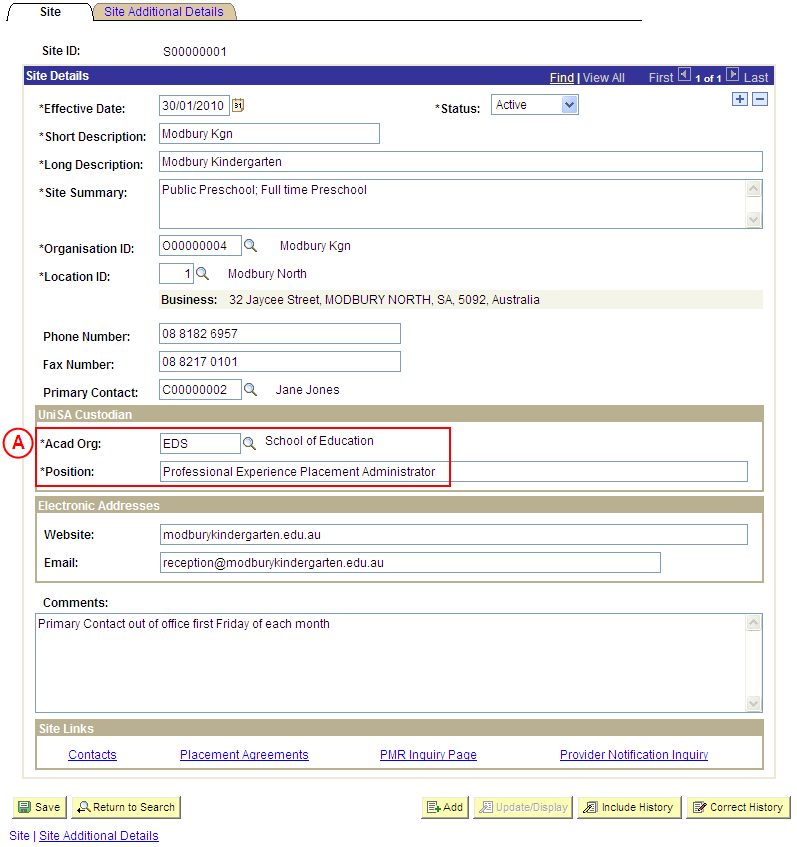
UniSA Custodian
|
|
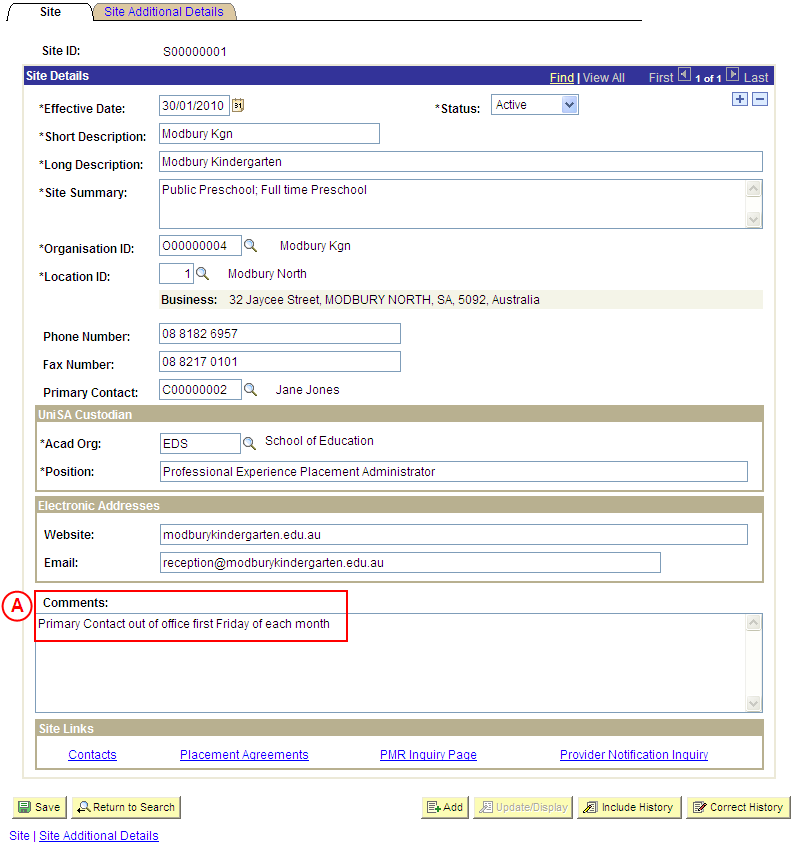
Step 5: View the Site’s Comments |
|
Application: Medici Navigation: The Sites: Site page will already be displayed as a result of performing step 1 |
|
|
|
|
|
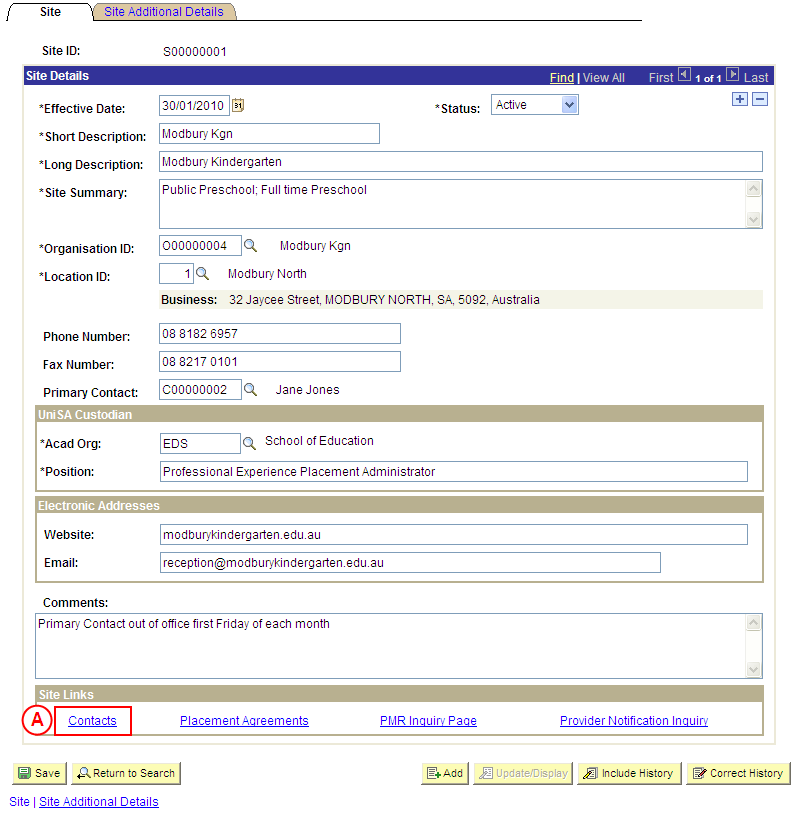
Application: Medici Navigation: The Sites: Site page will already be displayed as a result of performing step 1 |
|
|
|
Site Links
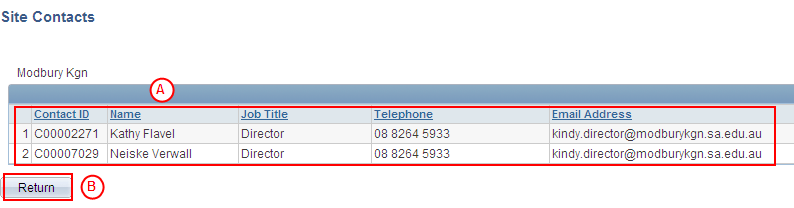
Result: The Site Contacts page is displayed. |
|
|
|
When you have finished viewing the Site’s Contacts: Result: The Sites: Site page is displayed again. |
|
Application: Medici Navigation: The Sites: Site page will already be displayed as a result of performing step 1 |
|
|
|
Site Links
Result: The Site Placement Agreements page is displayed. |
|
|
|
Result: The Sites: Site page is displayed again. |

|
Application: Medici Navigation: The Sites: Site page will already be displayed as a result of performing step 1 |
|
|
|
Result: The Sites: Site Additional Details page is displayed. |
|
|
|
Site Focus
|
|
Application: Medici Navigation: If the Sites: Site Additional Details page is not already displayed as a result of performing step 8, select the Site Additional Details tab or link |
|
|
|
Site Conditions
|
|
Application: Medici Navigation: If the Sites: Site Additional Details page is not already displayed as a result of performing step 8, select the Site Additional Details tab or link |
|
|
|
Site Pay Claims
|
|
Application: Medici Navigation: If the Sites: Site Additional Details page is not already displayed as a result of performing step 8, select the Site Additional Details tab or link |
|
|
|
myPlacement Information
|