Placement Processes
| Site: | learnonline |
| Course: | Student Placement System Help |
| Book: | Placement Processes |
| Printed by: | Guest user |
| Date: | Monday, 4 May 2026, 6:34 PM |
Description
Placement Processes
Table of contents
- Configuring a Computer to Open Unformatted (Log) Files in WordPad by Default
- Running the Student Pool File Load Process
- Running the Placement Offer Import Process and Purging Placement Offer Suspense
- Running the Batch Create Placement Management Records Process
- Running the Eligibility Check Process
- Running the Placement Auto-Allocation Process
- Running the Placement Management Record Confirmation Process
- Running the PMR Details Report
Configuring a Computer to Open Unformatted (Log) Files in WordPad by Default
Process Overview
The student placement processes in Medici will return various process output reports that are unformatted.
To ensure these reports are displayed in an easy to view and interpret format, it is suggested users of Medici configure their PC to open unformatted files (.log) in WordPad by default.
Once a computer has been configured to open Log files in WordPad it will retain these setting (there is no need to repeat these configuration steps prior to each running of a Student Placement process).
You will only need to repeat this configuration if you receive a new computer or move to a desk where the computer has not previously been configured to open Log files in WordPad.
Warning: You will not be able to perform this configuration if you do not have ‘Administrator Rights’ for your computer. If you do not have Administrator Rights contact the IT Helpdesk or your local IT support.
Step by Step Instructions
Step 1: Configure Log (.log) files to open in WordPad by default
|
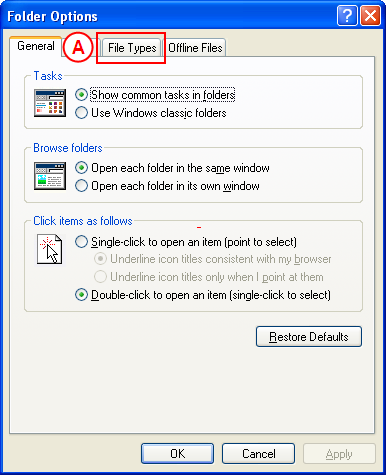
Application: My Computer (Start®My Computer) Navigation: Tools®Folder Options |
|
|
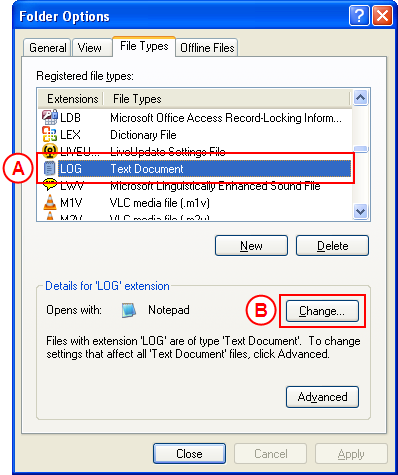
Result: The Folder Options: File Types tab is displayed. |
|
|
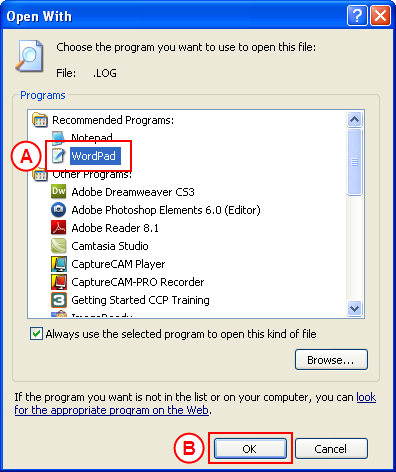
|
Result: The Open With dialogue box is displayed. Warning: You will not be able to select the Change button if you do not have ‘Administrator Rights’ for your computer. If you do not have Administrator Rights contact the IT Helpdesk or your local IT support. |
|
|
|
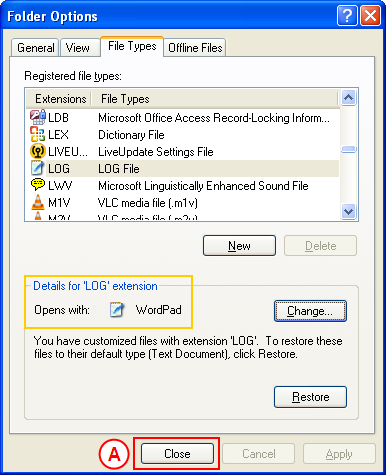
Result: The Open With dialogue box is closed, and the Details for ‘LOG’ Extension section of the Folder Options: File Types tab now displays ‘Opens With: WordPad’. |
|
|
|
Result: The Folder Options dialogue box is closed, and Explorer is configured to open LOG files in WordPad. |
Running the Student Pool File Load Process
Go straight to Step by Step Instructions
Process Overview
There are two methods available to load student records into a Student Pool:
- Students can be manually added to the Student Pool (via the Student Pool page in the Placement Administration menu of Medici)
- Students can be loaded in bulk from an input file (via the Student Pool Import page in the Placement Processes menu of Medici)
These instructions detail how to load student records in bulk from an input file: the ‘Student Pool Import’ process.
Note: It is suggested users configure their PC to open unformatted files in WordPad by default (this ensures process reports are displayed in an easy to view and interpret format). For instructions on how to configure a PC to open unformatted files in WordPad, please refer to the ‘Open Unformatted Files in WordPad’ process instructions.
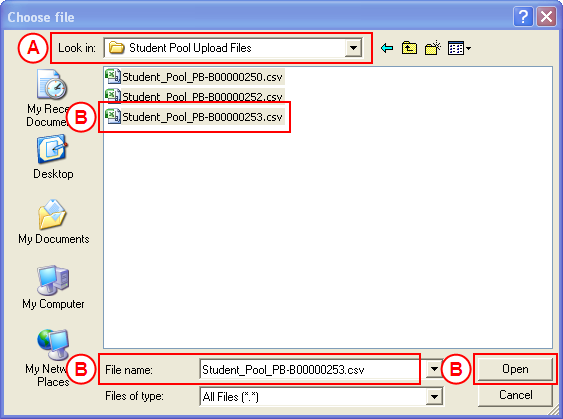
To upload students to a Student Pool, the list of relevant Student IDs must first be saved as a CSV (Comma Delimited - .csv) file. The list of students can be extracted from a Program, Course or Class list.
Warning: The spreadsheet must not contain a header row, and the list of students must be entered in Column A.
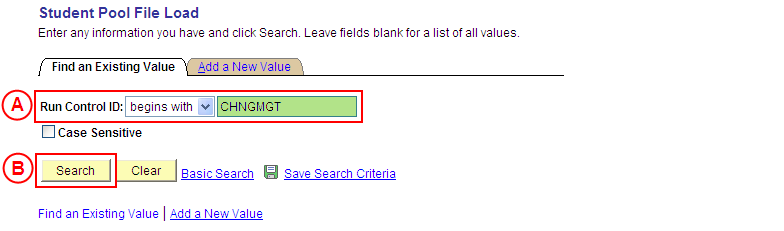
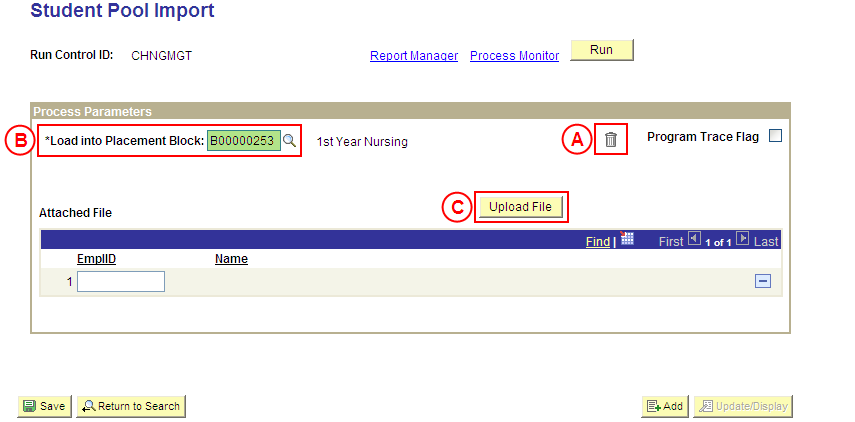
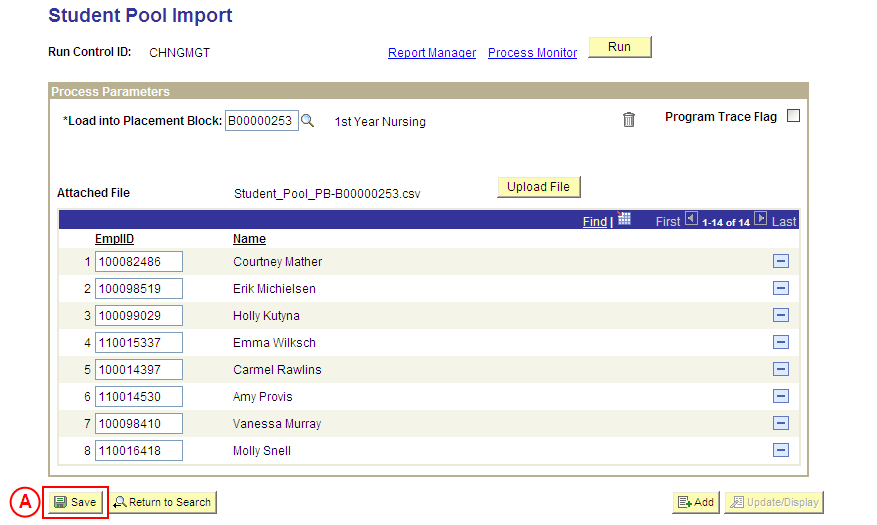
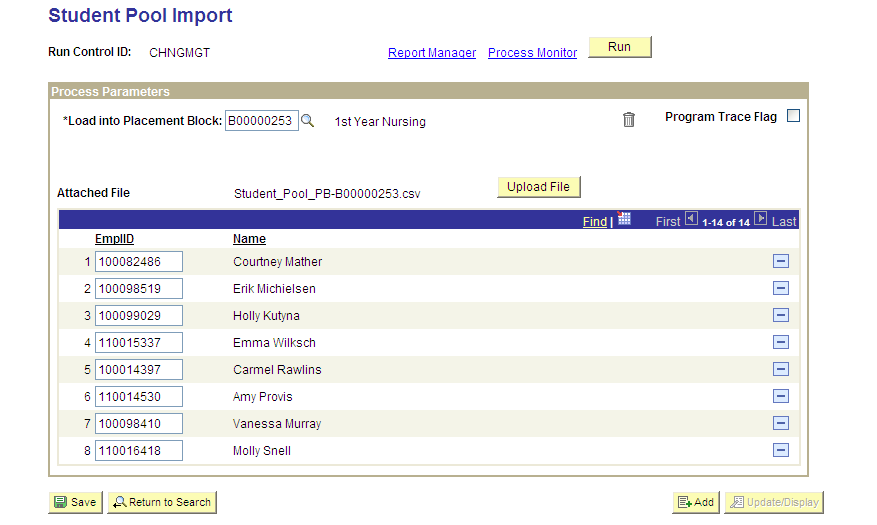
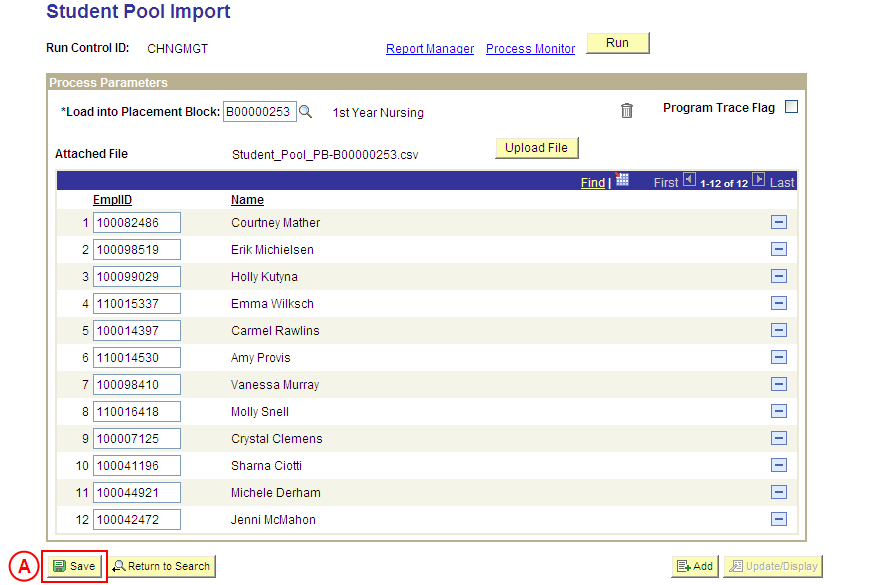
When preparing to run the Student Pool Import, the relevant Placement Block and input file is first selected in the Student Pool Import page in Medici.
If the list of students was manually entered into the upload file, inaccurate data may lead to one or more possible errors:
- Invalid Student ID (Student ID does not exist in Medici)
- Duplicate Student ID (Student ID is listed twice in the upload file)
Invalid Student ID
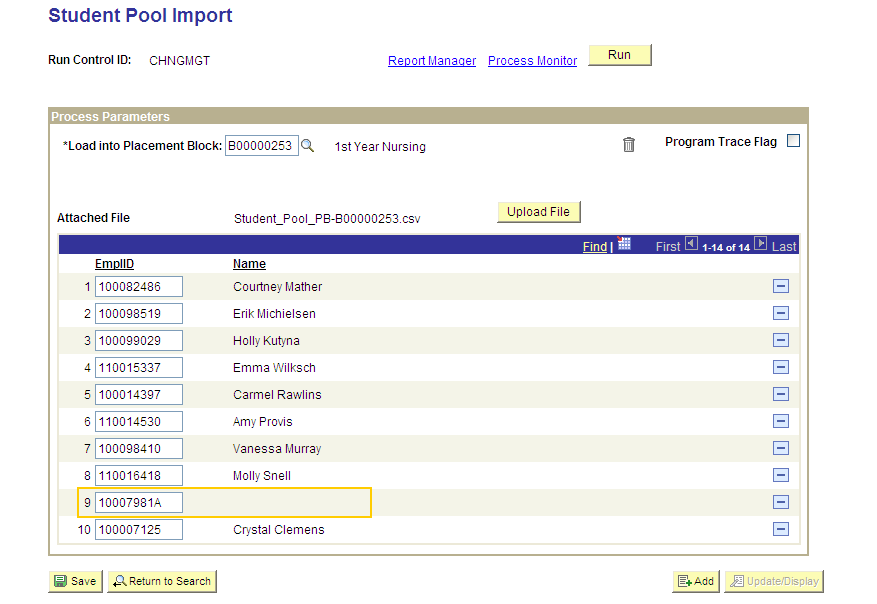
If an invalid Student ID is listed in the file, the Student ID will be displayed in the list of records to be loaded to the Student Pool from the file; however a name will not be displayed adjacent to the invalid Student ID.
If the invalid Student ID is recognised at this stage of the process (identified by the lack of adjacent name), the invalid Student ID can either be overtyped with the correct Student ID to be loaded to the Student Pool, or the invalid Student ID can be deleted from the list of students if it is not required.
If the invalid Student ID is not recognised at this point (and therefore is not corrected/amended), assuming a Student ID is not duplicated in the list, Medici will still allow the page to be saved and the Student Pool Import process to be run. The invalid Student ID(s) will fail to load to the Student Pool and will instead be listed in the Process Output report flagged ‘The EmplID could not be found’ (EmplID is the field name for Student IDs in some pages within Medici).
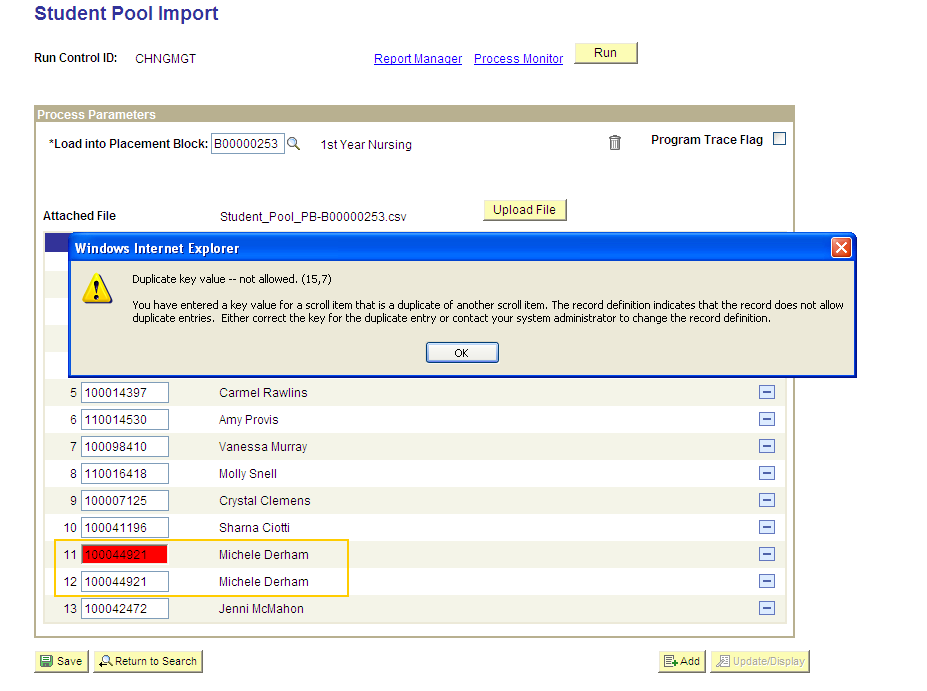
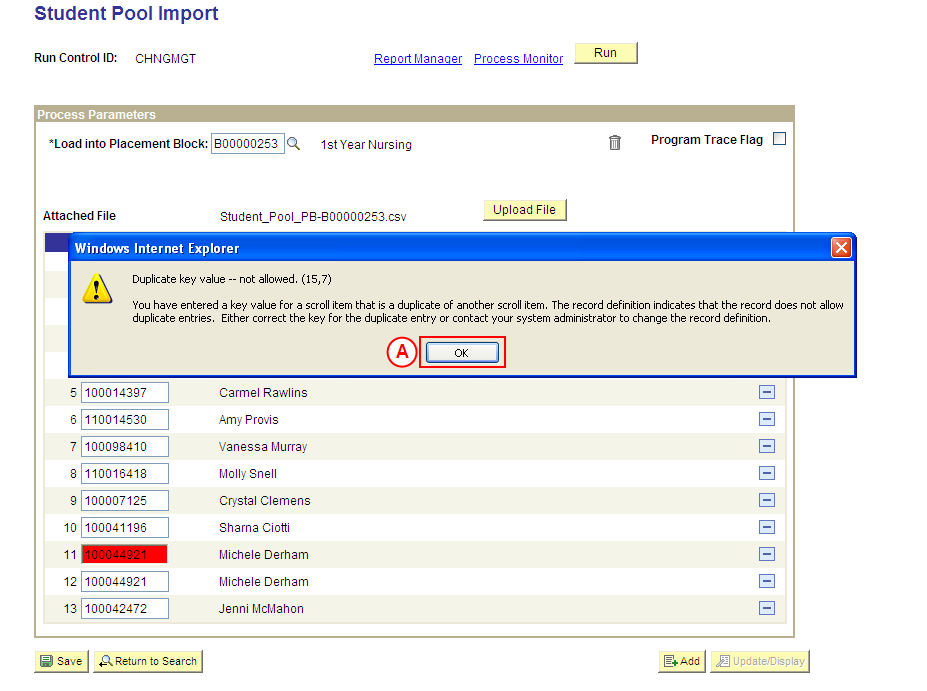
Duplicate Student ID
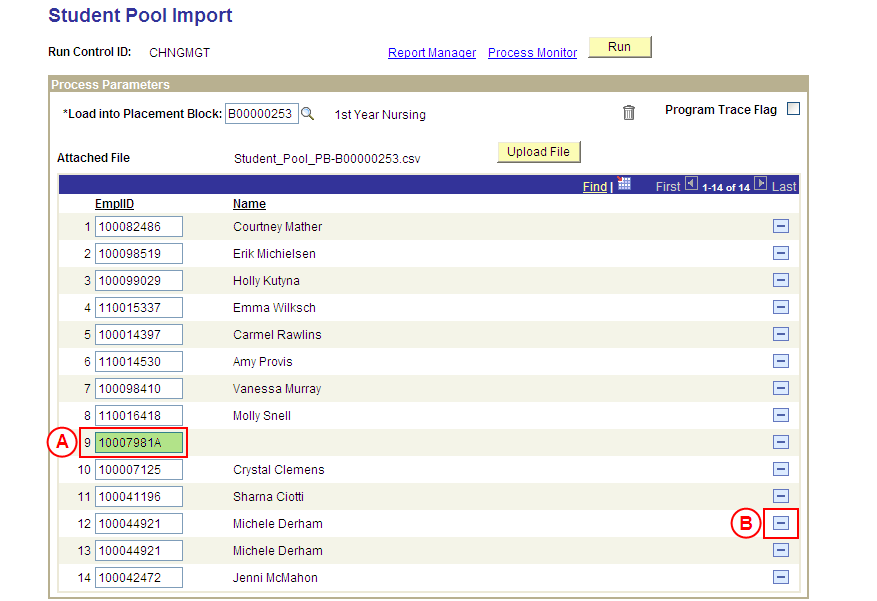
When an attempt is made to save the student list in the Student Pool Import page, a warning message will be displayed for any duplicate Student IDs (ie. same Student ID appears twice or more), and the duplicate record will be highlighted in red.
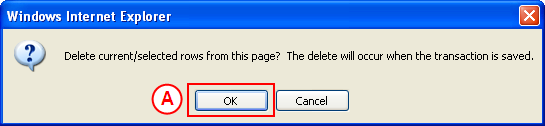
Duplicate Student ID is a critical error that prevents the import process from running; therefore the duplicate record(s) must be deleted before Medici will allow the Student Pool Import page to be saved and the Import process to be run.
Warning: Where there are duplicate Student IDs, only delete the duplicate record(s). You must ensure one instance of the Student ID remains in the list if the student is to be loaded to the Student Pool.
The duplicate error message will only be displayed if there are duplicate Student IDs within the upload file. If a Student ID is not duplicated in the upload file, but has previously been loaded to the Student Pool, Medici will allow the page to be saved without error at this point, and will allow the Student Pool Import process to be run. It is when the process is run that the duplication will be recognised, and the duplicate student record will fail to load to the Student Pool and will instead be listed in the Process Output report as a ‘Duplicate Entry’.
Once the Student Pool Import process has been run, the Process Output report must be viewed to confirm all students have been loaded to the Student Pool successfully:
- If the Process Output report indicates all students have loaded successfully, this should be confirmed by viewing the Student Pool to ensure students selected at random from the Import process are displayed in the Student Pool
- If the Process Output report indicates one or more students failed to load due to ‘Duplicate Entry’, view the Student Pool to ensure the ‘duplicate’ student(s) are already displayed in the Student Pool
- If the Process Output report indicates one or more students failed to load due to ‘The EmplID could not be found’, locate the correct Student ID and load the student manually via the Student Pool page.
Step by Step Instructions
Step 1: Create the Student List spreadsheet
Step 2: Select and save the Placement Block and Student List spreadsheet in Medici
Question 1: Are there duplicate Student IDs in the list of students to be loaded?
Step 3: Delete the duplicate Student IDs, and correct or delete the invalid Student IDs
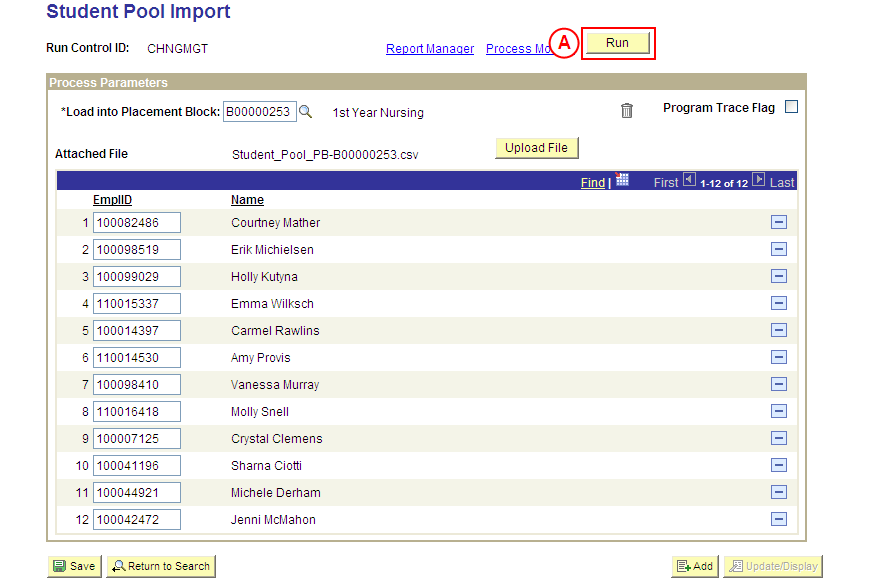
Step 4: Run the Student Pool Import process
Question 2: Does the Log Report indicate one or more records failed to load?
Question 3: Did a record fail to load due to invalid Student ID?
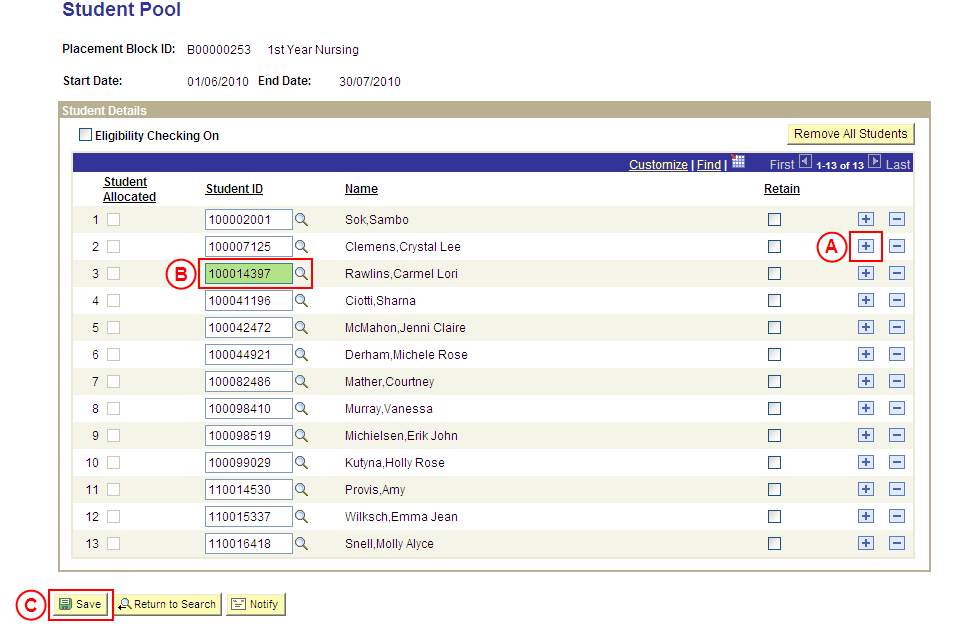
Step 5: Manually load the student record(s) to the Student Pool
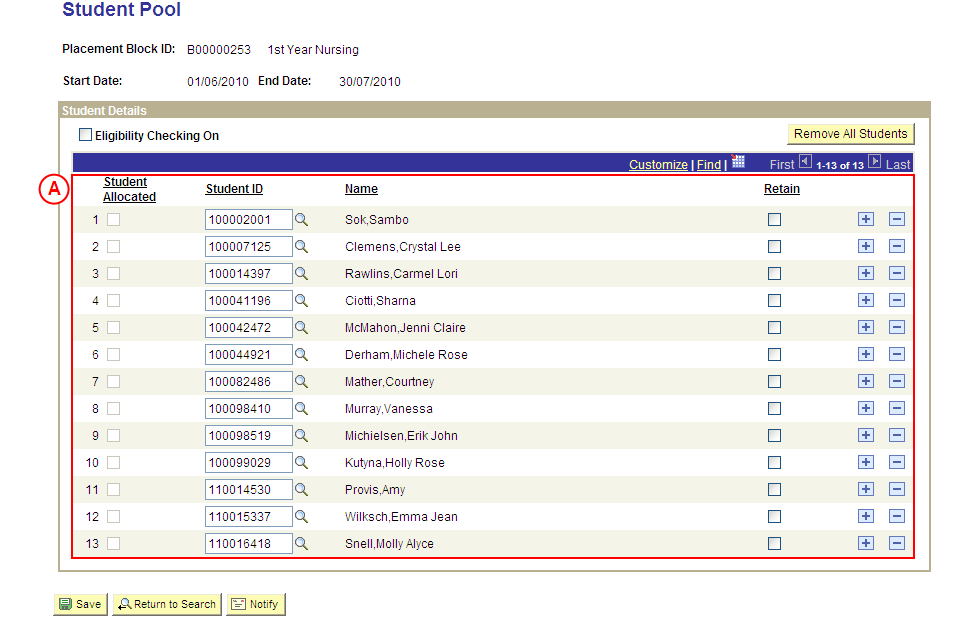
Step 6: Confirm the students are displayed in the Student Pool
|
Action |
Details |
|
Create a spreadsheet listing the students to be uploaded into the Student Pool. Warning: The spreadsheet must not contain a header row; and the list of students must be entered in Column A of the spreadsheet. |
The list of students can be extracted from a Program, Course or Class list. The spreadsheet must be created as follows: - The spreadsheet must not contain a header row - Column A must list the Student IDs of the students to be uploaded into the Student Pool |
|
Save the spreadsheet (as a CSV (Comma Delimited - .csv) file) ready to be uploaded. |
Take note of the file location and name for use later in the process. |


|
Question 1: Are there duplicate Student IDs in the list of students to be loaded? |
||
|
Question |
Yes |
No |
|
Are there duplicate Student IDs in the list of students to be loaded to the Student Pool? |
Go to step 3. |
Go to step 4. |
|
Explanation: If the Student List contains duplicate Student IDs, the duplicate Student IDs must be deleted (deleting duplicate records is mandatory prior to running the Student Pool Import process). If the Student List contains invalid Student IDs, it is recommended the invalid Student IDs be corrected or deleted, however correcting/deleting invalid Student IDs is optional (step 3). If the Student List does not contain duplicate Student IDs, the Student Pool Import process can be run in Medici (step 4). |
||
|
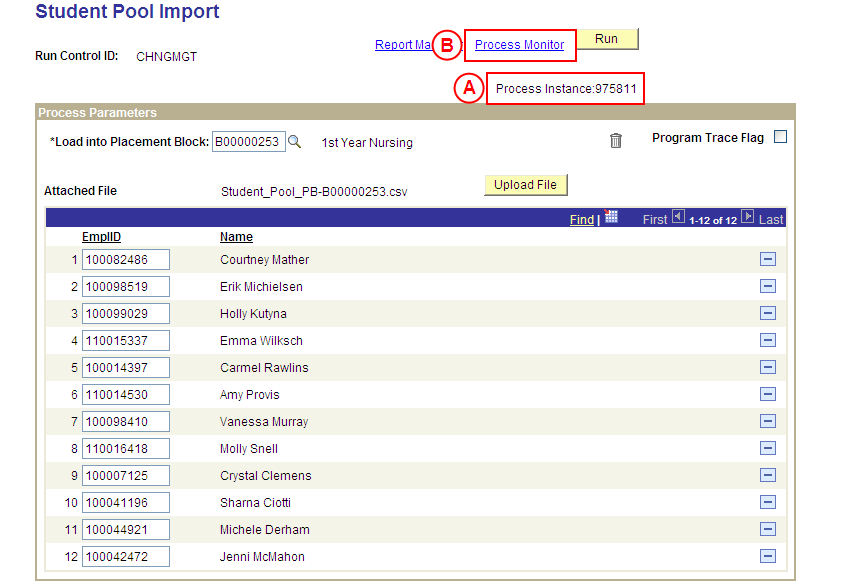
Application: Medici Navigation: The Student Pool Import page will already be displayed as a result of performing step 2 or 3 |
|
|
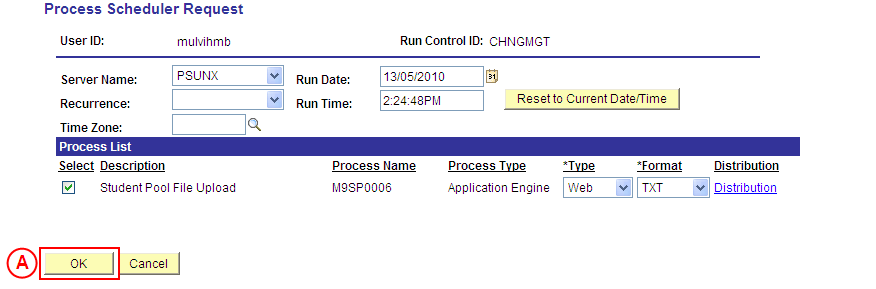
|
Result: The Process Scheduler Request page is displayed. |
|
|
|
Result: The selected file commences loading, and the Student Pool Import page is displayed again. The Process Instance is displayed at the top of the page (below the Run button). |
|
|
|
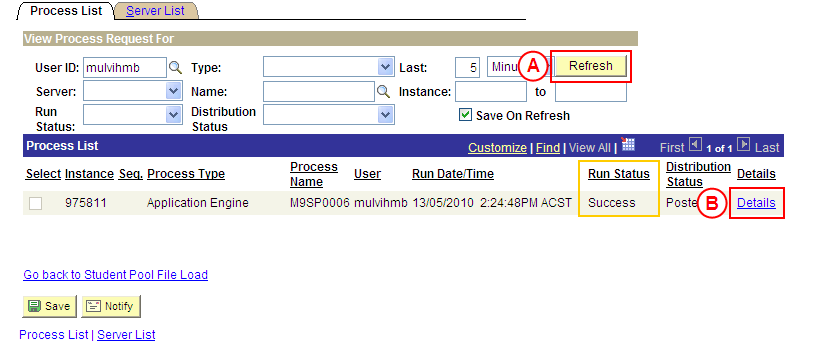
Result: The Process List page is displayed. |
|
|
|
If the Run Status for the Process Instance is ‘Queued’ or ‘Processing’: View Process Request For
Note: If the Run Status field displays ‘No Success’, the process has failed (process failures will be rare or non-existent). Should the process fail, repeat the run process. If the process fails a second time, refer to the SPS Support Matrix for instructions on how to seek further assistance (the source of the error can be investigated in the .sdtout file). Once the issue has been resolved, the Student Pool Import process can be resubmitted. Process List
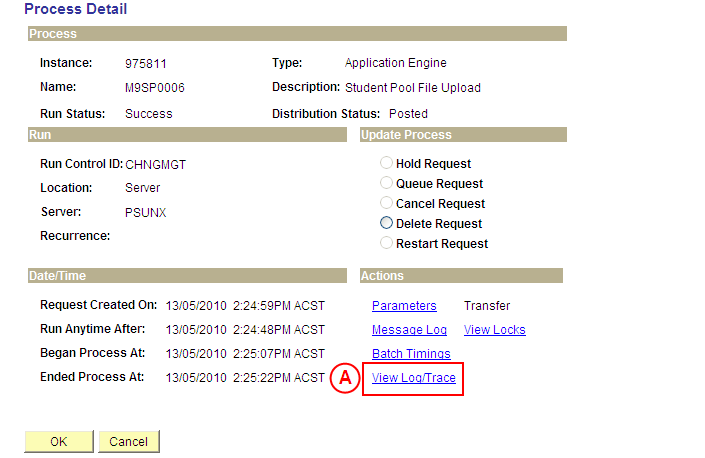
Result: The Process Detail page is displayed. |
|
|
|
Actions
Result: The View Log/Trace page is displayed. |
|
|
|
File List
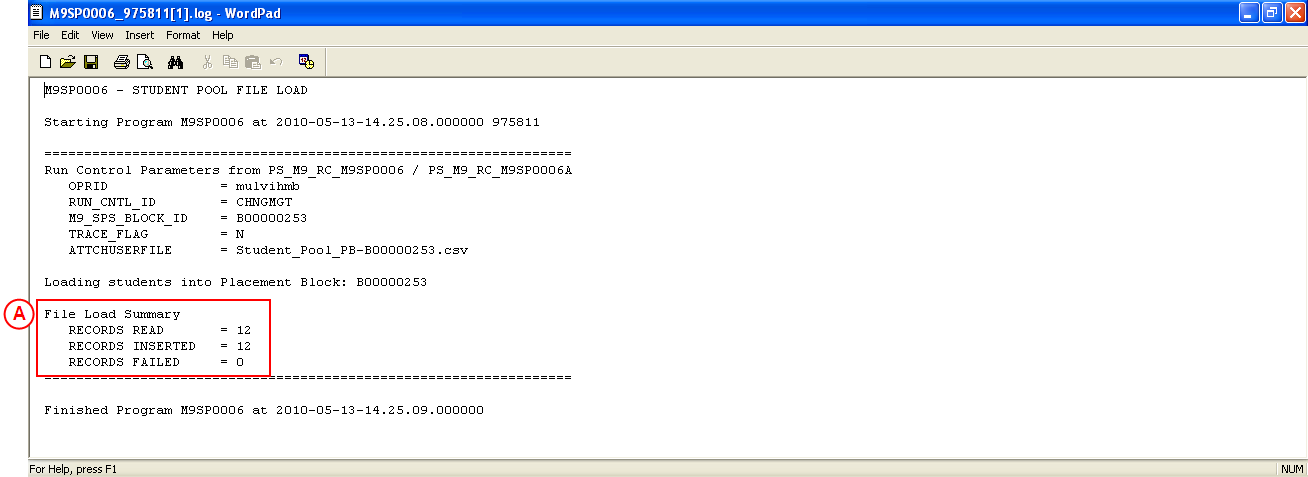
Result: The Log Report for the selected File Upload process is displayed. |
|
All records were loaded successfully:
|
|
If all records were loaded successfully:
Records Read: Will be the same as the number displayed in Records Inserted. Records Inserted: Will be the same as the number displayed in Records Read. Record Failed: Will be zero (0). |
|
Record(s) failed to load:
|
| If one or more records failed to load:
Records Read: Will be greater than the number displayed in Records Inserted. Records Inserted: Will be less than the number displayed in Records Read. Record Failed: Will be a number other than zero. If a record failed to load as it duplicates a record already loaded to the Student Pool:
Failed to Insert: Will be [Placement Block ID] [Student ID] – Duplicate Entry. If a record failed to load due to an invalid Student ID:
Failed to Insert: Will be [Placement Block ID] [Student ID] – The EmplID could not be found. |


|
Question 2: Does the Log Report indicate one or more records failed to load? |
||
|
Question |
Yes |
No |
|
Does the Log Report indicate one or more records failed to load? |
Go to question 3. |
Go to step 6. |
|
Explanation: If the Log Report indicates one or more records failed to load, the next step of the process depends on the reason why the record(s) failed to load (question 3). If the Log Report indicates all records loaded successfully, select random students from the load file and confirm the students are displayed in the Student Pool (step 6). |
||
|
Question 3: Did a record fail to load due to invalid Student ID? |
||
|
Question |
Yes |
No |
|
Did a record fail to load due to invalid Student ID? |
Go to step 5. |
Go to step 6. |
|
Explanation: If the Log Report indicates a record failed to load due to an invalid Student ID, manually add the student record(s) to the Student Pool (if required) (step 5). If the Log Report indicates a record failed to load as it duplicates an existing record in the Student Pool (ie. the student is already loaded in the Student Pool), the error does not need to be resolved and the process can continue by confirming the students are displayed in the Student Pool (step 6). |
||

Running the Placement Offer Import Process and Purging Placement Offer Suspense
a
Running the Batch Create Placement Management Records Process
a
Running the Eligibility Check Process
a
Running the Placement Auto-Allocation Process
a
Running the Placement Management Record Confirmation Process
a
Running the PMR Details Report
a