Working with your template
| Site: | learnonline |
| Course: | Word for thesis writing |
| Book: | Working with your template |
| Printed by: | Guest user |
| Date: | Monday, 8 June 2026, 1:29 PM |
Description
Working with your template
Save the thesis template
If you chose a template from the list of other sample templates, follow the instructions on the template's website to download and save it.
If no instructions are given, or you chose the UniSA sample template, follow these instructions for the Windows version of Word 2007.
Word 2010
Link to the UniSA sample thesis template (Word 2007 version)
 Choose the option to Open with, then click OK. The 2007 version of the template will open in Word 2010
 - When the template opens as a Word 2010 document (.docx), go to File (top left tab) > Save As
- In the Save As dialog box, select the Trusted Templates folder (top of left menu)
 Pull down the Save as type: menu and select Word Template (*.dotx)
- Rename the template if you wish
- Click Save
![]()
Word 2007
Link to the UniSA sample thesis template (Word 2007 version) (and click in Open box).
.jpg) When the template opens in a new Word screen:
When the template opens in a new Word screen:
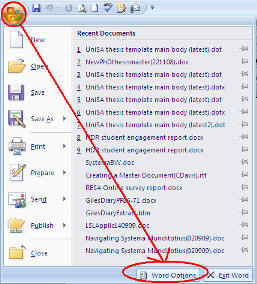
- Select Microsoft Office Button (top left corner of screen) > Save As (left menu) > Word template
.jpg) In the Save As dialog box select Trusted Templates (circled)
In the Save As dialog box select Trusted Templates (circled)- In File name give your template a distinctive name
- In Save as type select Word template (*.dotx)
- If you are ever likely to work on a computer that does NOT have Word 2007 installed, tick the box Maintain compatibility with Word 97-2003
- Select Save (bottom right)
Now go to Apply the template
![]()
Apply the template
To apply your saved thesis template, you can EITHER create a new document with the template attached (if you are beginning a new chapter) OR apply the template to an existing document (if you have already written part of a chapter with a different template).
- Word 2010
- Create a new document based on your thesis template
- Apply the thesis template to an existing document
- Word 2007
- Create a new document based on your thesis template
- Apply the thesis template to an existing document
- Template problems (troubleshooting)
Word 2010
Create a new document based on your thesis template
 Open MS Word 2010
- Select File > Options
- In Word Options, go to Customize Ribbon, and make sure the Developer box (in the Customize the Ribbon column) is ticked, then select OK
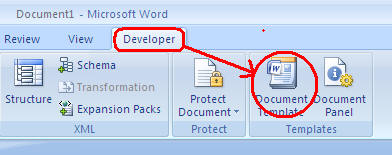
 Select the Developer tab
- Select Document Template
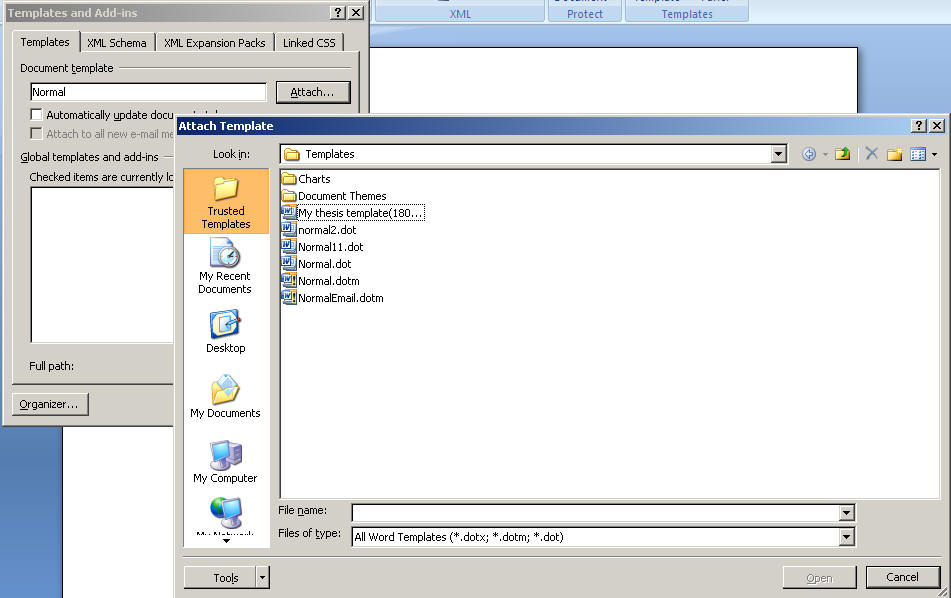
- In the Templates and Add-ins dialog box, select Attach... (in the 'Document template' section)
- Select the thesis template name (eg UniSAthesistemplatemainbody.dotx) in the Attach Template dialog box (view screen grab for more details)
- Select Open (Attach Template dialog box automatically closes, leaving the Templates and add-ins dialog box)
- Tick the box Automatically update document styles
- Select OK (bottom right)
![]()
Apply the thesis template to an existing document
To apply your thesis template to an existing document
- Open the existing Word document
- Follow steps 4 to 10 above
Your working document now has your thesis template attached. (Select the arrow in the bottom right corner of the Styles group in the Home tab – all the new styles should appear.)
You will need to go through the document and reset some of the styles. You should at least do the following.
- Highlight all normal text and select Body Text from the styles list (Select the arrow in the bottom right corner of the Styles group in the Home tab to find the styles list)
- Decide which levels your headings should be and convert each to the required style
- Reset the style for any block quotes
Other style changes will take place automatically.
![]()
Word 2007
Create a new document based on your thesis template
 Open MS Word 2007
- Select Office button > Word options
- In Word Options tick the box next to Show developer tab in the ribbon
- Select OK (bottom of dialog box)
 Select the Developer tab. If the Developer tab is not showing, click the Microsoft Office button menu (top left corner of the ribbon), and go to Word Options. In the Top options for working with Word section, click Personalize. Select 'Show Developer Tab in the Ribbon' (not shown by default) and click OK
- Select Document template
To follow steps 7 to 11 below, select the image at right.
|
- Select Attach in the Templates and Add-ins dialog box (Attach Templates dialog box automatically opens)
- Select My thesis template.dotx in the Attach Template dialog box
- Select Open (bottom of Attach Template dialog box) (Attach Template dialog box automatically closes, leaving the Templates and add-ins dialog box)
- Tick the box Automatically update document styles
- Select OK (bottom right)
Your document now has your thesis template attached to it. This means that when you select the arrow in the bottom right corner of the Styles group in the Home tab, the list of styles available for your thesis appears in the drop-down menu. (Go back to the Key concepts folder in the left menu and review this idea in the Templates page.
![]()
Apply the thesis template to an existing document
To apply your thesis template to an existing document
- Open the existing Word document
- Follow steps 5 to 11 above
Your working document now has your thesis template attached. (Select the arrow in the bottom right corner of the Styles group in the Home tab – all the new styles should appear.)
You will need to go through the document and reset some of the styles. You should at least do the following.
- Highlight all normal text and select Body Text from the styles list (Select the arrow in the bottom right corner of the Styles group in the Home tab to find the styles list)
- Decide which levels your headings should be and convert each to the required style
- Reset the style for any block quotes
Other style changes will take place automatically.
![]()
Modify the template
Rule 1: Don't tinker with the template.
Rule 2: If you must modify an existing Word template, follow the method below.
- Avoid varying heading styles in individual thesis chapters.
- Heading styles across all chapters must be consistent (stick to the template).
- Word uses common heading styles to create your contents page.
Word 2010 and Word 2007
If using Word 2010, follow the instructions below, but instead of Office Button, use the File tab.

- Open MS Word
- Select Office Button > New
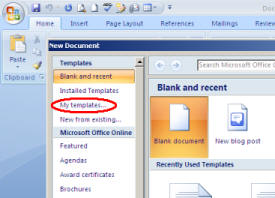
- Select My templates (left menu – see above left)
- Select Template button (bottom right of dialog box – see above right)
(Opens the template as a template, not as a document) - Select the template you wish to modify
- Select OK
- Modify the template as you wish in the same way that you would ordinarily make changes to a document
- Select Office Button > Save As
- Select Trusted Templates
- To save both old and new versions of the template, give the modified version a new name
- To replace the old version with the new version, retain the original name
- Go to Save as type and select Word Template (*.dotx)
- Select the Save button
- If a blank document is left onscreen, go to File > Close
Practise this method
Create a second working version of a template (see, step 9 above). When you no longer require this second version, trash it.
![]()
Captions
Figures and tables in your thesis will need captions. Inserting captions in MS Word, using a Caption dialog box, lets you:
- number captions sequentially
- monitor their location
- update numbering if you relocate or delete captions.
After insertion, captions can be formatted in the UniSA sample template, using built-in styles.
Insert captions in Word 2010 and 2007
 In your Word document – for example a thesis chapter:
- Click the point in your text where you want to insert a caption
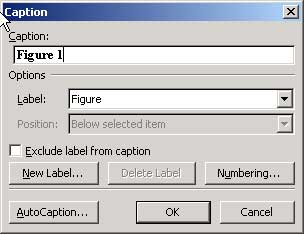
- Select References tab > Captions group > Insert Caption (the Caption dialog box shown at right opens with the default option Figure 1 in the caption text box)
- Enter the description of the figure after the figure number
- To create a caption for a table or equation instead of a figure, select Table or Equation from the drop-down Label list
- To create a caption for some other element – eg a photo or a map – click on New Label (a New Label dialog box opens)
- Enter your new label – eg Photo or Map – and click on OK
- The new label now appears in the Caption text box. It is added to the list of available labels for future use. To remove it at some later time, click on Delete Label.
- The default option for numbering captions is 1, 2, 3, ... To change this, click on Numbering in the Caption dialog box.
- Select a new numbering style from the drop-down Format menu
- If you wish, include the Chapter number
- If you include the chapter number, select a separator to go between the two numbers (default option is a full stop or period)
- Click OK to return to the Caption dialog box
- Click OK
If you alter your captions in any way using the above sequence, Word automatically updates all the caption numbers.
![]()
Format captions in Word 2010 and 2007
After you have inserted a caption for a figure or table
- Highlight the caption
- On the Home tab, click on the arrow in the bottom right corner of the Styles group.
- Select Figure Caption (or Table Caption) from the drop-down style menu.
- If you wish, the word Figure (and its number) or Table (and its number) can be in bold while the label is regular.
The default locations in the UniSA sample thesis template are
- for Figure captions – centred beneath the figure
- for Table captions – left-aligned above the table
These can be modified using Format > Styles and Formatting
![]()