The Arduino Interface and Tinkercad Circuits
The STEMIE Technology task uses Arduino coding.
Below are two options for practising your Arduino coding skills. One is a virtual environment using Tinkercad Circuits and the other is a practical version using the Arduino IDE software and components.
1. Coding in Tinkercad
If you have not got access to the Arduino interface and the equipment to create your circuits, you can use the virtual environment on Tinkercad called "Circuits"
Create a Tinkercad account. (If you have completed the 3D printing and Computer Aided Design activity you will already have an account). Click on the Circuits component and work through the tutorials to learn how to navigate this platform.
Once you have learnt to manipulate the components you can write code, or modify the code supplied. Make sure you change the code to Text, as this is the format the Technology Task in STEMIE will be using.
2. Coding using the Arduino IDE Software and Equipment.
Make sure you have downloaded the Arduino software, this can be found here:
https://www.arduino.cc/en/Main/Software
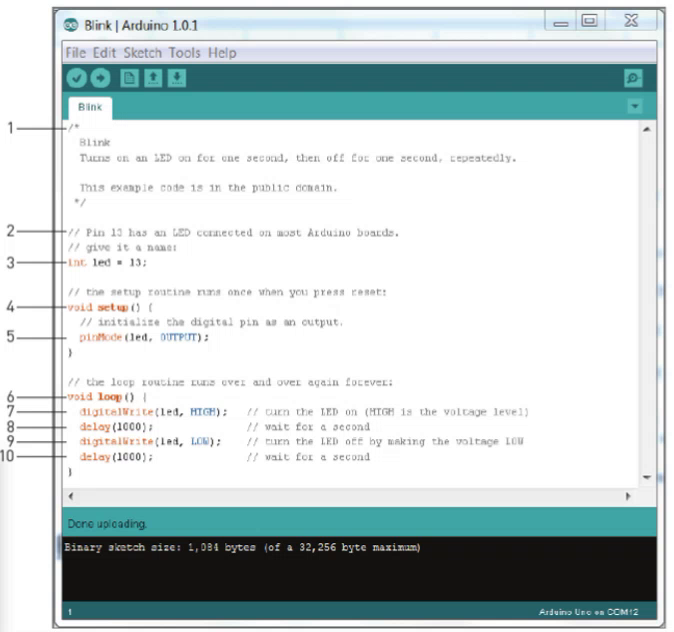
The Arduino Interface
Code and what it means:
1. Multiline comment
This is for the benefit of the user, allows code to be explained but is not used in the program itself
2. Single line comment
Again for clarification, not used in the program itself
3. Variable declaration
This is like the list of pins that will be used in the code, similar to a list of ingredients in a recipe. Components need to be given a name that the code will recognise, this will be spelling and case sensitive when referred to in the code itself.
4. void setup () function
This is the preparation for the code, in the same way a recipe might ask to preheat the oven.
5. Argument
Components at the various pins on the board need to be recorded as inputs or outputs to allow the program to function correctly.
6. void loop () function
This is the sequence of steps that need to be completed
7. digitalWrite ()
Assigns a value to a pin, HIGH (on) or LOW (off)
8. delay()
Pauses the program for the amount of milliseconds specified
9. digitalWrite ()
10. delay ()
