Apply the template
To apply your saved thesis template, you can either
create a new document with the template attached (if you are beginning a new chapter)
or apply the template to an existing document (if you have already written part of a chapter with a different template).
Apply the template in Word 2007
Create a new document based on your thesis template
- Open MS Word 2007
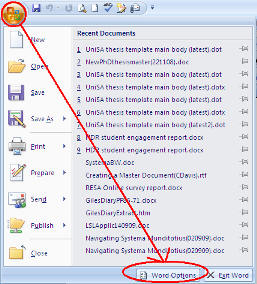
- Select Office button > Word options
- In Word options tick the box next to Show developer tab in the ribbon
- Select OK (bottom of dialog box)
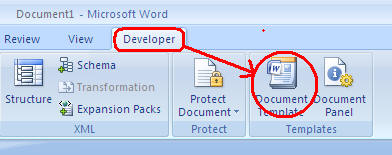
- Select Developer tab
- Select Document template
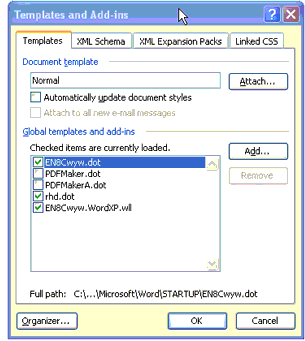
To follow steps 7 to 11 below, select the image at right.
|
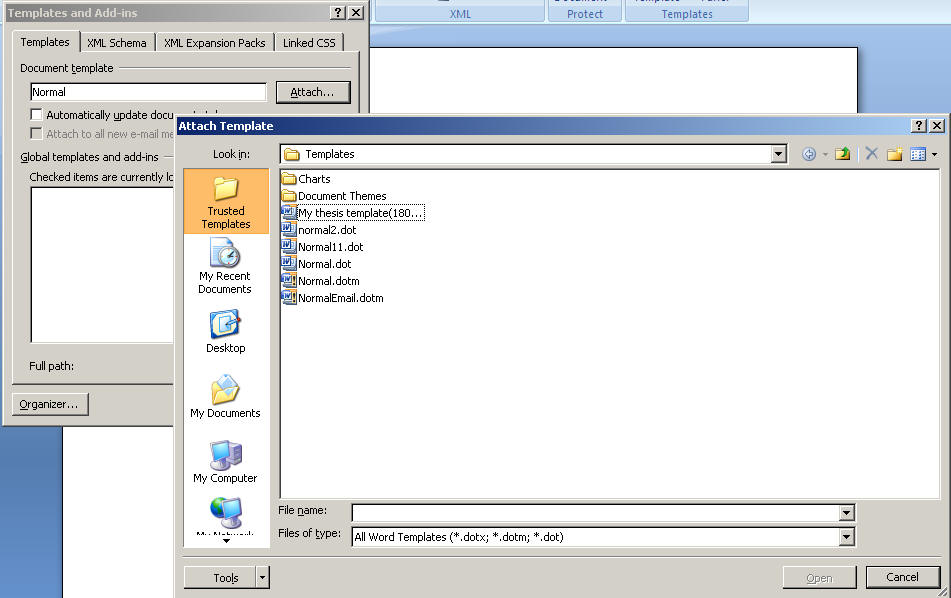
- Select Attach in the Templates and Add-ins dialog box
(Attach Templates dialog box automatically opens) - Select My thesis template.dotx in the Attach Template dialog box
- Select Open (bottom of Attach Template dialog box)
(Attach Template dialog box automatically closes, leaving the Templates and add-ins dialog box) - Tick the box 'Automatically update document styles'
- Select OK (bottom right)
Your document now has your thesis template attached to it. This means that when you select the arrow in the bottom right corner of the Styles group in the Home tab, the list of styles available for your thesis appears in the drop-down menu. (Go back to the Key concepts folder in the left menu and review this idea in the Templates page.
Apply the thesis template to an existing document
To apply your thesis template to an existing document
- Open the existing Word document
- Follow steps 5 to 11 above
Your working document now has your thesis template attached. (Select the arrow in the bottom right corner of the Styles group in the Home tab – all the new styles should appear.)
You will need to go through the document and reset some of the styles. You should at least do the following.
- Highlight all normal text and select Body Text from the styles list (Select the arrow in the bottom right corner of the Styles group in the Home tab to find the styles list)
- Decide which levels your headings should be and convert each to the required style
- Reset the style for any block quotes
Other style changes will take place automatically.
Apply the template in Word 97-2003
Create a new document based on your thesis template
- Open MS Word
- Select File > New
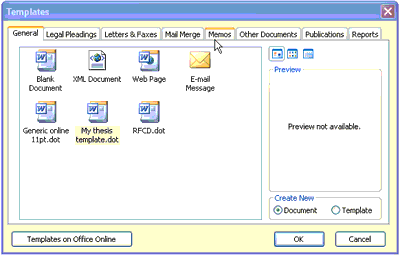
- Go to Templates (right side of screen) and select on my computer
- Click on General tab
- Click on My thesis template.dot
- Check that Document button is selected (bottom right of Templates dialog box)
- Click on OK
- Select File > Save As (save as chapter and number in your research folder)
The document now open onscreen has your thesis template attached.
This means that when you click on the arrow to the right of the Styles menu, the list of styles available for your thesis appears in the drop-down menu. (Go back to the Key concepts folder in the left menu and review this idea in the templates page.)
Begin writing your chapter (or appendix).
Apply the thesis template to an existing document
If you opened MS Word and began writing your chapter before you knew about templates, you are probably using the Normal template.
You can still change to your thesis template as follows.
- Open the document you have worked on
- Select Tools > Templates and Add-ins
- Click on Attach (available templates will appear in the dialog box)
- Click once on My thesis template.dot
- Click on Open
- Click in Automatically update document styles box
- Click on OK (bottom of dialog box)
Your working document now has your thesis template attached (check by looking in the styles list – all the new styles should appear)
You will need to go through the document and reset some of the styles.
- Highlight all normal text and select Body Text from the styles list
- Decide which levels your headings should be and convert each to the required style
- Reset the style for any block quotes
Other style changes will take place automatically.
 Open MS Word 2007
 Select Developer tab
 Open MS Word
 Open the document you have worked on