Contents page
Once you have completed steps 1 and 2 of compiling your thesis, your next step is to create and format the Contents page for your thesis final document. It will begin on page iii of the preliminary pages. (The widespread practice at UniSA is to head this page 'Contents' rather than 'Table of Contents'.)
Create Contents page
Word 2010 and 2007
- Go to Thesis folder
- Open Thesis final
- Go to Contents (page iii)
- Place the cursor in [Click and insert Table of Contents]
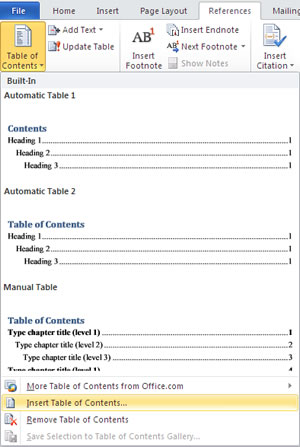
- Select References tab > Table of Contents > Insert Table of Contents (near bottom of dialog box)
- Click on Table of Contents tab
- Check the options available then click OK
Format Contents page
Word 2010 and 2007
This is a recommended format. It fits well with the UniSA sample template. If you chose another template, you may wish to experiment to produce a different format.
- Click on the first item in your Contents list (the complete list should become highlighted)
- Select References tab > Table of Contents > Insert Table of Contents (near bottom of dialog box).
The Table of Contents dialog box should open because you were there previously. If not, click on Table of Contents tab.
Note – Unless you are preparing your thesis for immediate electronic publication in HTML format (which you are probably not), untick the box labelled Use hyperlinks instead of page numbers.
Set Contents page options
With the Table of Contents box open, select options (lower right)
- Tick boxes labelled Show page numbers and Right align page numbers
- Set Tab leader to None
- Set Show levels to 2 (or 3 if you want three levels of heading included in your Contents – not recommended – 2 is probably sufficient)
- Click on Options (dialog box opens to enable you to select headings for your Contents page)
- Accept preliminary heading 1 as TOC level 1
- Scroll down available styles and set the following styles to TOC level 1
- Chapter title
- References
- Appendix title
- Set Heading 1 as TOC level 2
- Set Heading 2 as TOC level 3 (only if you set Show levels to 3 – not recommended)
- Click on OK
- Click OK, OR if you wish to modify the styles of your Contents entries, click on Modify (a Style dialog box opens)
- Select a TOC level you wish to modify
- Click on Modify (a Modify style dialog box opens)
- You may now modify the style as you did earlier in the workshop – see Modify the template
- Click OK on each dialog box when completed
You should now have a suitably formatted Contents page.
If you feel confident enough, experiment with the settings to further modify your Contents page.
Modify Contents page
After you have set up your Contents page, you may wish to modify it in some minor way. To do this, return to the Table of Contents box and select the Modify button.
Caution – After you carry out further modifications, check that your original settings remain intact. In particular check that the Tab leader is set to none. It has a habit of resorting to the default option.
A typical example is to reset the Contents page line spacing (PDF file 44kb).

WFTW.jpg)
 Click on Options (dialog box opens to enable you to select headings for your Contents page)
Click on Options (dialog box opens to enable you to select headings for your Contents page)