Create a New Contact
Process Overview
Placement Administrators and Placement Officers are able to create and update Contact records, and Placement Administrators are able to correct Contact records (when required).
Warning: Prior to creating a new Contact record, you must first perform a thorough search of the existing Contact records to ensure the required Contact does not already exist in Student Placements in Medici (the Contact may already exist through involvement with a different Organisation or Site to the one you are creating). Only create a new Contact record if you fail to find an existing record for the Contact.
Contacts are people external to the University who support the Placement process (eg. external contacts at Sites and Organisations).
Step by Step Instructions
Note: The following instructions assume information has not previously been configured for the Contact. If the Contact has previously been configured, and the existing information needs to be updated or corrected, please refer to the process instructions on the ‘Updating a Contact’ or ‘Correcting a Contact’ process pages.
Step 1: Create the Contact record in Medici
Question 1: Is the Contact for an Organisation?
Step 2: Attach the Contact to the Organisation record(s)
Question 2: Is the Contact also a Contact for a Site?
Step 3: Attach the Contact to the Site record(s)
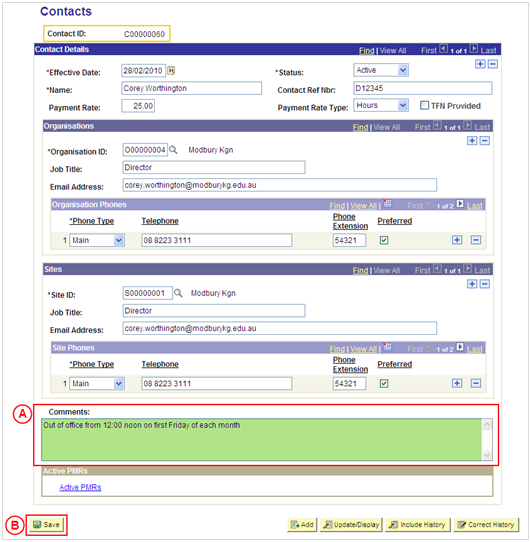
Step 4: Record Comments and save the new Contact record
|
Application: Medici Navigation: Student Placements®Placement Providers®Contacts |
|
|
|
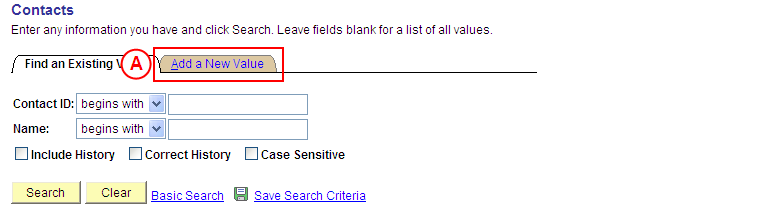
Warning: Prior to creating a new Contact record, you must first perform a thorough search of the existing Contacts records to ensure the required Contact does not already exist in Medici. Only create a new Contact record if you fail to find an existing record for the Contact.
Select the Add a New Value tab. Result: The Contacts: Add a New Value page is displayed. |
|
|
|
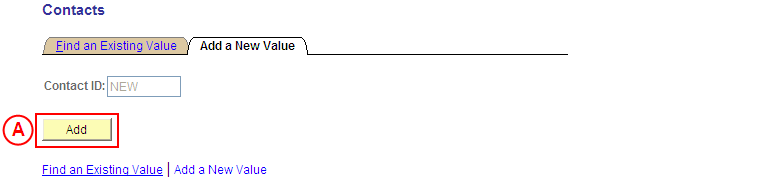
Select the Add button (or press Enter).
Result: The Contacts page is displayed. |
|
|
|
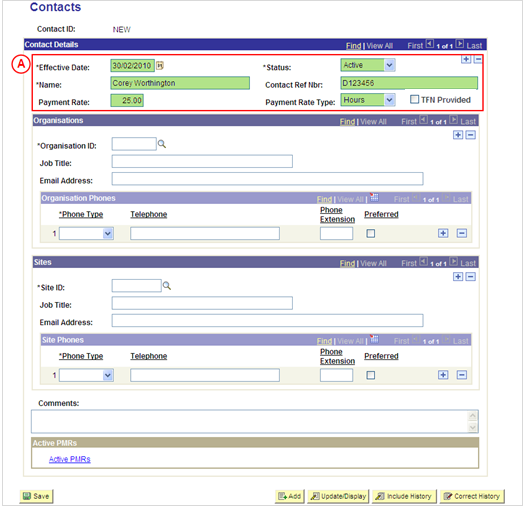
Contact Details
Effective Date: Type or select the [date the new Contact is to be available]. Status: Select Active (if this value is not already displayed). Name: Type the [new Contact’s name] (refer to the SPS Data Entry Standards for the required format). Contact Ref Nbr: Type the [Contact’s Reference Number] (if applicable – eg. DECS Employee No, Nursing Registration No, etc - refer to the SPS Data Entry Standards for the required format). Payment Rate: Type the [default pay rate for the Contact] (if applicable). Payment Rate Type: Select the appropriate value as follows: - Days (if a daily rate has been entered in the Payment Rate field). - Hours (if an hourly rate has been entered in the Payment Rate field). TFN Provided: If the Contact has provided a TFN, select the TFN Provided checkbox so that a tick is displayed. |
|
Question |
Yes |
No |
|
Is the Contact for an Organisation? |
Go to step 2. |
Go to step 3. |
|
Explanation: If the Contact is for an Organisation, the Contact must be attached to the relevant Organisation record(s) If the Contact is not for an Organisation, and is therefore a Site Contact, attach the Contact to the relevant Site record(s) (question 2). |
||
|
Application: Medici Navigation: The Contacts page will already be displayed as a result of performing step 1 |
|
|
|
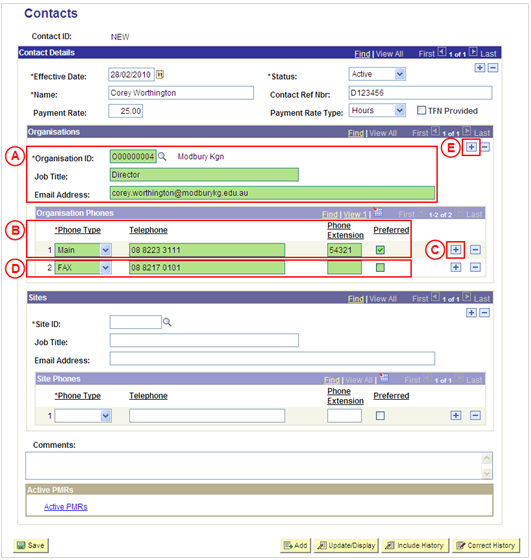
Organisations
Organisation ID: Select the [Organisation of the new Contact]. Job Title: Type the [Contact’s job title with the selected Organisation]. Email Address: Type the [Contact’s email address at the selected Organisation]. Organisation Phones Phone Type: Select the [type of number being entered for the Contact] (business, mobile, fax, etc) if the pre-populated value is incorrect. Telephone: Type the [Contact’s number] if the pre-populated number is incorrect. Phone Extension: Type the [Contact’s Extension] (if applicable). Preferred: If the number being entered is the Contact’s preferred or only number, select the Preferred checkbox so that a tick is displayed. If the Contact has further numbers to be recorded for the selected Organisation: In the Organisation Phones section, select the Add a New Row button (). Phone Type: Select the [type of number being entered for the Contact] (business, mobile, fax, etc). Telephone: Type the [Contact’s number]. Phone Extension: Type the [Contact’s Extension] (if applicable). Preferred: If the number being entered is the Contact’s preferred number, select the Preferred checkbox so that a tick is displayed. |
|
Continue to repeat parts C and D of this step until all numbers for the Contact at the selected Organisation have been recorded. |
|
If the Contact needs to be attached to a second Organisation: Organisations In the Organisations section, select the Add a New Row button (). |
|
Continue to repeat this step until the Contact has been attached to all relevant Organisations. |
|
Question |
Yes |
No |
|
Is the Contact also a Site Contact? |
Go to step 3. |
Go to step 4. |
|
Explanation: If the Contact is also a Contact for a Site, the Contact must be attached to the relevant Site record(s) (step 3). If the Contact is not a Contact for a Site, the new Contact record can be saved (step 4). |
||
|
Application: Medici Navigation: The Contacts page will already be displayed as a result of performing step 1 or 2 |
|
|
|
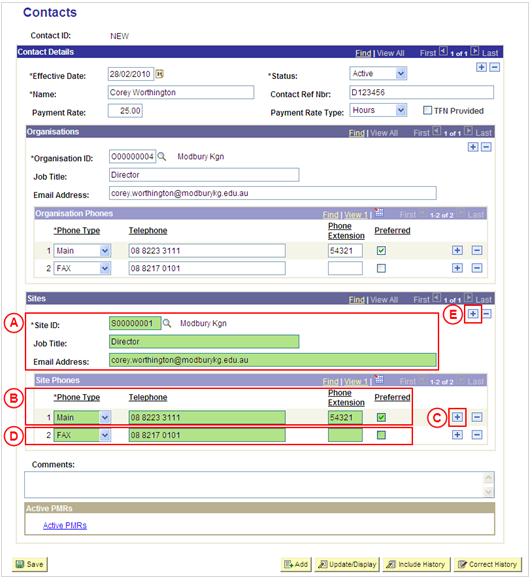
Sites
Site ID: Select the [Site of the new Contact]. Job Title: Type the [Contact’s job title with the selected Site]. Email Address: Type the [Contact’s email address at the selected Site]. Site Phones Phone Type: Select the [type of number being entered for the Contact] (business, mobile, fax, etc) if the pre-populated value is incorrect. Telephone: Type the [Contact’s number] if the pre-populated number is incorrect. Phone Extension: Type the [Contact’s Extension] (if applicable). Preferred: If the number being entered is the Contact’s preferred or only number, select the Preferred checkbox so that a tick is displayed. If the Contact has further numbers to be recorded for the selected Site: In the Site Phones section, select the Add a New Row button (). Phone Type: Select the [type of number being entered for the Contact] (business, mobile, fax, etc). Telephone: Type the [Contact’s number]. Phone Extension: Type the [Contact’s Extension] (if applicable). Preferred: If the number being entered is the Contact’s preferred number, select the Preferred checkbox so that a tick is displayed. |
|
Continue to repeat parts C and D of this step until all numbers for the Contact at the selected Site have been recorded. |
|
If the Contact needs to be attached to a second Site: Sites In the Sites section, select the Add a New Row button (). |
|
Continue to repeat this step until the Contact has been attached to all relevant Sites. |