Correct a Contact's Site(s)
Process Overview
Only Placement Administrators have access to correct a Contact record. If you are not a Placement Administrator, send an email request to your Placement Administrator.
A Contact record should only be corrected if incorrect information has been entered for the Contact. If the Contact record needs to be updated due to a recent or future change, insert a new effective dated row to update the record as at the date of the change (refer to the ‘Updating a Contact Record’ process page).
Step by Step Instructions
Note: This process provides instructions on how to correct a Contact’s Site(s). Instructions on how to correct a Contact’s basic details (eg. name, Contact Reference Number, Comments, etc), Payment Rate or Organisation details are available from the ‘Correcting a Contact Record’ process page.
Step 1: Receive request to correct a Contact’s Site(s) (if applicable)
Step 2: Access the Contact record in ‘Correction’ mode
Question 1: Does a Site need to be added to the Contact record?
Step 3: Add the Site(s) to the Contact record
Question 2: Does a Site need to be deleted from the Contact record?
Step 4: Delete the Site(s) from the Contact record
Question 3: Do existing Site details require correction?
Step 5: Correct the existing Site(s) details as required
Step 6: Save the corrections to the Contact record
Step 7: Send notification that the Contact record has been corrected (if applicable)
|
Application: Medici Navigation: Student Placements®Placement Providers®Contacts |
|
|
|
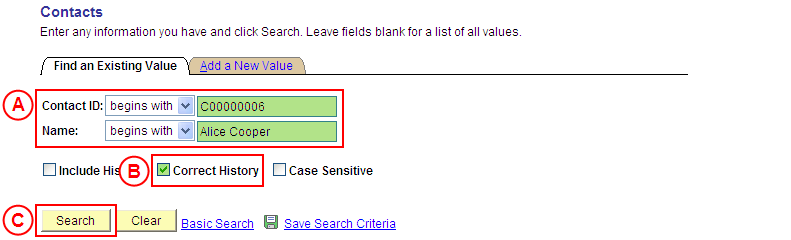
Populate one or more of the following search fields:
Contact ID: Type the relevant [Contact ID]. Name: Type the [name of the Contact to be corrected]. Correct History: Select the Correct History checkbox so that a tick is displayed. Select the Search button (or press Enter). Result: The Contacts page is displayed in ‘Correction’ mode. |
|
|
|
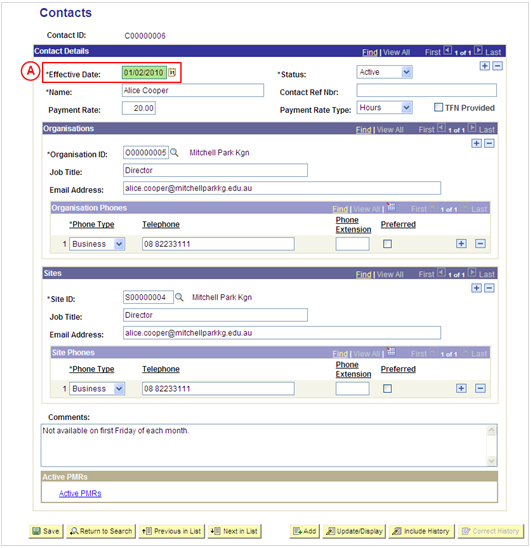
Warning: The Effective Date field should only be updated in ‘Correction’ mode if the effective date currently entered for the Contact record is incorrect. ‘Correction’ mode is generally used to correct information within the other fields on the page ‘as at’ the existing effective date. Contact Details Effective Date: If required, type or select the [correct date for the Contact record]. |
|
Question 1: Does a Site need to be added to the Contact record? |
||
|
Question |
Yes |
No |
|
Does a Site need to be added to the Contact record? |
Go to step 3. |
Go to question 2. |
|
Explanation: If a Site needs to be added to the Contact, add the Site(s) to the Contact record (step 3). If a Site does not need to be added to the Contact, the process continues by determining if a Site needs to be deleted from the Contact (question 2). |
||
|
Application: Medici Navigation: The Contacts page will already be displayed as a result of performing step 2 |
|
|
|
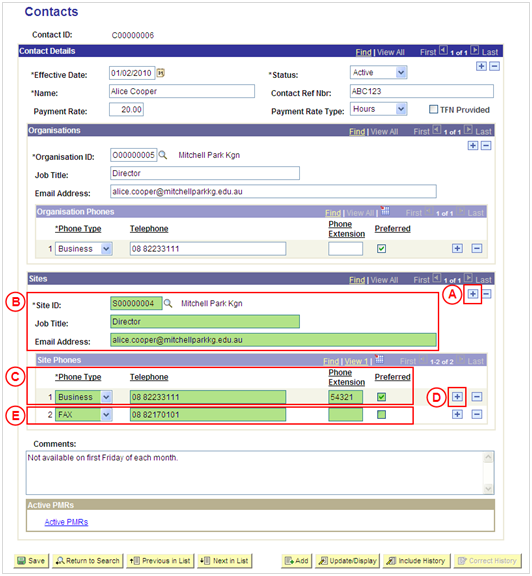
Sites If there is an existing Site attached to the Contact: In the Sites section, select the Add a New Row button (). There is no need to insert a new row if there are no existing Sites for the Contact. Site ID: Select the [Site to be added to the Contact record]. Job Title: Type the [Contact’s job title at the selected Site]. Email Address: Type the [Contact’s email address at the selected Site]. Site Phones Phone Type: Select the [type of number being entered for the Contact] (business, mobile, fax, etc). Telephone: Type the [Contact’s number]. Phone Extension: Type the [Contact’s Extension] (if applicable). Preferred: If the number being entered is the Contact’s preferred or only number, select the Preferred checkbox so that a tick is displayed. If the Contact has further numbers to be recorded for the selected Site: In the Site Phones section, select the Add a New Row button (). Phone Type: Select the [type of number being entered for the Contact] (business, mobile, fax, etc). Telephone: Type the [Contact’s number]. Phone Extension: Type the [Contact’s Extension] (if applicable). Preferred: If the number being entered is the Contact’s preferred number, select the Preferred checkbox so that a tick is displayed. |
|
Continue to repeat parts D and E of this step until all numbers for the Contact at the selected Site have been recorded. |
|
If further Sites need to be added to the Contact, continue to repeat this step until the Contact has been attached to all relevant Sites. |
|
Question 2: Does a Site need to be deleted from the Contact record? |
||
|
Question |
Yes |
No |
|
Does a Site need to be deleted from the Contact record? |
Go to step 4. |
Go to question 3. |
|
Explanation: If a Site needs to be deleted from the Contact, delete the Site(s) from the Contact (step 4). If a Site does not need to be deleted from the Contact, the process continues by determining if the Contact’s details for an existing Site (eg. Job Title, Phone Number) need to be corrected (question 3). |
||
|
Application: Medici Navigation: The Contacts page will already be displayed as a result of performing step 2 or 3 |
|
|
|
Sites
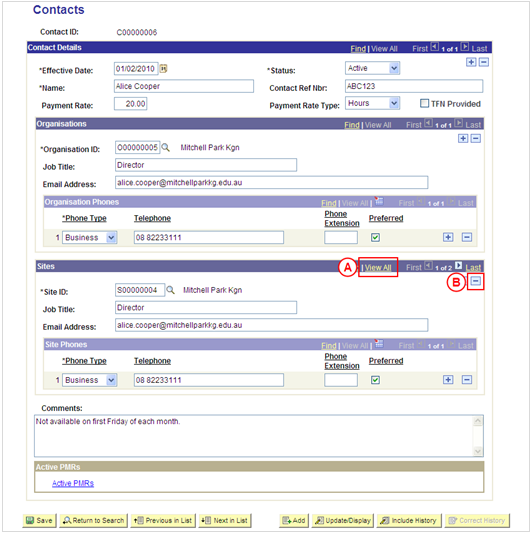
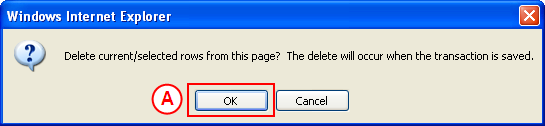
If there is more than one Site record attached to the Contact, in the Sites section, select the View All link to display all Site records attached to the Contact. Result: A message is displayed requesting confirmation the selected row is to be deleted, and advises the deletion will occur when the transaction is saved. |
|
|
| Select the OK button (or press Enter).
Result: The selected Site is deleted from the Contact. |
|
Continue to repeat this step until all Sites that are no longer required have been deleted. |
|
Question |
Yes |
No |
|
Do existing Site details require correction? |
Go to step 5. |
Go to step 6. |
|
Explanation: If the Contact’s existing Site details need to be corrected, correct the details as required (step 5). If the Contact’s existing Site details do not need to be corrected, the next step is to perform any other required corrections to the Contact record, and then save the record (step 6). |
||
|
Application: Medici Navigation: The Contacts page will already be displayed as a result of performing step 2, 3 or 4 |
|
|
|
Sites
Job Title: Type the [Contact’s correct job title at the selected Site] (if required). Phone Type: Select the [correct type of number for the Contact] (if required). Telephone: Type the [corect telephone number for the Contact] (if required). Phone Extension: Type the [Contact’s correct Extension Number] (if required). Preferred: If the number is the Contact’s preferred or only number, select the Preferred checkbox so that a tick is displayed (if required). |

|
Application: Medici Navigation: The Contacts page will already be displayed as a result of performing step 3, 4 or 5 |
|
|
|
If further Contact details need to be corrected (eg. Payment Rate or Organisation details), correct these details prior to saving the record. Refer to the relevant process instructions on the ‘Correcting a Contact Record’ process page if required. |
| Once all required corrections to the Contact have been completed, select the Save button.
Result: The corrected information will apply to the Contact as of the entered effective date. |

Process Overview
Only Placement Administrators have access to correct a Contact record. If you are not a Placement Administrator, send an email request to your Placement Administrator.
A Contact record should only be corrected if incorrect information has been entered for the Contact. If the Contact record needs to be updated due to a recent or future change, insert a new effective dated row to update the record as at the date of the change (refer to the ‘Updating a Contact Record’ process page).
Step by Step Instructions
Note: This process provides instructions on how to correct a Contact’s Site(s). Instructions on how to correct a Contact’s basic details (eg. name, Contact Reference Number, Comments, etc), Payment Rate or Organisation details are available from the ‘Correcting a Contact Record’ process page.
|
|
Step 1: Receive request to correct a Contact’s Site(s) (if applicable)
Step 2: Access the Contact record in ‘Correction’ mode
Question 1: Does a Site need to be added to the Contact record?
Step 3: Add the Site(s) to the Contact record
Question 2: Does a Site need to be deleted from the Contact record?
Step 4: Delete the Site(s) from the Contact record
Question 3: Do existing Site details require correction?
Step 5: Correct the existing Site(s) details as required
Step 6: Save the corrections to the Contact record
Step 7: Send notification that the Contact record has been corrected (if applicable)
|
Application: Medici Navigation: Student Placements®Placement Providers®Contacts |
|||
Contact ID: Type the relevant [Contact ID]. Name: Type the [name of the Contact to be corrected].
Result: The Contacts page is displayed in ‘Correction’ mode. |
|||
|
|||
|
Warning: The Effective Date field should only be updated in ‘Correction’ mode if the effective date currently entered for the Contact record is incorrect. ‘Correction’ mode is generally used to correct information within the other fields on the page ‘as at’ the existing effective date.
Effective Date: If required, type or select the [correct date for the Contact record]. |
|
Question 1: Does a Site need to be added to the Contact record? |
||
|
Question |
Yes |
No |
|
Does a Site need to be added to the Contact record? |
Go to step 3. |
Go to question 2. |
|
Explanation: If a Site needs to be added to the Contact, add the Site(s) to the Contact record (step 3). If a Site does not need to be added to the Contact, the process continues by determining if a Site needs to be deleted from the Contact (question 2). |
||
|
Application: Medici Navigation: The Contacts page will already be displayed as a result of performing step 2 |
|||||
|
Sites
In the Sites section, select the Add a New Row button ( ). There is no need to insert a new row if there are no existing Sites for the Contact.
Site ID: Select the [Site to be added to the Contact record]. Job Title: Type the [Contact’s job title at the selected Site]. Email Address: Type the [Contact’s email address at the selected Site].
Phone Type: Select the [type of number being entered for the Contact] (business, mobile, fax, etc). Telephone: Type the [Contact’s number]. Phone Extension: Type the [Contact’s Extension] (if applicable). Preferred: If the number being entered is the Contact’s preferred or only number, select the Preferred checkbox so that a tick (ü) is displayed.
In the Site Phones section, select the Add a New Row button ( ).
Phone Type: Select the [type of number being entered for the Contact] (business, mobile, fax, etc). Telephone: Type the [Contact’s number]. Phone Extension: Type the [Contact’s Extension] (if applicable). Preferred: If the number being entered is the Contact’s preferred number, select the Preferred checkbox so that a tick (ü) is displayed. |
|||||
|
Continue to repeat parts D and E of this step until all numbers for the Contact at the selected Site have been recorded. |
|||||
|
If further Sites need to be added to the Contact, continue to repeat this step until the Contact has been attached to all relevant Sites. |
|
Question 2: Does a Site need to be deleted from the Contact record? |
||
|
Question |
Yes |
No |
|
Does a Site need to be deleted from the Contact record? |
Go to step 4. |
Go to question 3. |
|
Explanation: If a Site needs to be deleted from the Contact, delete the Site(s) from the Contact (step 4). If a Site does not need to be deleted from the Contact, the process continues by determining if the Contact’s details for an existing Site (eg. Job Title, Phone Number) need to be corrected (question 3). |
||
|
Application: Medici Navigation: The Contacts page will already be displayed as a result of performing step 2 or 3 |
||
If there is more than one Site record attached to the Contact, in the Sites section, select the View All link to display all Site records attached to the Contact.
Result: A message is displayed requesting confirmation the selected row is to be deleted, and advises the deletion will occur when the transaction is saved. |
||
Result: The selected Site is deleted from the Contact. |
||
|
Continue to repeat this step until all Sites that are no longer required have been deleted. |
|
Question |
Yes |
No |
|
Do existing Site details require correction? |
Go to step 5. |
Go to step 6. |
|
Explanation: If the Contact’s existing Site details need to be corrected, correct the details as required (step 5). If the Contact’s existing Site details do not need to be corrected, the next step is to perform any other required corrections to the Contact record, and then save the record (step 6). |
||
|
Application: Medici Navigation: The Contacts page will already be displayed as a result of performing step 2, 3 or 4 |
|||
Job Title: Type the [Contact’s correct job title at the selected Site] (if required).
Phone Type: Select the [correct type of number for the Contact] (if required). Telephone: Type the [corect telephone number for the Contact] (if required). Phone Extension: Type the [Contact’s correct Extension Number] (if required). Preferred: If the number is the Contact’s preferred or only number, select the Preferred checkbox so that a tick (ü) is displayed (if required). |
|
Application: Medici Navigation: The Contacts page will already be displayed as a result of performing step 3, 4 or 5 |
|
|
If further Contact details need to be corrected (eg. Payment Rate or Organisation details), correct these details prior to saving the record. Refer to the relevant process instructions on the ‘Correcting a Contact Record’ process page if required. |
|
Result: The corrected information will apply to the Contact as of the entered effective date. |